Part I - Introduction to Ardour
1 - Welcome to Ardour
1.1 - About Ardour’s documentation
Conventions Used In This Manual
This section covers some of the typographical and language conventions used in this manual.
Keyboards and Modifiers
Keyboard bindings are shown like this: s or x.
x means “press the key, keep it pressed and then also press the x key”.
Combinations such as e may be seen, which means “hold down the key and the key, and then, while keeping them both down, press the e key”.
Different platforms have different conventions for which modifier key (Control or Command) to use as the primary or most common modifier. When viewing this manual from a machine identifying itself as running OS X, Cmd will be seen where appropriate (for instance in the first example above). On other machines Ctrl will be seen instead.
Mouse Buttons
Mouse buttons are referred to as Left, Middle and Right. Ardour can use additional buttons, but they have no default behaviour in the program.
Mouse Click Modifiers
Many editing functions are performed by clicking the mouse while holding a modifier key, for example Left.
Mouse Wheel
Some GUI elements can optionally be controlled with the mouse wheel when the pointer is hovering over them. The notation for mouse wheel action is ⇑ ⇐ ⇓ ⇒.
Context-click
The term context-click is used to indicate a Right-click on a particular element of the graphical user interface. Although right-click is the common, default way to do this, there are other ways to accomplish the same thing—this term refers to any of them, and the result is always that a menu specific to the item clicked on will be displayed.
“The Pointer”
When the manual refers to the “pointer”, it means the on-screen representation of the mouse position or the location of a touch action if touch interface is being used.
Other User Input
Ardour supports hardware controllers, such as banks of faders, knobs, or buttons.
Menu items are indicated like this: Top > Next > Deeper. Each “>”-separated item indicates one level of a nested menu or sub-menu.
OSC Messages
OSC messages, whether sent or received, are displayed like this: /transport_stop.
Preference/Dialog Options
Choices in various dialogs, notably the Preferences and Properties dialog, are indicated thus:
Edit > Preferences > Audio > Some Option.
Each successive item indicates either a menu, sub-menu, or a tabbed dialog navigation. The final item is the one to choose or select.
If an option is deselected, it will look like this:
Edit > Preferences > Audio > Some other Option.
User Input
Some dialogs or features may require the user to input data such as this. In rare cases, certain operations will be required to be performed at the command line of the operating system:
cat /proc/cpuinfo sleep 3600 ping www.google.com .. rubric:: Program Output
name: program-output
Important messages from Ardour or other programs will be displayed like this.
Notes
Important notes about things that might not otherwise be obvious are shown in this format.
Warnings
Hairy issues that might cause things to go wrong, lose data, impair sound quality, or eat your proverbial goldfish, are displayed in this way.
1.2 - Ardour Overview
Ardour is a professional digital workstation for working with audio and MIDI.
Ardour is meant for…
Audio Engineers
Ardour’s core user group: people who want to record, edit, mix and master audio and MIDI projects. When you need complete control over your tools, when the limitations of other designs get in the way, when you plan to spend hours or days working on a session, Ardour is there to make things work the way you want them to.
Musicians
Being the best tool to record talented performers on actual instruments has always been a top priority for Ardour. Rather than being focused on electronic and pop music idioms, Ardour steps out of the way to encourage the creative process to remain where it always has been: a musician playing a carefully designed and well built instrument.
Soundtrack Editors
Sample accurate sync and shared transport control with video playback tools allows Ardour to provide a fast and natural environment for creating and editing soundtracks for film and video projects.
Composers
Arrange audio and MIDI using the same tools and same workflow. Use external hardware synthesizers or software instruments as sound sources. From sound design to electro-acoustic composition to dense multitrack MIDI editing, Ardour can help.
Ardour features…
Audio and MIDI Multi-Track Recording and Editing
Any number of tracks and busses. Non-linear editing. Non-destructive (and destructive!) recording. Any bit depth, any sample rate. Dozens of file formats.
Plugins with Full Sample Accurate Automation
AudioUnit, LV2, LinuxVST and LADSPA formats. FX plugins. Software instruments. MIDI processors. Automate any parameters. Physically manipulate them via control surfaces. Distribute processing across as many (or as few) cores as you want.
Transport Sync and External Control Surfaces
Best-in-industry sync to MIDI timecode and LTC. Send and receive MIDI Machine Control. Sync with JACK transport and MIDI clock. Dedicated Mackie Control protocol support, pre-defined mappings for many MIDI controllers plus dynamic MIDI learn. Use OSC to drive almost any operation in Ardour.
Powerful Anywhere-to-Anywhere Signal Routing
Complex signal flows are simple and elegant. Inputs and outputs connect to your hardware and/or other applications. Use sends, inserts and returns freely. Connections can be one-to-many, many-to-one or many-to-many. Tap signal flows at any point. If you can’t connect in the way you want with Ardour, it probably can’t be done.
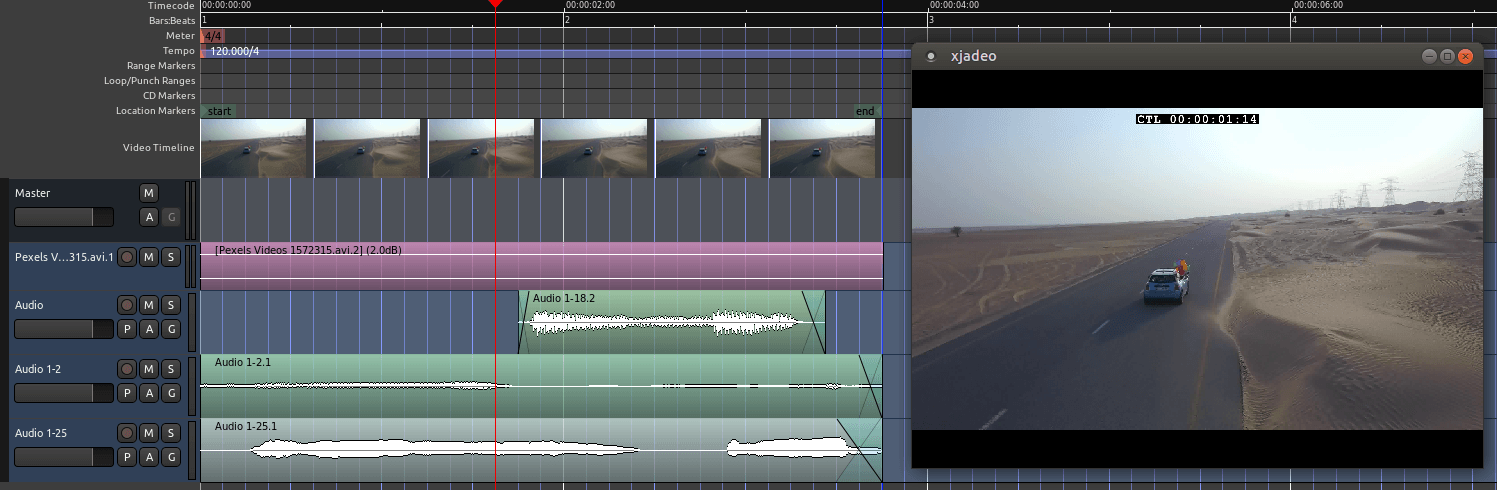
Video Timeline
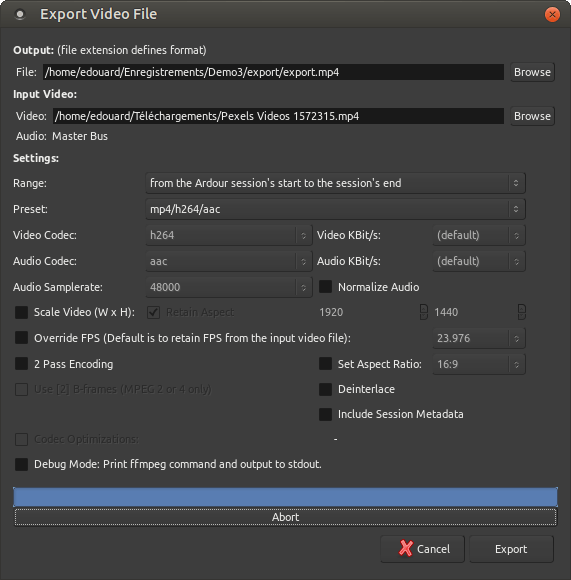
Import a single video and optionally extract the soundtrack from it. Display a frame-by-frame (thumbnail) timeline of the video. Use a Video-monitor window, or full-screen display, of the imported video in sync with any of the available ardour timecode sources. Lock audio-regions to the video: Move audio-regions with the video at video-frame granularity. Export the video, cut start/end, add blank frames and/or mux it with the soundtrack of the current-session.
1.3 - Why is it called Ardour?
The name “Ardour” came from considerations of how to pronounce the acronym HDR. The most obvious attempt sounds like a vowel-less “harder” and it then was then a short step to an unrelated but slightly homophonic word:
ardour n 1: a feeling of strong eagerness (usually in favor of a person or cause); “they were imbued with a revolutionary ardor”; “he felt a kind of religious zeal” [syn: ardor, elan, zeal]2: intense feeling of love [syn: ardor]3: feelings of great warmth and intensity; “he spoke with great ardor” [syn: ardor, fervor, fervour, fervency, fire, fervidness]
Given the work required to develop Ardour, and the personality of its primary author, the name seemed appropriate even without the vague relationship to HDR.
Years later, another interpretation of “Ardour” appeared, this time based on listening to non-native English speakers attempt to pronounce the word. Rather than “Ardour”, it became “Our DAW”, which seemed poetically fitting for a Digital Audio Workstation whose source code and design belongs to a group of collaborators.
1.4 - Why Write a DAW for Linux?
There are already a number of excellent digital audio workstations. To mention just a few: ProTools, Nuendo, Samplitude, Digital Performer, Logic, Cubase (SX), Sonar, along with several less well known systems such as SADIE, SAWStudio and others. Each of these programs has its strengths and weaknesses, although over the last few years most of them have converged on a very similar set of core features. However, each of them suffers from two problems when seen from the perspective of Ardour’s development group:
- they do not run natively on Linux
- they are not available in source code form, making modifications, improvements, bugfixes by technically inclined users or their friends or consultants impossible.
It is fairly understandable that most existing proprietary DAWs do not run on Linux, given the rather small (but growing) share of the desktop market that Linux has. However, when surveying the landscape of “popular operating systems”, we find:
- older versions of Windows: plagued by abysmal stability and appalling security
- newer versions of Windows seem stable but still suffer from security problems
- OS X: a nice piece of engineering that is excellent for audio work but only runs on proprietary hardware and still lacks the flexibility and adaptability of Linux.
Security matters today, and will matter more in the future as more and more live or semi-live network based collaborations take place.
Let’s contrast this with Linux, an operating system which:
- can stay up for months (or even years) without issues
- is endlessly configurable down to the tiniest detail
- is not owned by any single corporate entity, ensuring its life and direction are not intertwined with that of a company (for a contrary example, consider BeOS)
- is fast and efficient
- runs on almost any computing platform ever created, including old “slow” systems and new “tiny” systems (e.g. Raspberry Pi)
- is one of the most secure operating systems “out of the box”
More than anything, however, Ardour’s primary author uses Linux and wanted a DAW that ran there.
Having written a DAW for Linux, it turned out to be relatively easy to port Ardour to OS X, mostly because of the excellent work done by the JACK OS X group that ported JACK to OS X.
1.5 - Isn’t This a Really Complicated Program?
There is no point in pretending that Ardour is a simple, easy to use program. The development group has worked hard to try to make simple things reasonably easy, common tasks quick, and hard and/or uncommon things possible. There is no doubt that there is more to do in this area, as well as polishing the user interface to improve its intuitiveness and work flow characteristics.
At the same time, multi-track, multi-channel, non-linear, non-destructive audio editing is a far from simple process. Doing it right requires not only a good ear, but a solid appreciation of basic audio concepts and a robust mental model/metaphor of what one is doing. Ardour is not a simple “audio recorder”—it can certainly be used to record stereo (or even mono) material in a single track, but the program has been designed around much richer capabilities than this.
Some people complain that Ardour is not “intuitive” to use—its lead developer has some thoughts on that.
1.6 - Creating Music with Ardour
Ardour can be used in many different ways, from extremely simple to extremely complex. Many projects can be handled using the following kind of workflow:
Stage 1: Creating The Project
The first step is to create a new session, or open an existing one. A session consists of a folder containing a session file that defines all the information about the session. All media files used by the session are usually stored within the session folder.
More details on sessions can be found in Sessions chapter.
Stage 2: Creating and Importing Audio and MIDI Data
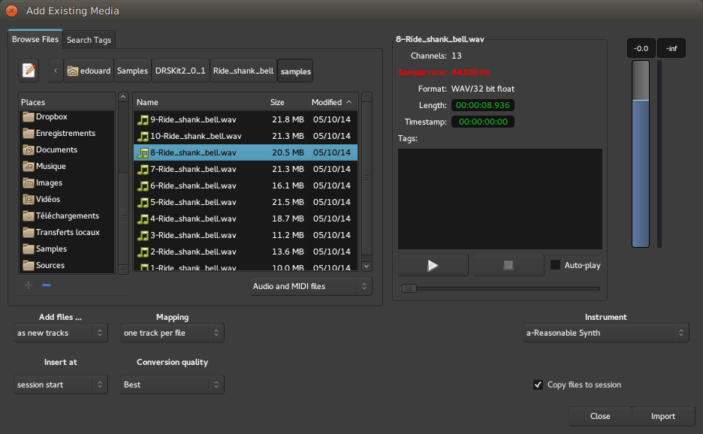
Once a session has been created, it will be necessary to add some audio and/or MIDI material to it—which can be done in one of 3 ways:
- Record incoming audio or MIDI data, either via audio or MIDI hardware connected to the computer, or from other applications
- Create new MIDI data using the mouse and/or various dialogs
- Import existing media files into the session
MIDI recordings consist of performance data (“play note X at time T”) rather than actual sound. As a result, they are more flexible than actual audio, since the precise sound that they will generate when played depends on where the MIDI data is sent to. Two different synthesizers may produce very different sounds in response to the same incoming MIDI data.
Audio recordings can be made from external instruments with electrical outputs (keyboards, guitars, etc.), or via microphones or other sound capturing equipment.
Ardour can use the JACK Audio Connection Kit for all audio and MIDI I/O, making recording audio/MIDI from other applications fundamentally identical to recording audio/MIDI from audio/MIDI hardware.
Stage 3: Editing and Arranging
Once there is material within the session, it can be arranged in time. This is done in one of the two main windows of Ardour: the Editor window.
Audio/MIDI data appears in chunks called regions, which are arranged into horizontal lanes called tracks. Tracks are stacked vertically in the Editor window. Regions can be copied, shortened, moved, and deleted without changing the actual data stored in the session at all—Ardour is a non-destructive editor. (Almost) nothing done while editing will ever modify the files stored on disk (with the exception of the session file itself).
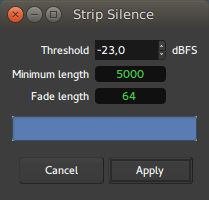
Many transformations can be done to the contents of regions, again without altering anything on disk. It is possible to alter, move, delete and remove silence from audio regions, for example.
MIDI regions can also be copied, moved, shortened, or deleted without altering the MIDI files, though any edit like adding, suppressing or moving notes inside a region results in a modification of the underlying MIDI file.
Stage 4: Mixing and Adding Effects
Once the arrangement of the session mostly complete, the next step is the mixing phase. Mixing is a broad term to cover the way the audio signals that the session generates during playback are processed and added together into a final result that is actually heard. It can involve altering the relative levels of various parts of the session, adding effects that improve or transform certain elements, and others that bring the sound of the whole session to a new level.
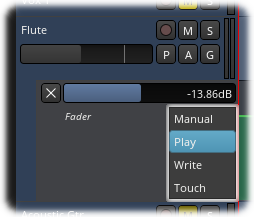
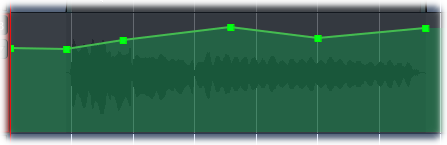
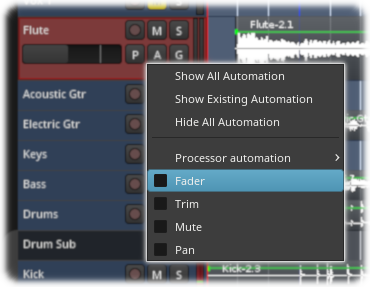
Ardour allows automation of changes to any mixing parameters (such as volume, panning, and effects controls)—it will record the changes made over time, using a mouse or keyboard or some external control device, and can play back those changes later. This is very useful because often the settings needed will vary in one part of a session compared to another—rather than using a single setting for the volume of a track, it may need increases followed by decreases (for example, to track the changing volume of a singer). Using automation can make all of this relatively easy.
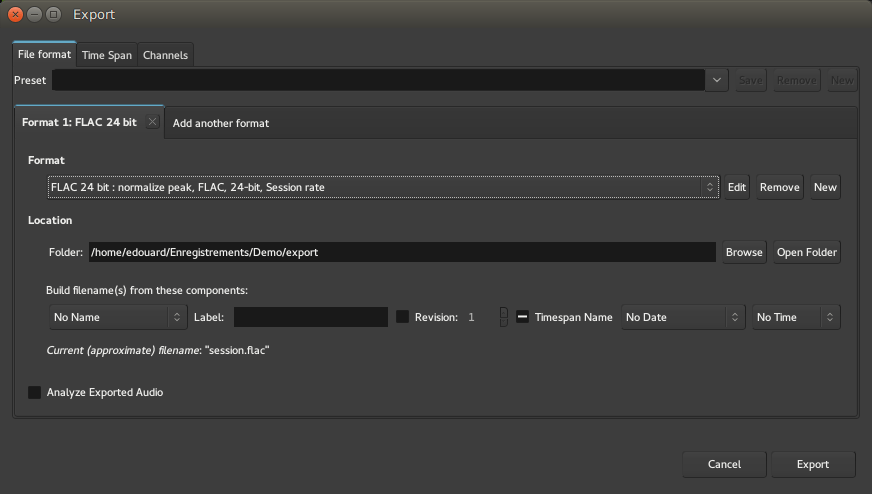
Stage 5: Export
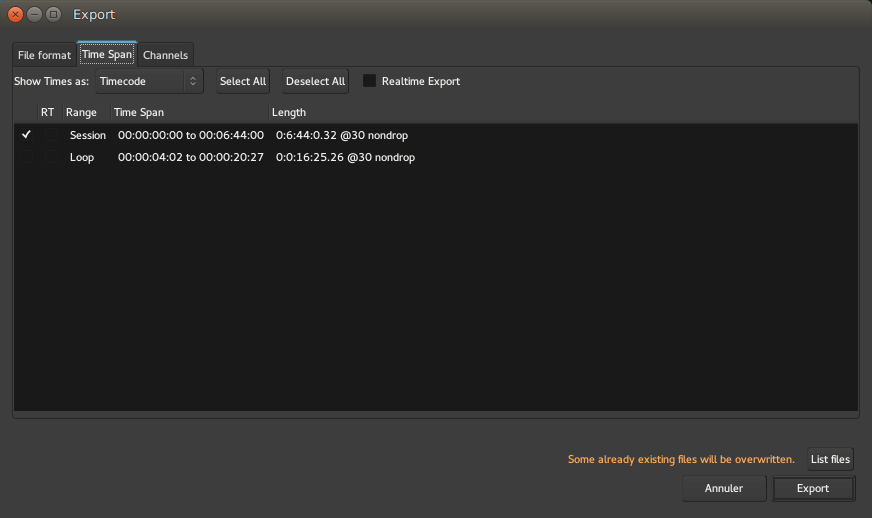
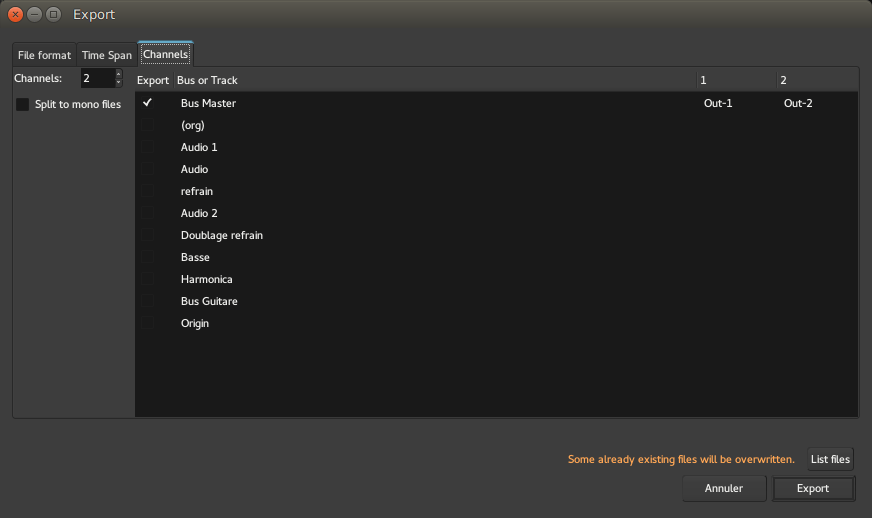
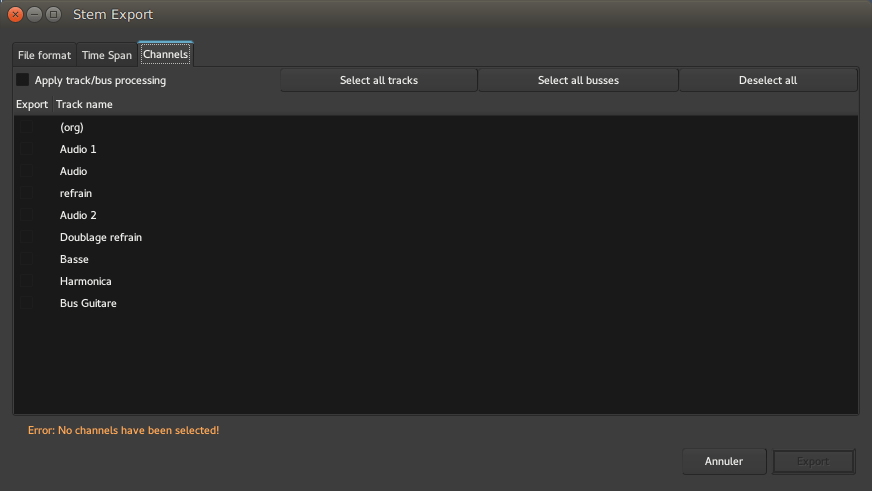
Once the arrangement and mix of the session is finalized, a single audio file that contains a ready-to-listen to version of the work is usually desired. Ardour allows the exporting of audio files in a variety of formats (simultaneously in some cases). This exported file would typically be used in creating a CD, or be the basis for digital distribution of the work.
Of course it is sometimes desirable to export material that isn’t finished yet—for example, to give a copy to another party to mix on their own system. Ardour allows exporting as much of a session as desired, at any time, in any supported format.
1.7 - Additional Resources
In addition to this documentation, there are a variety of other resources:
- the Ardour release notes
- the Ardour Forums
- information about Ardour Support via mailing lists and IRC (chat)
The IRC channels in particular are where most of the day-to-day development and debugging is done, and there are plenty of experienced users to help if problems are encountered when using Ardour.
Please be prepared to hang around for a few hours, the chat is usually busiest from 19:00 UTC to 04:00 UTC. It is best to keep one’s IRC client window open if possible, so that a belated answer can be seen.
2 - Ardour Basics
2.1 - Starting Ardour
There are several ways of starting Ardour, which may vary depending on which platform it is being used on:
- by double-clicking the Ardour icon in the platform’s file manager (e.g. Nautilus on Linux, Finder on OS X)
- by double-clicking on an Ardour session file in the platform’s file manager
- on Linux, Ardour can also be started via the command line (see below)
When Ardour is run for the very first time, a special dialog is displayed that will ask several questions about the system’s setup. The questions will not be asked again, but the choices thus made can always be modified via the Edit > Preferences dialog.
If JACK is needed, in general, it is sensible to start it before Ardour is run. Though this is not strictly necessary, it will provide more control and options over JACK’s operation. JACK can be started through the CLI of a terminal, or by using a GUI program, like QjackCtl or Cadence.
If Ardour is opened without specifying an existing session, it will display the Session > New… dialog and the Audio/MIDI Setup dialog. See New/Open Session Dialog for a description of those dialogs.
Starting Ardour From the Command Line (Linux)
Like (almost) any other program on Linux, Ardour can be started on the command line. Type the following command in a terminal window:
Ardour5 To start Ardour with an existing session, use:
Ardour5 /path/to/session Replace /path/to/session with the actual path of the session. Either the session folder or any session file inside the folder can be specified, including snapshots.
To start Ardour with a new, named session, use:
Ardour5 -N /path/to/session .. rubric:: 2.2 - Understanding Basic Concepts and Terminology
name: understanding-basic-concepts-and-terminology class: clear
In order to fully grasp the terms used in Ardour (and this manual), it is necessary to understand what things like sessions, tracks, busses, regions and so on—as used in Ardour—are.
Sessions
An Ardour session is a container for an entire project. A session may contain an arbitrary number of tracks and busses consisting of audio and MIDI data, along with information on processing those tracks, a mix of levels, and everything else related to the project. A session might typically contain a song, an entire album, or a complete live recording.
Ardour sessions are kept in directories; these directories contain one or more session files, some or all of the audio and MIDI data, and a number of other state files that Ardour requires. The session file describes the structure of the session, and holds automation data and other details.
Ardour’s session file is written in XML format, which is advantageous as it is somewhat human-readable and human-editable in a crisis. Sound files are stored in one of a number of optional formats, and MIDI files as SMF.
It is also possible for Ardour sessions to reference sound and MIDI files outside the session directory, to conserve disk space and avoid unnecessary copying if the data is available elsewhere on the disk.
Ardour has a single current session at all times; if Ardour is started without specifying one, it will offer to load or create one.
More details can be found in the Sessions chapter.
Tracks
A track is a concept common to most DAWs, and also used in Ardour. Tracks can record audio or MIDI data to disk, and then replay it with processing. They also allow the audio or MIDI data to be edited in a variety of different ways.
In a typical pop production, one track might be used for the kick drum, another for the snare, more perhaps for the drum overheads and others for bass, guitars and vocals.
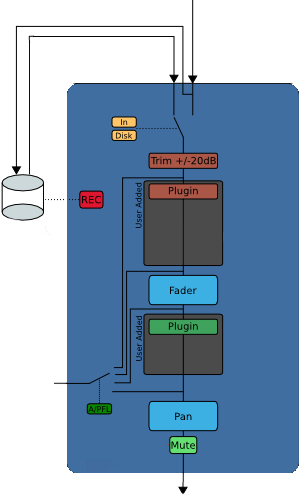
Ardour can record to any number of tracks at one time, and then play those tracks back. On playback, a track’s recordings may be processed by any number of plugins, panned, and/or its level altered to achieve a suitable mix.
A track’s type is really only related to the type of data that it stores on disk. It is possible, for example, to have a MIDI track with a synthesizer plugin which converts MIDI to audio. Even though the track remains MIDI (in the sense that its on-disk recordings are MIDI), its output may be audio-only.
More details can be found in the Tracks chapter.
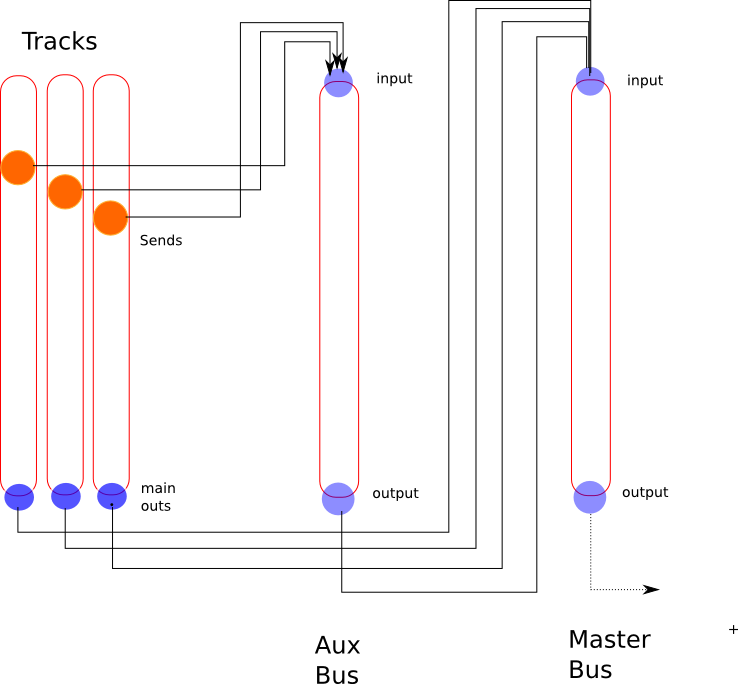
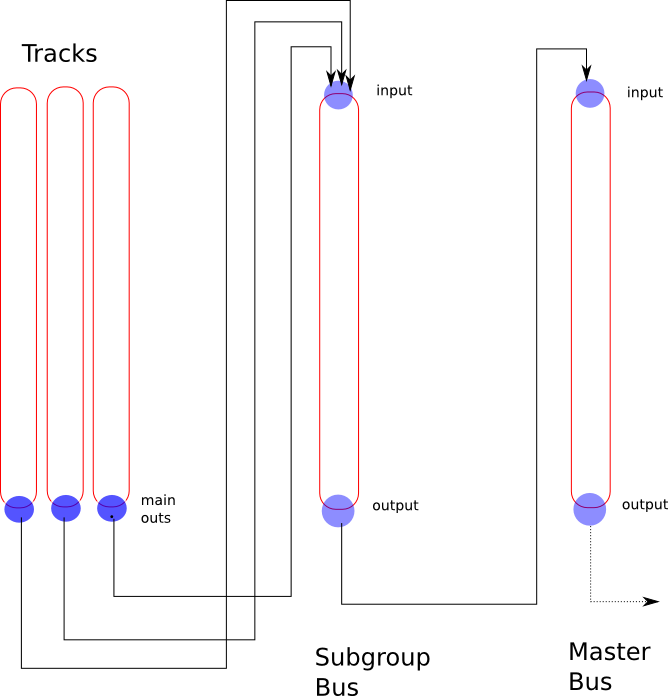
Busses
Busses are another common concept in both DAWs and hardware mixers. They are similar in many ways to tracks; they process audio or MIDI, and can run processing plugins. The only difference is that their input is obtained from other tracks or busses, rather than from disk.
A bus might typically be used to collect together the outputs of related tracks. Consider, for example, a three track recording of a drum kit; given kick, snare and overhead tracks, it may be helpful to connect the output of each to a bus called “drums”, so that the drum kit’s level can be set as a unit, and processing (such as equalization or compression) can be applied to the mix of all the tracks. Such busses are also called groups.
Regions
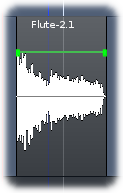
A track may contain many segments of audio or MIDI. Ardour contains these segments in things called regions, which are self-contained snippets of audio or MIDI data. Any recording pass, for example, generates a region on each track that is enabled for recording. Regions can be subjected to many editing operations; they may be moved around, split, trimmed, copied, and so on.
More details can be found at Working With Regions.
Playlists
The details of what exactly each track should play back is described by a playlist. A playlist is simply a list of regions; each track always has an active playlist, and can have other playlists which can be switched in and out as required.
More details can be found in the Playlists chapter.
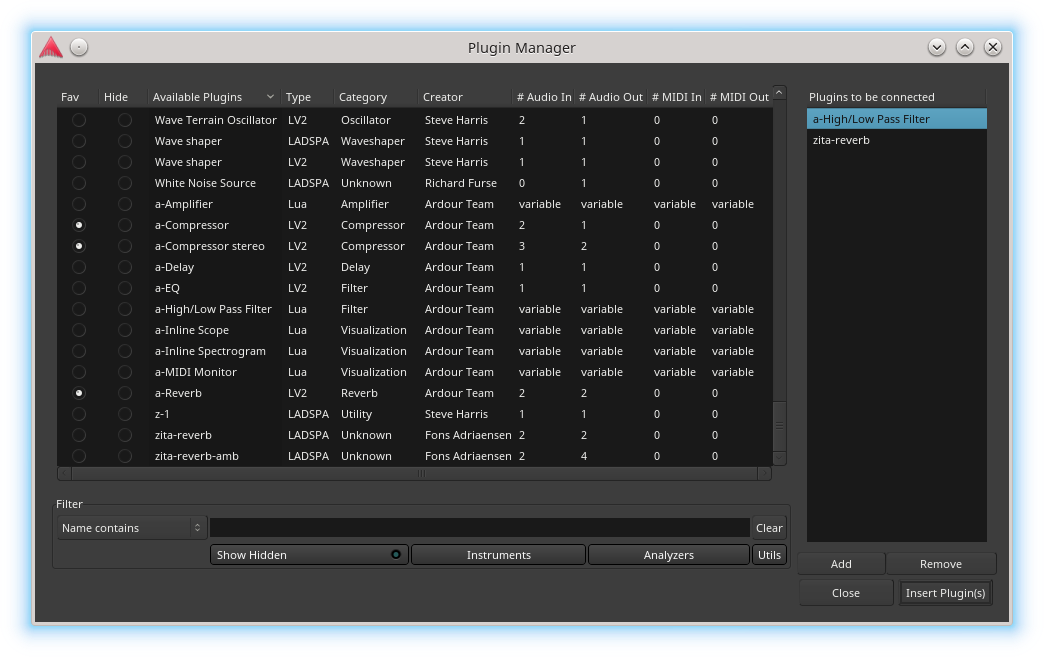
Plugins
Ardour allows processing audio and MIDI using any number of plugins. These are external pieces of code, commonly seen as VST plugins on Windows or AU plugins on Mac OS X. Ardour supports the following plugin standards:
| LADSPA | the first major plugin standard for Linux. Many LADSPA plugins are available, mostly free and open-source. |
| LV2 | the successor to LADSPA. Lots of plugins have been ported from LADSPA to LV2, and also many new plugins written. |
| VST | Ardour supports VST plugins that have been compiled for Linux. |
| AU | Mac OS X versions of Ardour support AudioUnit plugins. |
Ardour has some support for running Windows VST plugins on Linux, but this is rather complicated, extremely difficult for the Ardour developers to debug, and generally unreliable, as it requires running a large amount of Windows code in an emulated environment. If it is at all possible, it is strongly advisable to use native LADSPA, LV2 or Linux VST plugins on Linux, or AU on Mac OS X.
More details can be found at Working With Plugins.
2.3 - Using the Mouse
Clicking
Throughout this manual, the term click refers to the act of pressing and releasing the Left mouse button. This action is used to select objects, activate buttons, turn choices on and off, pop up menus and so forth. On touch surfaces, it also corresponds to a single, one-finger tap on the GUI.
Right Clicking
The term right-click refers to the act of pressing and releasing the Right mouse button. This action is used to pop up context menus (hence the term “context click”, which will also be seen). It is also used by default in combination with the shift key to delete objects within the editor window.
Some mice designed for use with Mac OS X may have only one button. By convention, pressing and holding the Control key while clicking is interpreted as a right-click by many applications.
Middle Clicking
A middle-click refers to the act of pressing and releasing the Middle mouse button. Not all mice have a middle click button (see the Mouse chapter for details). Sometimes the scroll wheel acts as a clickable middle button. This action is used for time-constrained region copying and mapping MIDI bindings.
Internally, your operating system may identify the mouse buttons as Button1, Button2, and Button3, respectively. It may be possible to invert the order of buttons to accommodate left-handed users, or to re-assign them arbitrarily. This manual assumes the canonical order.
Double Clicking
A double click refers to two rapid press/release cycles on the leftmost mouse button. The time interval between the two actions that determines whether this is seen as two clicks or one double click is controlled by your system preferences, not by Ardour.
Dragging
A drag primarily refers to the act of pressing the leftmost mouse button, moving the mouse with the button held down, and then releasing the button. On touch surfaces, this term also corresponds to a single one-finger touch-move-release action.
Ardour also uses the middle mouse button for certain kinds of drags, which will be referred to as a middle-drag.
Modifiers
There are many actions in Ardour that can be carried out using a mouse button in combination with a modifier key. When the manual refers to Left, it means that you should first press the key, carry out a left click while is held down, and then finally release the key.
Available modifiers depend on your platform:
Linux Modifiers
- Ctrl (Control)
- Shift
- Alt
- Win (Super/Windows)
OS X Modifiers
- Cmd (Command, “windmill”)
- Ctrl (Control)
- Alt (Option)
- Shift
Scroll Wheel
Ardour can make good use of a scroll wheel on the mouse (assuming it has one), which can be utilized for a variety of purposes. Scroll wheels generate vertical scroll events, ⇑ (ScrollUp) and ⇓ (ScrollDown). Some also emit horizontal events, ⇐ (ScrollLeft) and ⇒ (ScrollRight).
When appropriate, Ardour will differentiate between these two different scroll axes. Otherwise it will interpret ScrollDown and ScrollLeft as equivalent and similarly interpret ScrollUp and ScrollRight as equivalent.
Typically, scroll wheel input is used to adjust continuous controls such as faders and knobs, or to scroll vertically or horizontally inside a window.
2.4 - Basic GUI Operations
By default, Ardour will show helpful tooltips about the purpose and use of each GUI element if the pointer is positioned over it and hovered there for a short while. These little pop-up messages can be a good way to discover the purpose of many aspects of the GUI.
Pop-ups can also be distracting for experienced users, who may wish to disable them via Edit > Preferences > GUI > Show tooltip if mouse hovers over a control.
Selection Techniques
Ardour follows the conventions used by most other computer software (including other DAWs) for selecting objects in the GUI.
Selecting individual objects
Clicking on an object (sometimes on a particular part of its on-screen representation) will select the object, and deselect other similar objects.
Selecting multiple (similar) objects
A left-click on an object toggles its selected status, so using left on a series of objects will select (or deselect) each one of them. A completely arbitrary set of selections can be constructed with this technique.
Selecting a range of objects
In cases where the idea of “select all objects between this one and that one” makes sense, select one object and then left-click on another to select both of them as well as all objects in between.
Time range selection
To select a time range in the Editor, Left-click and drag the mouse. A Left drag then lets you create other ranges and a left-click extends a range to cover a wider area.
Selection Undo
The set of objects (including time range) that are selected at any one time is known as the selection. Each time an object is selected or deselected, the new selection is stored in an undo/redo stack. This stack is cleared each time the content of the timeline changes.
If a complex selection has been built up and then accidentally cleared it, choosing Edit > Undo Selection Change will restore the previous selection. If a selection is undone and a return to the state before the undo is desired, choosing Edit > Redo Selection Change will take the selection back to where it was before Edit > Undo Selection Change was chosen.
Cut and Paste Operations
The clipboard is a holder for various kinds of objects (regions, control events, plugins) that is used during cut-and-paste operations.
Cut
A cut operation removes selected objects and places them in the clipboard. The existing contents of the clipboard are overwritten. The default key binding is x.
Copy
A copy of the selected objects are placed in clipboard. There is no effect on the selected objects themselves. The existing contents of the clipboard are overwritten. The default key binding is c.
Paste
The current contents of the clipboard are pasted (inserted) into the session, using the current edit point as the destination. The contents of the clipboard remain unchanged—the same item can be pasted multiple times. The default key binding is v.
Deleting Objects
Within the Editor window (and to some extent within the Mixer window too), there are several techniques for deleting objects (regions, control points, and more).
Using the mouse and keyboard
Select the object(s) to be deleted and then press the Del key. This does not put the deleted object(s) in the clipboard, so they cannot be pasted elsewhere.
Using normal cut and paste shortcuts
Select the object(s) and then press x. This puts the deleted object(s) in the clipboard so that they can be pasted elsewhere.
Using just the mouse
By default, Shift Right will delete the clicked-upon object. Like the Del key, this does not put the deleted object(s) in the clipboard.
The modifier and mouse button used for this can be controlled via Edit > Preferences > User Interaction > Delete using …. Any modifier and mouse button combination can be used.
Undo/Redo for Editing
While editing, it sometimes happens that an unintended change is made, or a choice is made that is later decided to be wrong. All changes to the arrangement of session components (regions, control points) along the timeline can be undone (and redone if necessary).
The default keybindings are Z for Undo and R for Redo. These match the conventions of most other applications that provide undo/redo.
Changes are also saved to the session history file, so that undo/redo is possible even if the session is closed and reopened later, even if Ardour is exited in between.
The maximum number of changes that can be undone can be configured under Edit > Preferences > Misc > Undo. The maximum number of changes stored in the history file is a separate parameter, and can also be set in the same place.
In addition to the normal undo (which works only on actions that change the timeline), there is a visual undo which will revert any command that affects the display of the editor window. Its shortcut is Z. There is also an undo for selection; see “Selection Techniques” above.
3 - Keyboard and Mouse Shortcuts
3.1 - Default Keyboard Bindings
Almost every available function in Ardour can be bound to a keyboard shortcut (and those few that cannot will usually respond to an OSC command). Ardour comes with a rich set of default key bindings for the most commonly used functions.
These bindings strive to be mnemonic, that is, easy and intuitive to remember, and follow widely accepted conventions. As a general rule, the first letter of an operation will be used for as a shortcut, if available. This does not necessarily lead to the best ergonomics for rapid editing—there are alternative binding sets for that—but it does make it simpler for newcomers to remember some of the most useful ones, for example:
S for Region > Edit > Split or P for Transport > Playhead > Playhead to Mouse.
Existing key bindings in menus are listed on the right side of the menu items.
Almost every key binding in Ardour can be looked for and/or changed in Window > Key Bindings (which is bound to K).
Ardour will silently reassign the binding of a key combination that is already in use, possibly removing a standard keyboard shortcut without any warning. This might lead to confusion when asking for help—when the explanation is given in terms of a standard key binding—which will have a completely different effect on the system with the modified key bindings.
The conventions for using modifier keys (, , , etc.) differ among platforms, so different default bindings for each are provided.
3.2 - Mnemonic Bindings for Linux
A printable cheat-sheet with the mnemonic bindings for Linux is available for download in US Letter and A4 paper format.
This set of bindings assumes an en_US keyboard. However, most if not all bindings will also work on other keyboards when the AltGr key is used to compose those glyphs that are not directly accessible.
Transport & Recording Control
| destroy last recording | Del |
| engage record | r |
| fast forward | → |
| loop play (the loop range) | l |
| rewind | ← |
| set playhead position | p |
| start recording | Space |
| stop (keep loop/range play) | Space |
| stop and destroy | Space |
| toggle auto play | 5 |
| toggle auto return | 6 |
| toggle click (metronome) | 7 |
| toggle playhead follows edits | F |
| toggle playhead tracking | F |
| toggle roll | Space |
| toggle selected track rec-enable | b |
| toggle selected track solo status | s |
| transition to reverse | ↓ |
| transition to roll | ↑ |
Session & File Handling
| add track(s) or bus(ses) | n |
| export session | e |
| import audio files | i |
| open a new session | n |
| open a recent session | o |
| open an existing session | o |
| quit | q |
| save session | s |
| snapshot session | s |
| toggle selected track MIDI input | i |
Changing What’s Visible
| fit tracks vertically | f |
| move selected tracks down | ↓ |
| move selected tracks up | ↑ |
| scroll down (page) | PgDn |
| scroll down (step) | ↓ |
| scroll up (page) | PgUp |
| scroll up (step) | ↑ |
| toggle editor window mixer | e |
| visual undo | z |
| zoom height to selected region(s) | z |
| zoom height and time to selected region | z |
| zoom in | = |
| zoom out |
Window Visibility
| toggle locations dialog | l |
| focus on main clock | ÷ |
| maximise editor space | f |
| switch between editor & mixer window | m |
| show rhythm ferret window | f |
| toggle big clock | b |
| toggle color manager | c |
| toggle editor window | e |
| toggle global audio patchbay | p |
| toggle global midi patchbay | p |
| toggle key bindings editor | k |
| toggle preferences dialog | o |
| toggle preferences dialog | p |
Editing with Edit Point
Most edit functions operate on a single Edit Point (EP). The edit point can be any of: playhead (default), the mouse or an active marker. The choice of edit point (by default) also sets the Zoom Focus.
| EP to next region sync | ; |
| EP to prev region sync | ‘ |
| cycle to next grid snap mode | 2 |
| cycle to next zoom focus | 1 |
| insert from region list | i |
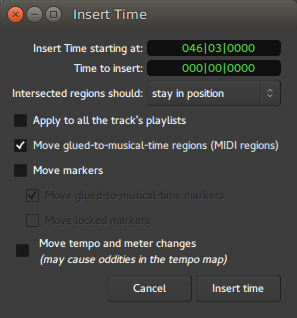
| insert time | t |
| move EP to playhead | ↵ |
| next EP w/marker | ` |
| next EP w/o marker | ` |
| trim back | k |
| trim front | j |
| trim region end to edit point | } |
| trim region start to edit point | { |
| trim region to end of prev region | j |
| trim region to start of next region | k |
| use previous grid unit | 3 |
| use next grid unit | 4 |
| use previous grid unit | 3 |
| use next musical grid unit | 4 |
Aligning with the Edit Point
Align operations move regions so that their start/end/sync point is at the edit point. Relative operations just align the first region and moves other selected regions to maintain relative positioning.
| align end(s) | a |
| align start(s) | a |
| align start(s) relative | a |
| align sync points | a |
| align sync points (relative) | a |
| range end to next prev edge | > |
| range end to next region edge | > |
| range start to next region edge | < |
| range start to prev region edge | < |
Edit Point Playback
| play edit range | Space |
| play from EP & return | Space |
| play selected region(s) | h |
Region Operations
| duplicate region (multi) | d |
| duplicate region (once) | d |
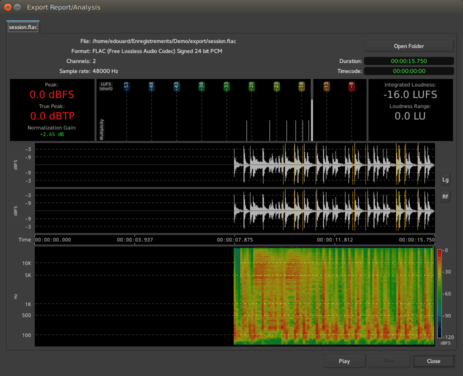
| export selected region(s) | e |
| increase region gain | ^ |
| move to original position | o |
| mute/unmute | m |
| normalize | n |
| nudge backward | – |
| nudge forward | |
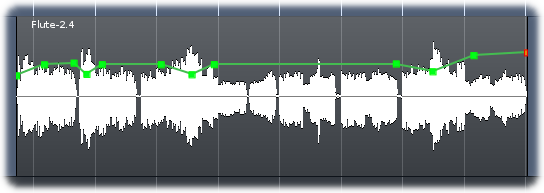
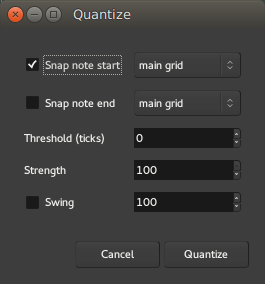
| quantize MIDI notes | q |
| reduce region gain | & |
| reverse | r |
| set fade in length | / |
| set fade out length | \ |
| set region sync point | v |
| split | s |
| toggle fade in active | / |
| toggle fade out active | \ |
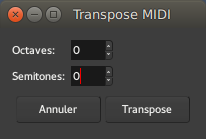
| transpose | t |
Generic Editing
| copy | c |
| cut | x |
| delete | Del |
| paste | v |
| redo | r |
| undo | z |
Selecting
There are a few functions that refer to an Edit Range. The current edit range is defined using combinations of the possible edit points: playhead, active marker, or mouse.
| all after playhead | p |
| all before playhead | p |
| all enclosed by edit range | u |
| all present in edit range | u |
| convert edit range to range | F6 |
| invert selection | i |
| select all after EP | e |
| select all before EP | e |
| select all in loop range | l |
| select all in punch range | d |
| select everything | a |
| select next track/bus | ↓ |
| select previous track/bus | ↑ |
Defining Loop, Punch Range and Tempo Changes
| set loop range from edit range | ] |
| set loop range from region(s) | ] |
| set punch range from edit range | [ |
| set punch range from region(s) | [ |
| set tempo (1 bar) from edit range | 0 |
| set tempo (1 bar) from region(s) | 9 |
3.3 - Mnemonic Bindings for OS X
A printable cheat sheet for these bindings is available for download.
Transport & Recording Control
| destroy last recording | Del |
| engage record | r |
| fast forward | → |
| loop play (the loop range) | l |
| rewind | ← |
| set playhead position | p |
| start recording | space |
| stop (keep loop/range play) | space |
| stop and destroy | space |
| toggle auto play | 5 |
| toggle auto return | 6 |
| toggle click (metronome) | 7 |
| toggle playhead follows edits | f |
| toggle playhead tracking | f |
| toggle roll | space |
| toggle track rec-enable | b |
| toggle track solo status | s |
| transition to reverse | ↓ |
| transition to roll | ↑ |
Session & File Handling
| add track(s) or bus(ses) | n |
| export session | e |
| import audio files | i |
| open a new session | n |
| open a recent session | o |
| open an existing session | o |
| quit | q |
| save session | s |
| snapshot session | s |
| toggle sel. track MIDI input | i |
Changing What’s Visible
| fit tracks vertically | f |
| move selected tracks down | ↓ |
| move selected tracks up | ↑ |
| scroll down (page) | PgDn |
| scroll down (step) | ↓ |
| scroll up (page) | PageUp |
| scroll up (step) | ↑ |
| toggle editor window mixer | e |
| toggle last 2 zoom states | z |
| zoom height to selected region(s) | Control+z |
| zoom height and time to selected region | z |
| zoom in | = |
| zoom out |
Window Visibility
| toggle locations dialog | l |
| focus on main clock | ÷ |
| maximise editor space | f |
| rotate editor & mixer window | m |
| show rhythm ferret window | f |
| toggle big clock | b |
| toggle color manager | c |
| toggle editor window | e |
| toggle global audio patchbay | p |
| toggle global midi patchbay | p |
| toggle key bindings editor | k |
| toggle preferences dialog | o |
| toggle preferences dialog | p |
Editing with Edit Point
Most edit functions operate on a single Edit Point (EP). The edit point can be any of: playhead (default), the mouse or an active marker. The choice of edit point (by default) also sets the Zoom Focus.
| EP to next region sync | ; |
| EP to prev region sync | ‘ |
| cycle to next grid snap mode | 2 |
| cycle to next zoom focus | 1 |
| insert from region list | i |
| insert time | t |
| move EP to playhead | Return |
| next EP w/marker | ^ |
| next EP w/o marker | ` |
| trim back | k |
| trim front | j |
| trim region end to edit point | } |
| trim region start to edit point | { |
| trim region to end of prev region | j |
| trim region to start of next region | k |
| use previous grid unit | 3 |
| use next grid unit | 4 |
| use previous grid unit | 3 |
| use next musical grid unit | 4 |
Aligning with the Edit Point
Align operations move regions so that their start/end/sync point is at the edit point. Relative operations just align the first region and moves other selected regions to maintain relative positioning.
| align end(s) | a |
| align start(s) | |
| align start(s) relative | |
| align sync points | a |
| align sync points (relative) | a |
| range end to next prev edge | > |
| range end to next region edge | > |
| range start to next region edge | < |
| range start to prev region edge | < |
Edit Point Playback
| play edit range | Space |
| play from EP & return | Space |
| play selected region(s) | h |
Region Operations
| duplicate region (multi) | d |
| duplicate region (once) | d |
| export selected region(s) | |
| increase region gain | ^ |
| move to original position | o |
| mute/unmute | m |
| normalize | n |
| nudge backward | – |
| nudge forward | |
| quantize MIDI notes | q |
| reduce region gain | & |
| reverse | r |
| set fade in length | / |
| set fade out length | \ |
| set region sync point | v |
| split | s |
| toggle fade in active | / |
| toggle fade out active | \ |
| transpose | t |
Generic Editing
| copy | c |
| cut | x |
| delete | Del |
| paste | v |
| redo | r |
| undo | z |
Selecting
There are a few functions that refer to an Edit Range. The current edit range is defined using combinations of the possible edit points: playhead, active marker, or mouse.
| all after playhead | p |
| all before playhead | p |
| all enclosed by edit range | u |
| all present in edit range | u |
| convert edit range to range | F6 |
| invert selection | i |
| select all after EP | Shift+e |
| select all before EP | e |
| select all in loop range | l |
| select all in punch range | d |
| select everything | a |
| select next track/bus | ↓ |
| select previous track/bus | ↑ |
Defining Loop, Punch Range and Tempo Changes
| set loop range from edit range | ] |
| set loop range from region(s) | ] |
| set punch range from edit range | [ |
| set punch range from region(s) | [ |
| set tempo (1 bar) from edit range | 0 |
| set tempo (1 bar) from region(s) | 9 |
Part II - Ardour Configuration
4 - Ardour Systems
Using a general purpose computer for the recording and playback of digital audio is not trivial. This chapter covers some of the most common pitfalls encountered on the way to creating a reliable and powerful audio workstation.
4.1 - The Right Computer System for Digital Audio
It is nice to think that one could just go and buy any computer, install a bit of software on it and start using it to record and create music. This idea isn’t necessarily wrong, but there are some important details that it misses. Any computer that that can be bought today (since somewhere around the end of 2012) is capable of recording and processing a lot of audio data. It will come with a builtin audio interface that can accept inputs from microphones and/or electrical instruments; it will have a disk with a huge amount of space for storing audio files.
However, when recording, editing and mixing music, it is generally desirable to have very little latency between the time a sound is generated and when it can be heard. When the audio signal flows through a computer, that means that the computer has to be able to receive the signal, process it and send it back out again as quickly as possible. And this is where it becomes very important what computer system is being used for this task, because it is absolutely not the case that any computer can do it well.
Routing audio through a computer will always cause some delay, but if it is small, it will generally never be noticed. There are also ways to work in which the delay does not matter at all (for example, not sending the output from the computer to speakers).
The latency that is typically needed for working with digital audio is in the 1–5 ms range. For comparison, if one is sitting 1 m (3 ft) from a set of speakers, the time the sound takes to reach the ears is about 3 ms. Any modern computer can limit the delay to 100 ms; most can keep it under 50 ms. Many will be able to get down to 10 ms without too much effort. Attempting to reduce the latency on a computer that cannot physically do it will cause clicks and glitches in the audio, which is clearly undesirable.
| Video interface | Poorly engineered video interfaces (and/or their device drivers) can “steal” computer resources for a long time, preventing the audio interface from keeping up with the flow of data. |
| Wireless interface | Poorly engineered wireless networking interfaces (and/or their device drivers) can also block the audio interface from keeping up with the flow of data. |
| USB ports | When using an audio interface connected via USB, and sometimes even if not, the precise configuration of the system’s USB ports can make a big difference. There are many cases where plugging the interface into one port will work, but using different USB port results in much worse performance. This has been seen even on Apple systems. |
| Internal USB Hubs | Ideally, all USB ports should connect directly to the main bus inside the computer. Some laptops (and possibly some desktop systems) come wired with an internal USB hub between the ports and the system bus, which can then cause problems for various kinds of external USB devices, including some models of audio interfaces. It is very difficult to discover whether this is true or not, without simply trying it out. |
| CPU speed control | Handling audio with low latency requires that the processor keeps running at its highest speed at all times. Many portable systems try to regulate processor speed in order to save power—for low latency audio, this should be totally disabled, either in the BIOS or at the OS level. |
| Excessive Interrupt Sharing | If the audio interface is forced by the computer to share an interrupt line (basically a way to tell the CPU that something needs its attention) with too many other (or wrong) devices, this can also prevent the audio interface from keeping up with the flow of data. In laptops it is generally impossible to do anything about this. In many desktop systems, it is possible at the BIOS level to reassign interrupts to work around the problem. |
| SMIs | SMIs are interrupts sent by the motherboard to tell the computer about the state of various hardware. They cannot safely be disabled, and they can take a relatively long time to process. It is better to have a motherboard which never sends SMIs at all—this is also a requirement for realtime stock trading systems, which have similar issues with latency. |
| Hyperthreading | This technology is becoming less common as actual multi-core CPUs become the norm, but it still exists and is generally not good for realtime performance. Sometimes this can be disabled in the BIOS, sometimes it cannot. A processor that uses hyperthreading will be less stable in very low latency situations than one without. |
| Excessive vibration | This doesn’t affect the flow of data to or from the audio interface, but it can cause the flow of data to and from disk storage to become much slower. If a computer going to be used in an environment with loud live sound (specifically, high bass volume), make sure it is placed so that the disk is not subjected to noticeable vibration. The vibrations will physically displace the read-write heads of disk, and the resulting errors will force a retry of the reading from the disk. Retrying over and over massively reduces the rate at which data can be read from the disk. Avoid this. |
Richard Ames presents a long (28 minute) video that is very helpful if you want to understand these issues in more depth. It is a little bit Windows-centric, but the explanations to all types of computers and operating systems.
4.2 - The Right Mouse
Ardour is designed to work best with a three button mouse equipped with a scroll wheel. While it can be used with a two button mouse or touchpad, at least two key operations will not be (easily) available:
- time-constrained region copying
- MIDI bindings created by “learning” them from incoming MIDI data
It is strongly encouraged to invest in a three-button mouse. A good quality mouse (especially one with a weighted, latchable scroll wheel) will make the use of Ardour vastly more efficient. They are cheap, and time is not.
For information on how to use the mouse in Ardour, see Using the mouse.
5 - System Specific Setup
It is unfortunate, but some OSes and/or Desktop Environments will cause problems that are beyond the capability of Ardour to address. The following covers some of the known problems and how to work around them.
5.1 - Ubuntu Linux
Ubuntu Linux is the most popular variety of Linux in use on desktop and laptop systems. It has the backing of a for-profit corporation (Canonical Inc.), a defined philosophy and a huge and worldwide user base. As a result, it is a common platform for people who want to use Ardour and other tools for music creation and pro-audio work.
High Level Recommendations for Ubuntu Users
Currently, installing pro audio applications on vanilla Ubuntu requires some configuration, in order for the user to gain realtime privilege (read below). Ubuntu Studio, which is an official flavor of Ubuntu, and thus shares the repositories with Ubuntu, has this already configured. Other distributions, such as KXStudio, and Dreamstudio are largely based on Ubuntu, and like Ubuntu Studio, has these settings pre-configured, while also containing customized versions of Ubuntu packages, which often are more up to date.
Installing Ardour
There may be unintended differences, and even bugs in Ubuntu native packages, as a result of a different building method. For this reason, Ardour developers highly recommend installing the official ready-to-run version of the program that can be downloaded from ardour.org, as Ubuntu native packages are not supported in the official Ardour forums or other support channels.
Follow these steps to install the latest version of Ardour:
- Download the latest release from ardour.org.
- Right-click the downloaded file and choose properties.
- Click the Permissions tab and check the option “Allow this file to run as a program”.
- Close the dialog and double-click the file.
- Follow the prompts.
Problems with the interaction between PulseAudio and JACK
Background Info
Like many distributions, Ubuntu has decided to use PulseAudio as the default audio system. PulseAudio is a rich and capable system that provides excellent services for typical users of Linux on the desktop. However, it is not capable of the type of performance that tools like Ardour require and in particular does not offer the possibility of sending audio between applications that can make the Linux audio environment a very interesting one.
This would not be a problem if it were not for the fact that JACK will not run correctly (if at all) if it needs to use the same soundcard/audio interface that PulseAudio is using. And since, PulseAudio on Ubuntu is configured by default to always use the (typically single) audio interface on the computer, this is a bit of a problem.
The developers of JACK and PulseAudio got together in 2009 and agreed upon a mechanism by which PulseAudio and JACK could cooperate in their use of a single soundcard. Whether or not PulseAudio is running by default, when JACK starts up it sends out a request to use the soundcard. If PulseAudio is running, it will give up its use of the soundcard to allow JACK to take over (and can optionally be told to route its own audio through JACK). When JACK finishes, it sends out another message, and PulseAudio can once again use the soundcard directly.
What is the problem?
The specific issues known at this time for all flavors of Ubuntu 12.04 and 12.10 are:
- a bug in PulseAudio that causes it not to give up the soundcard when JACK asks (LP: #1163638, fixed in Ubuntu 13.04).
Symptoms
A message like Cannot start JACK in the output from JACK as it starts up (though see the next section for other causes of this). This output may be hidden in the Messages window of QJackCtl (aka JACK Control), so one should check there.
How to fix
These bugs do not affect releases from 13.04, and earlier releases (12.04 and 12.10) are in the process of being fixed.
Problems with JACK configuration
What is the problem?
To function as intended, JACK needs to run with access to two operating system facilities called realtime scheduling and memory locking. This means that the user who starts JACK must be allowed access to these facilities. By default, Ubuntu does create a user group that has this permission but—it does not put new users into this group by default. Read more about why here. Consequently, the user will not have permission to run JACK in the way they should.
Symptoms
A message like Cannot lock down memory in the output from JACK as it starts up. This output may be hidden in the Messages window of QJackCtl (aka JACK Control), so one should check there.
How to fix
Make sure the file /etc/security/limits.d/audio.conf exists. If it is named /etc/security/limits.d/audio.conf.disabled, rename it to the former. Run the command:
sudo usermod -a -G audio YOUR-LOGIN-NAME Then log out and log in again. On Ubuntu Studio the user is a member of audio group by default, but not on other official flavors.
Reporting Issues
Given the difficulties in supporting Ubuntu and the limited time and resources of the Ardour team, the Ubuntu Studio Project has requested that issues and bug reports related to Ubuntu, Ubuntu Studio and other derivatives be directed to them.
Contact Information for Ubuntu Studio
Information on the Ubuntu Studio Mailing Lists.
Information on the Ubuntu Studio IRC channel. #ubuntustudio on irc.freenode.net
5.2 - Microsoft Windows
Microsoft Windows is officially supported since version 5.0 (2016).
Installing Ardour
- Download the latest windows build from the download page.
- Run the installer and follow the prompts.
How to help
- Hang out in #ardour on irc.freenode.net. One may ask questions there and if possible, answer questions that others have.
- Keep an eye on the Windows forum and contribute to the discussions there.
- Update this manual via pull requests on github.
5.3 - KDE Plasma 5
Under KDE Plasma 5, plugin and various other windows will not stay on top of any main window; therefore a workaround is required.
Workaround for ancillary windows not staying on top in KDE Plasma 5
In order to force ancillary windows in Ardour to stay on top, the following steps are necessary:
- Launch the System Settings application.
- Open Workspace > Window Management.
- Select Window Rules in the left-hand sidebar. It should default to the Window matching tab.
- Click on the New… button.
- On the line that says Window class (application), set the combo box to Substring Match and type ardour in the text entry field.
- In the list box that is labeled Window types:, click on the option Dialog Window, then press and hold Ctrl while clicking on the second option Utility Window.
- Select the Arrangement & Access tab.
- Check the box next to the Keep above option. On the same line, select Force from the combo box, then click on the Yes radio button for that line.
- Click on the OK button to dismiss the dialog.
At this point the System Settings application can be closed.
Background Info
According to one of the lead KDE developers, they are not willing to follow the ICCCM standard for utility windows. Apparently they are alone in this understanding, as plugin windows on Ardour under Linux work out of the box on every other WM out there.
Under KDE 4, there was a workaround in Ardour (Preferences > Theme > All floating windows are dialogs) that would “trick” KDE into forcing certain window types to be on top of their parent windows, but this no longer works under KDE Plasma 5.
6 - I/O Setup
6.1 - Connecting Audio and MIDI Devices
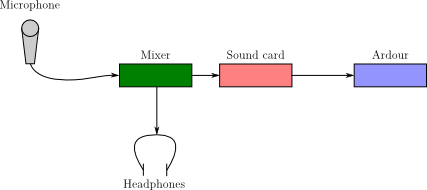
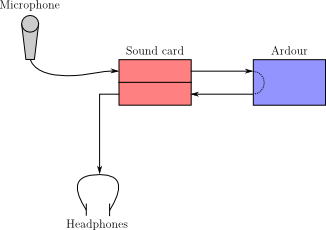
Normally Ardour does not care about how audio and MIDI gets into the computer—it pretty much deals only with its own inputs and outputs; it is up to the user to ensure that all external routing is sound. After all, Ardour has no way to know how signals from the outside world get to it. However, there are some things that Ardour can do to help troubleshoot problems with audio and MIDI connections—at least on the computer side.
For example, a typical setup might include a microphone that feeds a mixer that then feeds the computer. A failure can occur anywhere in that signal chain, including the cables that connect everything together. As far as Ardour is concerned, the most important connection is the one coming from the sound source to the physical audio input of the computer—in this example, the cable connecting between the mixer and the computer.
Common sense and basic troubleshooting skills are needed when problems arise, and in the above example, one would have to go through the entire signal chain to ensure that each component was working as it should.
Common Problems
Ardour tries to set things up in a sane manner by automatically connecting the hardware inputs of the computer to its master input and the hardware outputs to the master output. If the signal coming into the hardware inputs is active, the meters on Ardour’s master channel should move. If they don’t, some things to check include:
- Making sure there is actually an input signal
- Making sure the input signal is getting into the computer
- Making sure that Ardour is talking to the correct sound card
- Making sure that the sound card in use by Ardour is working properly
6.2 - Using More Than One Audio Device
Ardour will only ever deal with a single audio device. When it is desired to use more than one audio device at the same time, there are two choices:
- Use Ardour to start JACK (which handles all audio I/O), and create a “fake” audio device which represents all the multiple devices to be used. How to do this is platform dependent and described below.
- Use a different tool to start JACK and manage all the devices.
Ardour is fundamentally designed to be a component in a pro-audio/music creation environment. Standard operating practice for such setups involves using only a single digital sample clock (something counting off the time between audio samples). This means that trying to use multiple independent soundcards is problematic, because each soundcard has its own sample clock, running independently from the others. Over time, these different clocks drift out of sync with each other, which causes glitches in the audio. This drift cannot be stopped, although in some cases the effects may be insignificant enough that they might not be noticeable.
Thus, in an ideal world, a single device with a single clock and all the inputs, outputs and other features needed should be used. Of course, there are those who like to point out that this is not an ideal world, and believe that software should make up for this.
OS X
In CoreAudio, aggregate devices provide a method to use multiple soundcards as a single device. For example, two eight-channel devices can be aggregated so that 16 channels can be recorded in Ardour.
When using a single typical 3rd party audio interface (such as those from Apogee, RME, Presonus, and many others), or using JackPilot or a similar application to start JACK, there is no need to worry about any of this. An aggregate device only needs to be set up if any of the following conditions are true:
- Two entirely separate devices are used and JACK is started using Ardour
- A builtin audio device is used and JACK is started using Ardour
- More than two entirely separate devices are used
In the case of a builtin audio device, an aggregate device that combines “Builtin Input” and “Builtin Output” into one device needs to be created.
The precise instructions for creating an aggregate device on OS X have varied from one released to another. Please read https://support.apple.com/en-us/HT202000.
Linux
Please see the instructions at http://jackaudio.org/faq.
6.3 - Monitor Setup in Ardour
Ardour has three main settings which affect how monitoring is performed. The first is Edit > Preferences > Signal Flow > Record monitoring handled by. There are two or three options here, depending on the capabilities of the hardware.
The other two settings are more complex. One is Tape machine mode, found in the same dialog, and the other is the Session > Properties > Monitoring automatically follows transport state setting.
Monitoring also depends on the state of the track’s record-enable button, the session record-enable button, and on whether or not the transport is rolling.
Software or Hardware Monitoring Modes
If Ardour is set to external monitoring, Ardour does not do any monitoring.
Monitoring in Non-Tape-Machine Mode
When Tape-Machine mode is off, and a track is armed, Ardour always monitors the live input, except in one case: if the transport is rolling, the session is not recording, and auto-input is active, the playback from an armed track will be heard.
Unarmed tracks will play back their contents from disc, unless the transport is stopped and auto-input is enabled. In this case, the track monitors its live input.
Monitoring in Tape-Machine Mode
In Tape-Machine mode, when a track is armed, its behaviour is the same as in non-tape-machine mode.
Unarmed tracks however will always just play back their contents from disk; the live input will never be monitored.
7 - Synchronization
7.1 - On Clock and Time
Synchronization in multimedia involves two concepts which are often confused: clock (or speed) and time (location in time).
A clock determines the speed at which one or more systems operate. In the audio world this is generally referred to as Word Clock. It does not carry any absolute reference to a point in time: A clock is used to keep a system’s sample rate regular and accurate. Word clock is usually at the frequency of the sample rate—at 48 kHz, its period is about 20 μs. Word Clock is the most common sample rate based clock but other clocks do exist such as Black and Burst, Tri-Level and DARS. Sample rates can be derived from these clocks as well.
Time or timecode specifies an absolute position on a timeline, such as
01:02:03:04 (expressed as Hours:Mins:Secs:Frames). It is actual
data and not a clock signal per se. The granularity of timecode is
Video Frames and is an order of magnitude lower than, say, Word Clock
which is counted in samples. A typical frame rate is 25 fps with a
period of 40 ms. In the case of 48 kHz and 25 fps, there are 1920 audio
samples per video frame.
The concepts of clock and timecode are reflected in JACK and Ardour:
JACK provides clock synchronization and is not concerned with time code (this is not entirely true, more on jack-transport later). On the software side, jackd provides sample-accurate synchronization between all JACK applications. On the hardware side, JACK uses the clock of the audio-interface. Synchronization of multiple interfaces requires hardware support to sync the clocks. If two interfaces run at different clocks the only way to align the signals is via re-sampling (SRC—Sample Rate Conversion), which is expensive in terms of CPU usage and may decrease fidelity if done incorrectly.
Timecode is used to align systems already synchronized by a clock to a common point in time, this is application specific and various standards and methods exist to do this.
To make things confusing, there are possibilities to synchronize clocks using timecode. e.g. using mechanism called jam-sync and a phase-locked loop.
An interesting point to note is that LTC (Linear Time Code) is a Manchester encoded, frequency modulated signal that carries both clock and time. It is possible to extract absolute position data and speed from it.
7.2 - Latency and Latency-Compensation
Latency is a system’s reaction time to a given stimulus. There are many factors that contribute to the total latency of a system. In order to achieve exact time synchronization all sources of latency need to be taken into account and compensated for.
Sources of Latency
Sound propagation through the air
Since sound is a mechanical perturbation in a fluid, it travels at comparatively slow speed of about 340 m/s. As a consequence, an acoustic guitar or piano has a latency of about 1–2 ms, due to the propagation time of the sound between the instrument and the player’s ear.
Digital-to-Analog and Analog-to-Digital conversion
Electric signals travel quite fast (on the order of the speed of light), so their propagation time is negligible in this context. But the conversions between the analog and digital domain take a comparatively long time to perform, so their contribution to the total latency may be considerable on otherwise very low-latency systems. Conversion delay is usually below 1 ms.
Digital Signal Processing
Digital processors tend to process audio in chunks, and the size of that chunk depends on the needs of the algorithm and performance/cost considerations. This is usually the main cause of latency when using a computer and the one that can be predicted and optimized.
Computer I/O Architecture
A computer is a general purpose processor, not a digital audio processor. This means the audio data has to jump a lot of fences in its path from the outside to the CPU and back, contending in the process with some other parts of the system vying for the same resources (CPU time, bus bandwidth, etc.)
The Latency chain
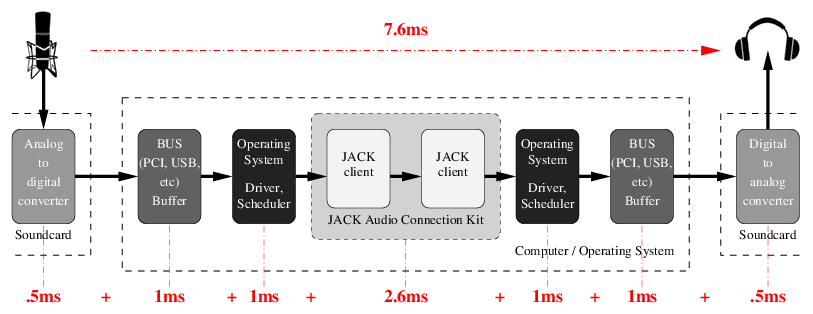
Latency chain
The numbers are an example for a typical PC. With professional gear and an optimized system the total round-trip latency is usually lower. The important point is that latency is always additive and a sum of many independent factors.
Processing latency is usually divided into capture latency (the time it takes for the digitized audio to be available for digital processing, usually one audio period), and playback latency (the time it takes for In practice, the combination of both matters. It is called round-trip latency: the time necessary for a certain audio event to be captured, processed and played back.
It is important to note that processing latency in a jackd is a matter of choice. It can be lowered within the limits imposed by the hardware (audio device, CPU and bus speed) and audio driver. Lower latencies increase the load on the system because it needs to process the audio in smaller chunks which arrive much more frequently. The lower the latency, the more likely the system will fail to meet its processing deadline and the dreaded xrun (short for buffer over- or under-run) will make its appearance more often, leaving its merry trail of clicks, pops and crackles.
The digital I/O latency is usually negligible for integrated or PCI audio devices, but for USB or FireWire interfaces the bus clocking and buffering can add some milliseconds.
Low Latency use cases
Low latency is not always a feature one wants to have. It comes with a couple of drawbacks: the most prominent is increased power consumption because the CPU needs to process many small chunks of audio data, it is constantly active and can not enter power-saving mode (think fan noise). Since each application that is part of the signal chain must run in every audio cycle, low-latency systems will undergo context switches between applications more often, which incur a significant overhead. This results in a much higher system load and an increased chance of xruns.
For a few applications, low latency is critical:
Playing virtual instruments
A large delay between the pressing of the keys and the sound the instrument produces will throw off the timing of most instrumentalists (save church organists, whom we believe to be awesome latency-compensation organic systems.)
Software audio monitoring
If a singer is hearing her own voice through two different paths, her head bones and headphones, even small latencies can be very disturbing and manifest as a tinny, irritating sound.
Live effects
Low latency is important when using the computer as an effect rack for inline effects such as compression or EQ. For reverbs, slightly higher latency might be tolerable, if the direct sound is not routed through the computer.
Live mixing
Some sound engineers use a computer for mixing live performances. Basically that is a combination of the above: monitoring on stage, effects processing and EQ.
In many other cases, such as playback, recording, overdubbing, mixing, mastering, etc. latency is not important, since it can easily be compensated for.
To explain that statement: During mixing or mastering, one doesn’t care if it takes 10ms or 100ms between the instant the play button is pressed and the sound coming from the speaker. The same is true when recording with a count in.
Latency compensation
During tracking it is important that the sound that is currently being played back is internally aligned with the sound that is being recorded.
This is where latency compensation comes into play. There are two ways to compensate for latency in a DAW, read-ahead and write-behind. The DAW starts playing a bit early (relative to the playhead), so that when the sound arrives at the speakers a short time later, it is exactly aligned with the material that is being recorded. Since we know that playback has latency, the incoming audio can be delayed by the same amount to line things up again.
The second approach is prone to various implementation issues regarding timecode and transport synchronization. Ardour uses read-ahead to compensate for latency. The time displayed in the Ardour clock corresponds to the audio signal that is heared on the speakers (and is not where Ardour reads files from disk).
As a side note, this is also one of the reasons why many projects start at timecode 01:00:00:00. When compensating for output latency the DAW will need to read data from before the start of the session, so that the audio arrives in time at the output when the timecode hits 01:00:00:00. Ardour does handle the case of 00:00:00:00 properly but not all systems/software/hardware that you may inter-operate with may behave the same.
Latency Compensation And Clock Sync
To achieve sample accurate timecode synchronization, the latency introduced by the audio setup needs to be known and compensated for.
In order to compensate for latency, JACK or JACK applications need to know exactly how long a certain signal needs to be read-ahead or delayed:

Jack Latency Compensation
In the figure above, clients A and B need to be able to answer the following two questions:
- How long has it been since the data read from port Ai or Bi arrived at the edge of the JACK graph (capture)?
- How long will it be until the data written to port Ao or Bo arrives at the edge of the JACK graph (playback)?
JACK features an API that allows applications to determine the answers to above questions. However JACK can not know about the additional latency that is introduced by the computer architecture, operating system and soundcard. These values can be specified by the JACK command line parameters -I and -O and vary from system to system but are constant on each. On a general purpose computer system the only way to accurately learn about the total (additional) latency is to measure it.
Calibrating JACK Latency
Linux DSP guru Fons Adriaensen wrote a tool called jack_delay to accurately measure the round-trip latency of a closed loop audio chain, with sub-sample accuracy. JACK itself includes a variant of this tool called jack_iodelay.
Jack_iodelay allows to measure the total latency of the system, subtracts the known latency of JACK itself and suggests values for jackd’s audio-backend parameters.
jack_[io]delay works by emitting some rather annoying tones, capturing them again after a round trip through the whole chain, and measuring the difference in phase so it can estimate with great accuracy the time taken.
The loop can be closed in a number of ways:
- Putting a speaker close to a microphone. This is rarely done, as air propagation latency is well known so there is no need to measure it.
- Connecting the output of the audio interface to its input using a patch cable. This can be an analog or a digital loop, depending on the nature of the input/output used. A digital loop will not factor in the AD/DA converter latency.
Once the loop has been closed, one must:
- Launch jackd with the configuration to test.
- Launch jack_delay on the command line.
- Make the appropriate connections between the jack ports so the loop is closed.
- Adjust the playback and capture levels in the mixer.
7.3 - Timecode Generators and Slaves
Ardour supports three common timecode formats: LTC, MTC, and MIDI Clock, as well as JACK-transport, a JACK-specific timecode implementation.
Ardour Timecode Configuration
Each Ardour session has a specific timecode frames-per-second setting which is configured in session > properties > timecode. The selected timecode affects the timecode ruler in the main window as well as the clock itself.
Note that some timecode formats do not support all of Ardour’s available fps settings. MTC is limited to 24, 25, 29.97 and 30 fps.
The video pull-up modes change the effective samplerate of Ardour to allow for changing a film soundtrack from one frame rate to another. The concept is beyond the scope of this manual, but Wikipedia’s entry on Telecine may be a good start.
Ardour Timecode Generator Configuration
This is pretty straightforward: simply turn it on. The MTC and MIDI-Clock generator do not have any options. The LTC generator has a configurable output level. JACK-transport cannot be generated. Jack itself is always synced to its own cycle and cannot do varispeed—it will always be synced to a hardware clock or another JACK master.
The relevant settings for timecode generator can be found in Edit > Preferences > MIDI Preferences (for MTC, MC) and Edit > Preferences > Transport Preferences (for LTC).
The timecode is sent to jack-ports ardour:MTC out,
ardour:MIDI clock out and ardour:LTC-out. Multiple generators
can be active simultaneously.
Note that, as of Jan 2014, only the LTC generator supports latency compensation. This is due to the fact the Ardour MIDI ports are not yet latency compensated.
In Session > Properties, it is possible to define an offset between Ardour’s internal time and the timecode sent. Currently only the LTC generator honors this offset.
Both LTC and MTC are limited to 30 fps. Using frame rates larger than that will disable the generator. In both cases also only 24, 25, 29.97df (drop-frame) and 30 fps are well defined by specifications (such as SMPTE-12M, EU and the MIDI standard).
MTC Generator
The MTC generator has no options. Ardour sends full MTC frames whenever the transport is relocated or changes state (start/stop). MTC quarter frames are sent when the transport is rolling and the transport speed is within 93% and 107%.
LTC Generator
The level of the LTC generator output signal can be configured in in the Preferences > Transport dialog. By default it is set to -18 dBFS, which corresponds to 0dBu in an EBU calibrated system.
The LTC generator has an additional option to keep sending timecode even when the transport is stopped. This mode is intended to drive analog tape machines which unspool the tape if no LTC timecode is received.
LTC is send regardless of Ardour’s transport speed. It is accurately generated even for very slow speeds (<5%) and only limited by the soundcard’s sampling-rate and filter (see Gibbs phenomenon) for high speeds.
Ardour Slave Configuration
The timecode source can be switched with the button just right of Ardour’s main clock. By default it is set to Internal in which case Ardour will ignore any external timecode. The button allows to toggle between Internal and the configured timecode source which is chosen in Edit > Preferences > Transport.
When Ardour is chasing (synchronizing to) an external timecode source, the following cases need to be distinguished:
- the timecode source shares the clock
- the timecode source is independent (no wordclock sync)
and
- the timecode source uses the same FPS setting as Ardour
- the timecode source runs at different frames-per-second
In both cases the first option is preferred: clock sync + same FPS setting.
Frames-per-second
If the frames-per-second do not match, Ardour can either re-calculate and map the frames, or the configured FPS (Session > Properties) can be changed automatically while the slave is active. The behavior is configured with the checkbox Edit > Preferences > Transport > Match session video frame rate to external timecode.
When enabled, the session video frame rate will be changed to match that of the selected external timecode source. When disabled, the session video frame rate will not be changed to match that of the selected external timecode source. Instead the frame rate indication in the main clock will flash red, and Ardour will convert between the external timecode standard and the session standard.
Clock Sync Lock
As described in the On Clock and Time chapter, timecode and clock are independent. If the external timecode source is not in sample-sync with the audio hardware (and JACK), Ardour needs to run at varispeed to adjust for the discrepancy.
The checkbox External timecode is sync locked allows to select the behavior according to the setup. When enabled, it indicates that the selected external timecode source shares sync (Black & Burst, Wordclock, etc) with the audio interface.
In other words: if enabled, Ardour will only perform initial synchronization and keep playing at speed 1.0 instead of vari-speed adjusting to compensate for drift.
Note that vari-speed is unavailable when recording in Ardour, and all tracking happens at speed 1.0. So in order to record in sync with external timecode it must be sample-locked or it will drift over time.
MIDI Clock
MIDI Clock is not a timecode format but tempo-based time. The absolute reference point is expressed as beats-per-minute and Bar, Beat and Tick. There is no concept of sample-locking for MIDI clock signals. Ardour will vari-speed if necessary to chase the incoming signal.
Note that the MIDI Clock source must be connected to the
ardour:MIDI clock in port.
LTC—Linear Timecode
The LTC slave decodes an incoming LTC signal on a JACK audio port. It will auto-detect the frame rate and start locking to the signal once two consecutive LTC frames have been received.
The incoming timecode signal needs to arrive at the ardour:LTC-in
port. Port-connections are restored for each session and the preference
dialog offers an option to select it for all sessions.
Ardour’s transport is aligned to LTC-frame start/end positions according to the SMPTE 12M-1999 specification, which means that the first bit of an LTC-Frame is aligned to different Lines of a Video-Frame, depending on the TV standard used. Only for Film (24fps) does the LTC-Frame directly match the video Frame boundaries.
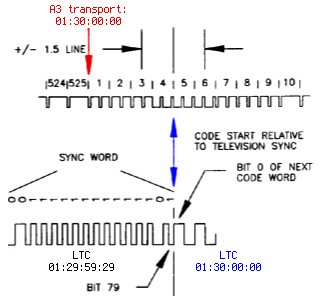
LTC frame alignment for the 525/60 TV standard
Ardour supports vari-speed and backwards playback but will only follow speed changes if the sync locked option is disabled.
While Ardour is chasing LTC, the main transport clock will display the received Timecode as well as the delta between the incoming signal and Ardour’s transport position.
A global offset between incoming timecode and Ardour’s transport can be configured in Session > Properties.
The user-bits in the received LTC frame are ignored.
MTC—MIDI Timecode
Ardour’s MTC slave parses full timecode messages as well as MTC
quarter-frame messages arriving on the ardour:MTC in port. The
transport will only start rolling once a complete sequence of 8 quarter
frames has been received.
Ardour supports vari-speed and backwards playback but will only follow MTC speed changes if the sync locked option is disabled.
When Ardour is chasing MTC, the main transport clock will display the received Timecode as well as the delta between the incoming signal and Ardour’s transport position.
JACK Transport
When slaved to jack, Ardour’s transport will be identical to JACK-transport. As opposed to other slaves, Ardour can be used to control the JACK transport states (stopped/rolling). No port connections need to be made for jack-transport to work.
JACK-transport does not support vari-speed, nor offsets. Ardour does not chase the timecode but is always in perfect sample-sync with it.
JACK-transport also includes temp-based-time information in Bar:Beats:Ticks and beats-per-minute. However, only one JACK application can provide this information at a given time. The checkbox Session > Properties > JACK Time Master configures Ardour to act as translator from timecode to BBT information.
Timecode settings are accessed from the menu in three places:
- Session > Properties > Timecode
- Edit > Preferences > Transport
- Edit > Preferences > MIDI
Timecode Settings
| Timecode frames-per-second | Configure timecode frames-per-second (23.976, 24, 24.975, 25, 29.97, 29.97 drop, 30, 30 drop, 59.94, 60). Note that all fractional framerates are actually fps*(1000.0/1001.0). |
| Pull up/down | Video pull-up modes change the effective samplerate of Ardour to allow for changing a film soundtrack from one frame rate to another. See Telecine |
| Slave Timecode offset | The specified offset is added to the received timecode (MTC or LTC). |
| Timecode Generator offset | Specify an offset which is added to the generated timecode (so far only LTC). |
| JACK Time Master | Provide Bar|Beat|Tick and other information to JACK. |
These settings are session specific.
Transport Preferences
| External timecode source | Select timecode source: JACK, LTC, MTC, MIDI Clock |
| Match session video frame rate to external timecode | This option controls the value of the video frame rate while chasing an external timecode source. When enabled, the session video frame rate will be changed to match that of the selected external timecode source. When disabled, the session video frame rate will not be changed to match that of the selected external timecode source. Instead the frame rate indication in the main clock will flash red and Ardour will convert between the external timecode standard and the session standard. |
| External timecode is sync locked | Indicates that the selected external timecode source shares sync (Black & Burst, Wordclock, etc) with the audio interface. |
| Lock to 29.9700 fps instead of 30000/1001 | The external timecode source is assumed to use 29.97 fps instead of 30000/1001. SMPTE 12M-1999 specifies 29.97df as 30000/1001. The spec further mentions that drop-frame timecode has an accumulated error of -86ms over a 24-hour period. Drop-frame timecode would compensate exactly for a NTSC color frame rate of 30 * 0.9990 (ie 29.970000). That is not the actual rate. However, some vendors use that rate—despite it being against the specs—because the variant of using exactly 29.97 fps has zero timecode drift. |
| LTC incoming port | Offers a session agnostic way to retain the LTC port connection. |
| Enable LTC generator | Does just what it says. |
| Send LTC while stopped | Enable to continue to send LTC information even when the transport (playhead) is not moving. This mode is intended to drive analog tape machines which unspool the tape if no LTC timecode is received. |
| LTC generator level | Specify the Peak Volume of the generated LTC signal in dbFS. A good value is 0 dBu (which is -18 dbFS in an EBU calibrated system). |
These settings are common to all sessions.
MIDI Preferences
| Send MIDI Timecode | Enable MTC generator |
| Send MIDI Clock | Enable MIDI Clock generator |
These settings are also common to all sessions.
8 - Preferences
Global preferences control general workflow and system configuration, and should apply to all sessions. They are located in Edit > Preferences and stored in Ardour’s user configuration file in the user’s home directory.
General
- DSP CPU Utilization
- Signal processing uses: sets how many cpu processors can be used to do signal processing. It can be set to use one up to all processors.
- Memory Usage
- Waveform image cache (megabytes): sets the maximum amount of ram that can be used to store the images representing the waveforms in the editor. Past this amount, the images will be regenerated when needed, which can significantly decrease the system’s performance.
- Engine
- Try to auto-launch audio/midi engine allows Ardour to try to automatically launch the audio and MIDI system, driver and device, thus not showing the Audio/MIDI Setup dialog. This can save a little time if the system is always used the same way.
- Automation
- Thinning factor ranges from 0 to 1000 with larger values sending fewer automation changes. Thinning is like lossy audio compression, removing data that is less likely to be noticed, although the more is removed, the more likely the loss will be noticed. The advantage to thinning is reduced CPU usage.
- Automation sampling interval ranges from 1 to 1000 ms. Determines how frequently the automation input is sampled. The shorter the interval the higher the accuracy but also the higher the CPU requirements.
- Tempo
- Allow non quarter-note pulse: by default, Ardour understands the tempo as the number of quarter notes in a minute. Checking this option allows to set the tempo based on any division of the note, from whole to 1/128th. This is reflected in the Edit Tempo window (accessed by double clicking a tempo marker) that shows a “Pulse” menu when this option is checked.
- GUI Lock
- Lock timeout (seconds):locks the GUI after this many idle seconds (zero being ‘never lock’). The GUI can also be locked with Session > Lock. When locked, a dialog will display a “Click to unlock” button.
Session
- Undo defines the behaviour of the Undo operations:
- Limit undo history sets how many commands can be undone using Z or Edit > Undo. Unchecking will keep an endless memory of operations to undo, at the expense of memory.
- Save undo history sets how many commands are saved so they are available to be undone after reopening the session. This can also be unchecked to keep all actions undoable, at the cost of bigger session files.
- Verify removal of last capture when enabled prompts to verify removal the last recording capture when Edit > Remove Last Capture is executed.
- Session Management:
- Make periodic backups of the session file will create a backup session file after changes to the timeline. The backup file is the session name followed by .ardour.bak. The backup can be used to recover from crashes when the session had not been explicitly saved.
- Always copy imported files selects, and then disables changes to, the Copy files to session option in the Add Existing Media dialog.
- Default folder for new sessions: defaults the folder where Ardour will create new session folders. This is used in the Session Setup dialog displayed by Session > New.
- Maximum number of recent sessions: determines how many of the last opened sessions shows in the Recent Sessions dialog displayed by Session > Recent.
Translation
- Internationalization
- Use translations sets if Ardour should use a translated version of all the messages. The default (unchecked) is English (US). When checked, and if a language file exists for the system language, this file will be used to translate Ardour.
Editor
- General
- Snap rubberband to grid when enabled uses the grid when selecting regions with a rubberband rectangle.
- Prompt for new marker names when enabled, popup a dialog when a new marker is created. This allows markers to be named as they are created.
- Allow dragging of the playhead, when enabled, allows dragging the playhead with the mouse in the Editor window.
- Playhead dragging speed (%): chooses how fast the canvas scrolls when dragging the playhead outside of the visible canvas.
- Limit zooming & summary view to X minutes beyond session extents prevents the zoom out both in the editor and the summary, to show anything past the chosen time after the end marker, restraining the vision to only useful content.
- Zoom to mouse position when zooming with scroll wheel: by default, Ardour zooms to the edit point. When this option is checked, and the zoom is done with + mousewheel, the zoom will happen at the mouse cursor position regardless of the edit point chosen.
- Zoom with vertical drag in rulers allows, when checked, to click anywhere in an empty zone of the ruler zone and drag up to zoom in or down to zoom out.
- Double click zooms to selection allows by double clicking, to zoom on the selection, both on the time and tracks axes. If the selection has been done with or , then this key should still be pressed when double clicking for this to work, otherwise the first click breaks the group selection.
- Update editor window during drags of the summary: when enabled the contents of the editor window will redraw the tracks area as the selection rectangle in the summary area is moved or resized.
- Auto-scroll editor window when dragging near its edges when enabled will scroll the editor window automatically when dragging a region. This can make it easier to see where to position the region.
- Show gain envelopes in audio regions: sets in which modes the gain envelope is displayed in audio regions. The gain envelope is superimposed over the region in the selected modes, and hidden otherwise for a better legibility.
- Editor Behaviour
- Move relevant automation when audio regions are moved, when enabled, causes automation data to stay with a region when the region is moved inside the playlist. When disabled, the automation is not affected by movement of regions.
- Ignore Y-axis click position when adding new automation-points allows to create new automation points at the x-position of the mouse, without using the Y-position as the value, hence creating a new automation point at its present value.
- Default fade shape: sets which fade shape is the default.
- Regions in edit groups are edited together: sets the criteria to see if editing actions apply to tracks grouped together in an group.
- Layering model: Ardour allows layering multiple regions in the same track. This selector defines how these layers are managed, either manually or by placing the latest on top.
- After splitting selected regions, select: determines which, if any, regions are selected after a split operation. The options are no regions, the regions created by the split, and if more than one region was selected to start with, the existing selection and the new regions.
Modifiers
This page allows to choose how things are done in the editor. This is a very flexible way for Ardour to match an existing workflow, or speed up the editing process based on the user’s most used actions.
The Reset to recommended defaults button at the bottom provides a way to revert any user made change to its default value.
Mixer
- Solo contains settings that affect the use of solo,
muting, and panning.
- Solo controls are Listen controls: when enabled, the soloed track is soloed only on the monitor bus, the master fader mix is not affected by the solo. This option can also be set by enabling pre-fader listen or after-fader listen in the Mixer monitor section.
- Exclusive solo when enabled will only solo the last track selected for solo. Previously soloed tracks will be un-soloed. This setting is also available from the Mixer monitor section.
- Show solo muting when enabled outlines the mute button on tracks and busses when another track is soloed.
- Soloing overrides muting when enabled allows a track to be heard when it is soloed while muted. This setting is also available from the Mixer monitor section.
- Solo-in-place mute cut (dB): sets the attenuation of the other tracks when another track is soloed in place. This setting is also available from the Mixer monitor section. The default is “−inf” for −∞, meaning the other tracks are totally muted.
- Listen Position: determines what is listened to when the solo controls are used as listen controls. The options are after-fader or pre-fader.
- PFL signals come from: determines whether the pre-fader listen position is before or after the pre-fader processors.
- AFL signals come from: determines whether the after-fader listen position is before or after the after-fader processors.
- Default Track / Bus Muting Options sets the muting options for a
newly created tracks or bus. The mute options for an existing track
or bus are changed by the right-click context menu on a mute button.
- Mute affects pre-fader sends when enabled pre-fader sends will be muted by default.
- Mute affects post-fader sends when enabled post-fader sends will be muted by default.
- Mute affects control outputs when enabled control outputs are muted by default.
- Mute affects main outputs when enabled main outputs are muted by default.
- Send Routing affects aux and external sends.
- Link panners of Aux and External Sends with main panner by default when enabled, sends follow the channel panner. When disabled, sends can panned independently of the channel panner and fader. Double clicking the send in the processor box toggles the main panner and fader between the aux send and the channel.
Signal Flow
- Monitoring
- Record monitoring handled by: determines whether Ardour provides monitoring of incoming audio or whether monitoring is provided by hardware. See Monitoring for more information.
- Tape machine mode when enabled defaults new audio tracks to tape machine mode. See Track Types for more information.
- Track and Bus Connections
- Auto-connect main output (master or monitor) bus to physical ports auto-connects the outputs to the first N physical ports. In a session without a monitor section, the master-bus is connected to the system’s playback ports, and if a monitor section exists, the monitor-bus’ output are connected.
- Connect track inputs: allows to choose when a new track is created whether its inputs will be automatically connected to the physical inputs of the system or not (hence the user has to manually connect it).
- Connect track and bus outputs: allows to choose, for any new track or bus created, whether its output will automatically be connected to the master bus, directly to the physical outputs or to nothing (the user has to manually connect it).
- Use ‘Strict-I/O’ for new tracks or busses determines the default choice for the signal flow of a newly created track or bus. This can be overridden in the Add Track/Bus/VCA dialog
Audio
- Buffering settings determine how many seconds of audio off of disk
will be buffered in memory. Longer settings reduce the risk of buffer
under-runs but consume more memory.
- Preset: will automatically choose the values for the playback and recording buffer based on the chosen size of the session. The Custom option allows to manually select the buffers with the two sliders below.
- Playback (seconds of buffering): sets how many seconds of audio Ardour will buffer during playback.
- Recording (seconds of buffering): sets how many seconds of audio Ardour will buffer during recording.
- Denormals are a specific type of very small numbers that can cause
issues with CPU consumption when using some plugins in some
circumstances. Ardour provides two methods of handling the issue.
Trying different combinations of these settings may minimize CPU
consumption.
- Use DC bias to protect against denormals adds a small constant value to numbers to move the numbers away from zero.
- Processor handling:, if the computer’s hardware supports it, offers two methods that can be used individually or combined. Flush to zero and denormals are zero.
- Regions
- Enable automatic analysis of audio generates the transient values (used in e.g. the Rhythm Ferret) automatically. When unchecked, the transient values will be generated on demand.
- Replicate missing region channels: if a track is N-channel, and the region has fewer channels, this option copies the existing channel’s data for this non-existent one. If left unchecked, the missing channels will stay silent.
MIDI
- Buffering
- MIDI read-ahead time (seconds): defines how much time of MIDI data must be read in advance by Ardour and put in the buffer. More time means more stability while playing back, at the expense of more time to buffer the data. This should be set to a low value for a reasonably capable machine.
- Session
- Initial program change: Ardour will send a MIDI program change
message on the
ardour:MMC outJACK port when a session is loaded and whenever this field is changed. A value of -1 means don’t send any program change message.
- Initial program change: Ardour will send a MIDI program change
message on the
- Audition
- Sound MIDI notes as they are selected in the editor will play any selected or added MIDI note when in Draw or Internal Edit modes. The note is sent as MIDI as if Ardour was playing it withe the session, so the processors and signal routing will be applied.
- Midi Audition Synth (LV2): allows to select in the list of LV2 instruments, which one will be used to audition MIDI when e.g. in the import dialog.
Metronome
- Metronome handles the way Ardour’s metronome is played when enabled
in the Transport Bar.
- Emphasis on first beat plays a different sound when the first beat is played (e.g. 1/4 in 4/4, 1/3 in 3/4,…). When unchecked, all the beats are indistinguishable.
- Use built-in default sounds when checked, uses Ardour’s own sounds for the metronome click. Unchecking this allows to set some custom sounds below.
- Audio file: selects an audio file for the beats, in any format Ardour supports.
- Emphasis audio file: in conjunction with Emphasis on first beat, selects an audio file for the first beats of each bar.
- Gain level: allows the metronome’s click sounds to be boosted or attenuated.
- Options
- Enable Metronome only while recording: when enabled, the metronome will remain silent unless Ardour is recording.
Metering
- Metering
- Peak hold time: allows the meter to keep displaying the highest signal level for a period of time before reverting to showing the actual instantaneous value (unless an even higher peak occurs). The longer this time is, the easier it is to spot peaks, at the expense of instantaneous accuracy.
- DPM fall-off: describes how fast the Digital Peak Meters can go from a high value to a lower one. Faster values are more accurate but less readable.
- Meter line-up level; 0 dBu: chooses a standard for the conversion between dBFS (Full Scale) which represent the numeric signal level, and dBu which represents the analog signal level. This value is used to configure meter-marks and color knee-points, or set the reference levels for various meter-types.
- IEC1/DIN Meter line-up level; 0 dBu: sets the reference level for the IEC1/DIN Meter
- VU Meter standard: selects which standard to use for the zero value of the vu-meters, i.e. the analog dBu value that will show as 0 on the VU-meter.
- Peak indicator threshold [dBFS]: at that value and over, the signal will make the peak meter to turn red, indicating a level too high.
- Default Meter Types sets the default meters when creating a session
or track. These meters can be changed afterwards by right-clicking a
meter.
- Default Meter Type for Master Bus: defines which kind of meter will be used when creating a new session (does not apply to the current session).
- Default Meter Type for busses: defines which kind of meter will be used when creating a new bus (applies to the bus created after changing the value).
- Default Meter Type for tracks: same as above, for tracks.
- Post Export Analysis
- Save loudness analysis as image file allows, when the Analyze
Exported Audio is checked in the Export
dialog, to save the analysis graph as a file
named
session.pngalongside the exported audio file(s) (in the same folder).
- Save loudness analysis as image file allows, when the Analyze
Exported Audio is checked in the Export
dialog, to save the analysis graph as a file
named
Transport
- General
- Stop at the end of the session causes the transport to stop during playback when it reaches the end marker. Behavior during recording is not changed.
- Keep record-enable engaged on stop leaves the global record-enable engaged after transport is stopped. Does not affect track level record-enable which is never changed on stop.
- Disable per-track record disarm while rolling, when enabled, will not allow the any track’s record-enable to be disarmed during record, preventing accidentally stopping the recording of a take.
- 12dB gain reduction during fast-forward and fast-rewind when enabled will reduce the unpleasant increase in perceived volume that occurs when fast-forwarding or rewinding through some kinds of audio.
- Preroll: sets the duration of the preroll for playing and recording when using a preroll. Can be a musical duration (in bars) or a duration in seconds.
- Looping
- Play loop is a transport mode changes the behavior of the loop button, turning it into a toggle. When enabled, the loop button does not start playback but forces playback to always play the loop. Looping stays engaged when the transport is stopped. Playback continues where the transport stopped and continues to loop. When disabled, the loop button starts playing the loop but stop then cancels loop playback.
- Do seamless looping removes any clicks that might otherwise be audible when the transport moves from the end of the loop range back to the beginning.
- Dropout (xrun) Handling
- Stop recording when an xrun occurs will stop the transport when an xrun occurs during recording, ensuring no audible glitches are recorded.
- Create markers where xruns occur will create a new marker when an xrun occurs during recording at the location of the xrun. This marks where possible xruns might produce audible glitches.
Sync
- External Synchronization
- External timecode source determines which external source to use when Ardour is using an external synchronization source. Depending on the timecode source chosen, the additional preference options below are available.
- Match session video frame rate to external timecode controls the value of the video frame rate while chasing an external timecode source. When enabled, the session video frame rate will be changed to match that of the selected external timecode source. When disabled, the session video frame rate will not be changed to match that of the selected external timecode source. Instead, the frame rate indication in the main clock will flash red and Ardour will convert between the external timecode standard and the session standard.
- Sync-lock timecode to clock (disable drift compensation) When enabled, Ardour will never varispeed when slaved to external timecode. Sync Lock indicates that the selected external timecode source shares clock-sync (Black & Burst, Wordclock, etc) with the audio interface. This options disables drift compensation. The transport speed is fixed at 1.0. Vari-speed LTC will be ignored and cause drift. When disabled, Ardour will compensate for potential drift regardless if the timecode sources shares clock sync.
- Lock to 29.9700 fps instead of 30000/1001, when enabled, will force Ardour to assume the external timecode source uses 29.97 fps instead of 30000/1001. SMPTE 12M-1999 specifies 29.97 df as 30000/1001. The spec further mentions that drop-frame timecode has an accumulated error of -86 ms over a 24 hour period. Drop-frame timecode would compensate exactly for an NTSC color frame rate of 30 × 0.9990 (i.e. 29.970000). That is not the actual rate. However, some vendors use that rate—despite it being against the specs—because the variant of using exactly 29.97 fps has zero timecode drift.
LTC
- Linear Timecode (LTC) Reader
- LTC incoming port: specifies which physical incoming port of the system will provide the LTC signal.
- Linear Timecode (LTC) Generator
- Enable LTC generator when enabled Ardour will output an LTC timecode signal on its LTC-out port. If this option is checked, the two options below are active:
- Send LTC while stopped, when enabled Ardour will continue to send LTC information even while the transport (playhead) is not moving.
- LTC generator level [dBFS]: specifies the peak volume of the generated LTC signal in dbFS. A good value is 0dBu=−18dbFS in an EBU calibrated system.
MIDI
- MIDI Beat Clock (Mclk) Generator
- Enable Mclk generator when enabled Ardour will generate a (tempo
dependant) beat clock at a rate of 24 pulses per quarter note on
the
ardour:MIDI clock outJACK port.
- Enable Mclk generator when enabled Ardour will generate a (tempo
dependant) beat clock at a rate of 24 pulses per quarter note on
the
- MIDI Time Code (MTC) Generator
- Enable MTC Generator when enabled Ardour will generate MIDI time
code on the
ardour:MTC outJACK port. - Percentage either side of normal transport speed to transmit MTC: MIDI time code generation will be disabled when the transport speed is greater than normal speed plus this percentage or less than normal minus this percentage.
- Enable MTC Generator when enabled Ardour will generate MIDI time
code on the
- MIDI Machine Control (MMC)
- Respond to MMC commands when enabled Ardour will respond to MIDI
Machine Control commands received on the
ardour:MMC inJACK port. - Send MMC commands when enabled Ardour will send MIDI Machine
Control commands on the
ardour:MMC outJACK port. - Inbound MMC device ID: is the only device ID Ardour will respond
to when an MMC command is received on the
ardour:MMC inJACK port. - Outbound MMC device ID: is the MIDI device ID Ardour will use when it sends MMC commands.
- Respond to MMC commands when enabled Ardour will respond to MIDI
Machine Control commands received on the
Control Surfaces
This tab contains settings for control surfaces.
It lists all the Control Surface protocols Ardour knows. To enable a Control Surface Protocol, the Enable checkbox next to its name should be ticked. Editing the settings related to this protocol can be done by double-clicking its name or clicking the Show protocol settings (only for Generic MIDI and Open Sound Control).
MIDI Ports
- MIDI Port Options
- MIDI input follows MIDI track selection allows Ardour to automatically connect the MIDI input to the selected track. Selecting a different MIDI track results in Ardour disconnecting the MIDI device from the former track and connecting it to the newly selected one, so that the MIDI device is always connected to the selected track. Which MIDI device will follow selection can be chosen below.
- MIDI Inputs This is a list of all the MIDI devices connected as
inputs (capture devices) to Ardour. For each devices, there are 3
checkboxes:
- Music Data if checked, Ardour will consider this device as a source for musical data input (notes, etc…)
- Control Data if checked, Ardour will consider this device as a source for control data input (play/stop, etc…)
- Follow selection if the above MIDI input follows MIDI track selection is checked, Ardour will make this device follow track selection.
- MIDI Outputs This is a list of all the MIDI devices connected as
outputs (playback devices) to Ardour. For each devices, there are 2
checkboxes:
- Music Data if checked, Ardour will consider this device as a target for musical data output (notes, etc…)
- Control Data if checked, Ardour will take this device as a target for control data output (play/stop, etc…)
Plugins
The content of this preference page varies heavily between versions or Ardour: both the platform and the build-time options can make Ardour support some types of plugins and not others. While this documentation tries to show all possible options, most systems will only show a subset of the options hereunder, e.g. AudioUnits are macOS only…
- Scan/Discover
- Scan for Plugins will initiate an immediate scan of the system for available plugins. Useful to get a newly installed plugin recognised by Ardour.
- General
- Always Display Plugin Scan Progress When enabled a popup window showing plugin scan progress is displayed for indexing (cache load) and discovery (detect new plugins).
- Silence plugins when the transport is stopped when stopping playback or recording, if this option is checked, the plugins that still emit sound (reverbs, etc…) will be stopped. If unchecked, the plugins will continue playing after the transport stop.
- Make new plugins active when enabled, any plugin added to a track will be in active mode. If unchecked, the plugins will be added in inactive mode by default, hence have no processing effect on the track/bus.
- Limit automatable parameters per plugin: as some plugins (synthesizers, …) have a lot of parameters, and those parameters can be automated by Ardour, checking this will limit the number of parameters that are listed as automatable, hence making the lists shorter and the GUI more responsive.
- Plugin GUI
- Automatically open the plugin GUI when adding a new plugin shows the plugins GUI as soon as it is added to the processing box. If unchecked, the plugin will be added in the processor box but the GUI will only be shown when double clicking it.
- Show Plugin Inline Display on Mixer strip by default allows Ardour to show, in the mixer strips, a visual rendering of the effect. These Inline Display are a special feature of Ardour, so not all plugins are able to show this display. Most of Ardour’s own plugins have an Inline Display. At any time, the plugin’s Inline Display can be toggled on or off by double-clicking it.
- Don’t automatically open the plugin GUI when the plugin has an
inline display mode: this option, available only if Automatically
open the plugin GUI when adding a new plugin is checked,
supercedes it and hides the plugin GUI at creation if it has an
Inline Display, like Ardour’s own
a-*plugins.
- Instrument
- Ask to replace existing instrument plugin: if a MIDI track already has an instrument (i.e. MIDI to audio converter of some sort) and this option is checked, Ardour will detect it and offer to replace the existing instrument with the newly added one, avoiding a possible conflict.
- Interactively configure instrument plugins on insert: when inserting a multichannel instrument plugin, if this option is checked, prompts the user for the channel configuration for this plugin.
VST
- VST
- Enable Mac VST support (requires restart or re-scan) makes a MacOs system able to run VST-Mac plugins. As stated, a new scan for plugins is required, be it manually or by restarting Ardour.
- Scan for [new] VST Plugins on Application Start When enabled new VST plugins are searched, tested and added to the cache index on application start. When disabled new plugins will only be available after triggering a ‘Scan’ manually.
- Verbose Plugin Scan: adds information about the plugin in the Log window.
- Scan Time Out Specifies the default timeout for plugin instantiation. Plugins that require more time to load will be blacklisted. A value of &infinity; disables the timeout.
- VST Cache: Clicking the Clear button removes all VST plugins from the list of plugins available to be inserted into the processor box. A new VST plugin scan is then required.
- VST Blacklist: Clicking the Clear button makes blacklisted VST plugins available to be added to the processor box.
- Linux VST Path: Clicking the Edit button pops up a dialog to manage the directories that will be searched for Linux VST plugins. When modified, Ardour will offer to scan those paths for plugins.
- Path: are the paths chosen above.
- Windows VST Path: Clicking the Edit button pops up a dialog to manage the directories that will be searched for Windows VST plugins. When modified, Ardour will offer to scan those paths for plugins.
- Path: are the paths chosen above.
Audio Unit
- Audio Unit
- Scan for [new] AudioUnit Plugins on Application Start When enabled, new AU plugins are searched, tested and added to the cache index on application start. When disabled, new plugins will only be available after triggering a ‘Scan’ manually.
- AU Cache: Clicking the Clear button removes all AU plugins from the list of plugins available to be inserted into the processor box. A new AU plugins scan is then required.
- AU Blacklist: Clicking the Clear button makes blacklisted AU plugins available to be added to the processor box.
Appearance
- Graphics Acceleration
- Possibly improve slow graphical performance (requires restart) Ardour uses hardware accelerated gradient creation by default for speed. Sometimes though, a buggy driver can cause this to make the system slow or unstable. Checking this will make Ardour draw its own gradients without hardware acceleration, improving stability and responsiveness on those buggy systems.
- Graphical User Interface
- Highlight widgets on mouseover, when checked, makes Ardour’s widgets (buttons, sliders, …) slightly change color when the mouse hovers them, visually indicating what a mouse action would interact with.
- Show tooltips if mouse hovers over a control when checked, displays a little help bubble about the control the mouse hovers. The mouse pointer needs to stay idle for about 1 sec for the tooltip to appear.
- Update clocks at TC Frame rate: Ardour updates its clocks every 100 ms. Checking this will make the clock refresh at every TimeCode frame which is more responsive, at the cost of a bit more system stress.
- Blink Rec-Arm buttons: when enabled, the record-armed buttons on tracks will blink when they are armed but not currently recording. When disabled, the record-armed buttons on tracks will be outlined in red instead of blinking. The global record-arm button in the Transport bar is unaffected.
- Blink Alert indicators: when enabled, the Alert indicators (like the Error Log or the Feedback button) will blink when they are active (when an error or feedback has been detected, respectively). When disabled, the indicators will turn red instead of blinking.
- GUI and Font scaling: allows the display size of most of the text and buttons in the user interface to be scaled up or down. May require a restart to take effect.
Editor
- General
- Use name highlight bars in region displays (requires a restart): when enabled, the region name is displayed, in the editor, in its own opaque bar at the bottom of the region. When disabled, the region name is overlaid at the top of the region, possibly over audio waveforms or MIDI notes.
- Region color follows track color: when enabled, the background color of regions in the editor will be displayed using the color assigned to the track. When disabled the default region background color will be used.
- Waveforms
- Show waveforms in regions when enabled shows a visual representation of the region’s audio waveform.
- Show waveform while recording when enabled, will draw the audio waveform in regions being recorded, in near real time. When disabled, only a region block will be drawn while recording, reducing CPU requirements.
- Show waveform clipping: when enabled the waveform displayed will show peaks marked in red if they exceed the clip level.
- Waveform Clip Level (dBFS): sets the level at which the waveform shown in an audio region will be drawn in red to indicate clipping. Setting lower than 0.0 dBFS can be useful if any tool in the audio chain has problems near 0.0 dBFS.
- Waveform scale: when waveforms are shown in audio regions, they can be displayed using a linear or a logarithmic scale. See Waveform display.
- Waveform shape: when waveforms are shown in audio regions, they can be displayed using a traditional or a rectified shape. See Waveform display.
- Editor Meters
- Show meters in track headers, when enabled, shows a small meter in the Editor’s track headers. The meter is shown on the right side area of the header and provides an instant, if unprecise, view of the levels on this track/bus.
- Limit track header meters to stereo: if a track has more than two outputs (e.g. with a drum plugin), limits the number of meters in the track header to the first two ones. Only affects audio meters, not MIDI.
- MIDI Regions
- Display first MIDI bank/program as 0: when patches and bank changes are displayed in the editor, if this option is checked, the numbering will be zero-based instead of one-based, i.e. banks/programs will be numbered O, 1 ,2… instead of 1, 2, 3…
- Don’t display periodic (MTC, MMC) SysEx messages in MIDI Regions: if checked, will hide these control messages from the MIDI regions for better legibility.
Mixer
- Mixer Strip
- This table enables (checked) or disables (unchecked) the display of controls in the mixer strip. Controls whose display can be toggled are: Input, Phase Invert, Record & Monitor, Solo Iso/Lock, Output, Comments and VCA Assigns.
- Use narrow strips in the mixer for new strips by default When enabled, new mixer strips are created in narrow format. When disabled, they are created in wide format. Existing mixer strips width can be toggled with the width control at the top left of the mixer strip.
Toolbar
- Main Transport Toolbar Items: this section allows to toggle the
visibility of some elements of the main toolbar:
- Display Record/Punch Options toggles the visibility of the punch and record slice of the main toolbar.
- Display Monitor Options toggles the visibility of the monitor options slice of the main toolbar.
- Display Selection Clock toggles the visibility of the selection clocks slice of the main toolbar.
- Display Secondary Clock toggles the visibility of the secondary clocks slice of the main toolbar.
- Display Navigation Timeline toggles the visibility of the navigation/mini timeline slice of the main toolbar.
- Display Master Level Meter toggles the visibility of the selection clocks slice of the main toolbar.
- Lua Action Script Button Visibility enables or disables the visibility of the four columns of Lua script buttons. Each columns contains two user-assignable buttons.
Theme
- Theme
- Draw “flat” buttons: when enabled, button controls in the user interface will be drawn with a flat look. When disabled button controls will have a slight 3D appearance.
- LED meter style if checked, the bar meters in the editor and mixer will be styled to look like if they were made of LEDs, with a dotted bar. Unchecking this option makes the bars flat and continuous.
- Waveforms color gradient depth: determines how much gradient effect is applied to the inner of audio waveforms displayed in the editor. Values range from 0.0, no gradient effect, to 1.0, maximum effect.
- Timeline item gradient depth: Determines how much gradient effect is applied to the backgrounds of regions displayed in the editor. Values range from 0.0, no gradient effect, to 1.0, maximum effect.
- Icon Set: Changes the mouse cursor icons used to indicate different tool modes in the editor. An example would be the icons used to indicate whether the cursor will select a region or change the length of a region.
Colors
- Colors
- Color Theme allows to switch between some presets bundled with Ardour, changing both the palette and items colors, hence styling Ardour all at once.
- The table allows to change the color settings in Ardour by acting
on three parameters:
- Items that allow to choose any color from the palette (see below) to color a UI element. Clicking on a color sample in the Color column bring up the Palette, to choose from.
- Palette that allows to create a set of colors that will be used in the UI. Using a palette allows for better consistency, instead of picking “free” colors for each UI element. Clicking on a color patch brings up a full color selector, to assign this color to this patch of the palette.
- Transparency where possible, allows to select, with a slider, the transparency of the UI element, with 0 (slider to the left) being fully opaque.
- Restore Defaults turns all the palette, item colors and transparency back to Ardour’s default base setting, in case Ardour’s appearance has turned into a toddler’s toy.
Quirks
- Various Workarounds for Windowing Systems: As Ardour is available on
a number of platforms and windowing systems, some specific
workarounds are sometimes required to provide a smooth experience to
the user.
- Use visibility information provided by your Window Manager/Desktop allows the system window manager’s rules for the windows visibility to supercede Ardour’s.
- All floating windows are dialogs: when enabled, Ardour will use type “Dialog” for all floating windows instead of using type “Utility” for some of them. This may help usability with some window managers. This setting requires a restart of Ardour to take effect.
- Transient windows follow front window.: when enabled, transient windows will follow the front window when toggling between the editor and mixer. This setting requires a restart of Ardour to take effect.
- Float detached monitor-section window: as the monitor section can be detached from the mixer, this option makes it a floating window, which may be handled differently by the windowing system and easier to access.
Video
- Video Server
- Show Video Export Info before export Shows a warning message when exporting a video about licensing and offers to open the export video section of this manual.
- Show Video Server Startup Dialog: when using video inside Ardour, this video is accessed via Xjadeo from a source file through a Video Server. This options shows the server’s startup dialog (useful for debugging a malfunctioning video).
- Advanced Setup (remote video server) can be used when the setup is more complex than opening a local file with Ardour. The tools used behind the scene by Ardour allow a lot of flexibility, so for a competent user, the options below are provided to access a distant file (i.e. on another machine). The default options for the two following fields (“http://localhost:1554” and “/”) are suitable for local files.
- Video Server URL: Base URL of the video server delivering the
video through the network (
http://IP-or-address:port). - Video folder is the server’s local path to the document-root, i.e. the files that can be delivered by the server.
- Video Monitor
- Custom Path to Video Monitor (xjadeo) - leave empty for default: Ardour bundles offer xjadeo bundled, so it should run flawlessly. Though, for custom builds or if a newer version of xjadeo is available, one can specify a path to the wanted version of xjadeo.
9 - Session Properties
Session properties control aspects of the workflow or configuration that pertain to the current session only; these settings are initially set from the template used to create the session. They can be found in Session > Properties, and are stored in the session file.
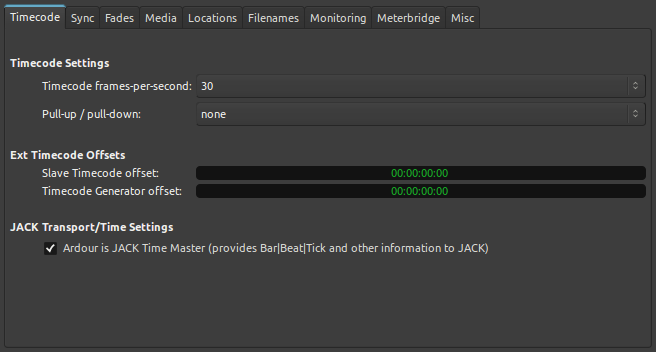
The Session Properties dialog.
9.1 - Timecode Tab
Session properties timecode tab
This tab is used to change how Ardour interprets and manipulates timecode.
- Timecode Settings lets you set the number of frames per second and pull up/down to match the timecode used other synchronized systems.
- External Timecode Offsets allows Ardour to a fixed offset from other synchronized systems. Slave Timecode offset adds the specified offset to the received timecode (MTC or LTC). Timecode Generator offset adds the specified offset to the timecode generated by Ardour (so far only LTC).
- Jack Transport / Time Settings determines whether Ardour controls Bar|Beat|Tick and other information for Jack.
9.2 - Sync Tab
Session properties sync tab
This tab is used to modify the timecode settings when working with video to use the imported video’s timecode settings instead of the session defaults.
9.3 - Fades Tab
Session properties fades tab
Change how Ardour works with region crossfades.
- Destructive crossfade length is used when an operation on a region is destructive, such as when recording in a track is in tape mode.
- When Region fades active is checked, the region fades set up in the mixer are used during playback. When unchecked, the fades are ignored.
- When Region fades visible is checked the region fades are visible in the the Editor.
9.4 - Media Tab
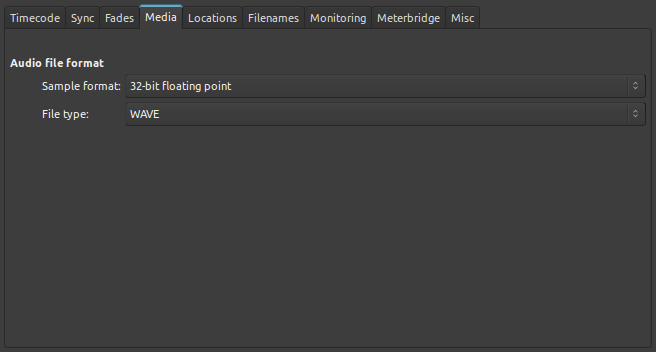
Session properties media tab
Change how sound is stored on disk. These options do not change how sound is handled internally.
- Sample format defaults to 32-bit floating point, the same as the internal representation. 24 and 16-bit integer representation are also available.
- File type options are WAVE, WAVE-64, and CAF.
9.5 - Locations Tab
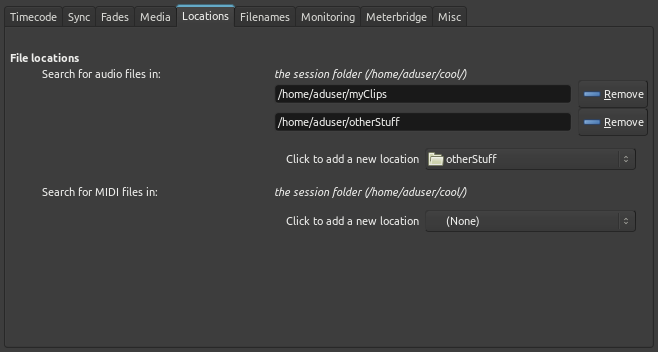
Session properties locations tab
These options add file locations that will be searched to find the audio and midi files used by the session. This is useful when the files have been imported into the session but not copied into the session.
To add a location, navigate to the directory where the files are stored. Drill down into the directory and then click open. The directory will show up in the dialog. The remove button next to the added directory can be used to remove it from the search path.
9.6 - Filenames Tab
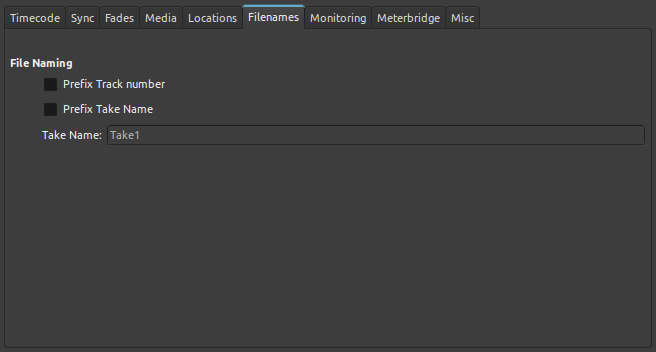
Session properties filenames tab
This tab is used to change how Ardour names recorded regions. If Prefix track number is selected a unique number will appear on each track in the Editor window and will prefix the region name. If the track number is 2 and the region would have been Gtr-1.1 with track number prefix turned on the region will be named 2_Gtr-1.1 instead. See XX for base of the region name.
If Prefix take name is selected and the Take name has Take1 the region will have the name Take1_Gtr-1.1 instead. If both boxes are checked the name will be Take1_2_Gtr-1.1 instead.
When Prefix take name is enabled, the first time a track is recorded it will have the specified take name. When recording is stopped, any trailing number on the end of the take name will incremented by 1. If the track name specified doesn’t have a number on the end, the number 1 will be suffixed.
9.7 - Monitoring Tab
Provides options affecting monitoring.
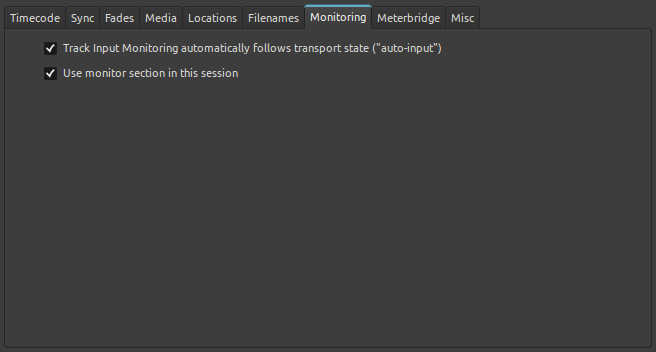
The session properties ‘monitoring’ tab
The Track Input Monitoring automatically follows transport state affects how input monitoring is handling. See Monitor Setup in Ardour.
The ‘Use monitor section’ displays an extra section in the Mixer window that is modelled on the similarly named section on large analog consoles. More information can be found on the Monitor Section page.
9.8 - Meterbridge Tab
The meters from audio tracks always display in the Meterbridge. This tab changes what additional controls are also displayed.
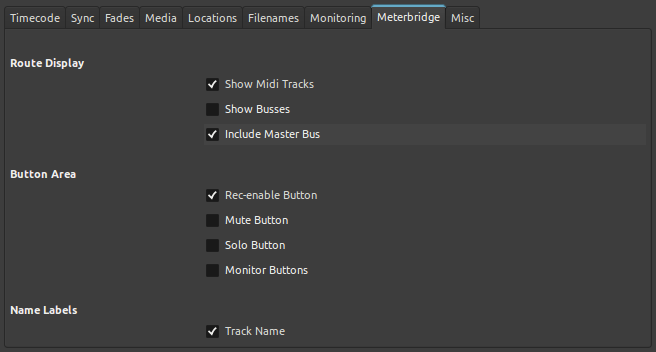
Session properties meterbridge tab
- Route Display has options for showing midi tracks, busses, and the master bus.
- Button Area has options for adding record enable, mute, solo, and input monitor buttons.
- Name Labels adds the track name and, if numbers are enabled on the filenames tab, the number.
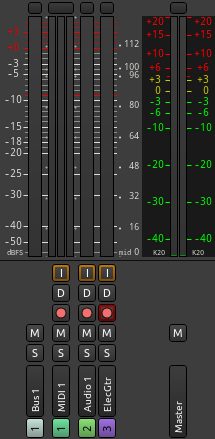
Meterbidge with all options on
9.9 - Session Misc Tab
This tab has several things that don’t fit on the other tabs.

Session properties misc tab
- MIDI Options
- If MIDI region copies are independent is selected, when a MIDI region is copied or duplicated, the new region is not linked to the region it was copied from. If it is not selected, the copied regions are linked and any editing of one of the linked regions changes all of the linked regions.
- The Editor can be configured to handle overlapping MIDI notes
several ways.
- never allow them
- don’t do anything in particular
- replace any overlapped existing notes
- shorten the overlapped existing note
- shorten the overlapped new note
- replace both overlapping notes with a single note
- Glue to bars and beats
- New markers can be glued to bars and beats
- New regions can be glued to bars and beats
- Settings from the session properties dialogs can be saved to the default session template.
10 - Configuring MIDI
MIDI is a way to describe musical performances and to control music hardware and software.
Ardour can import and record MIDI data, and perform a variety of editing operations on it. Furthermore, MIDI can be used to control various functions of Ardour.
MIDI Handling Frameworks
MIDI input and output for Ardour are handled by the same “engine” that handles audio input and output.
| OS X | CoreMIDI is the standard MIDI framework on OSX systems. |
| Linux | ALSA MIDI is the standard MIDI framework on Linux systems. |
| Windows | There is no single standard MIDI framework on Windows, but Ardour can work with ASIO and others. |
On Linux systems, QJackCtl control software displays ALSA MIDI ports under its “ALSA” tab (it does not currently display CoreMIDI ports). By contrast, JACK MIDI ports show up under the MIDI tab in QJackCtl.
JACK MIDI Configuration
By default, JACK will not automatically detect and use existing MIDI ports. One of several ways of bridging between the native MIDI frameworks (e.g. CoreMIDI or ALSA) and JACK MIDI must be chosen, as described in the following sections.
10.1 - MIDI on Linux
The right approach for using MIDI on Linux depends on which version of JACK is in use. The world divides into:
| Systems using JACK 1, versions 0.124 or later | On these systems, JACK must be
started with the -X alsa_midi
server argument. To support
legacy control applications, the
-X seq argument to the ALSA
backend of JACK can also be used
to get the exact same results. |
| All others | Using a2jmidid acts as a bridge
between ALSA MIDI and JACK. The
-X seq or -X raw
arguments should not be
used—the timing and performance
of these options is unacceptable. |
Using a2jmidid
a2jmidid is an application that bridges between the system MIDI ports and JACK.
First it must be ensured that there is no ALSA sequencer support enabled in JACK. To check that, one must open QJackCtl’s Setup window and set Settings > MIDI Driver to none, then uncheck the Misc > Enable ALSA Sequencer support option. The jack server must then be restarted before going on.
Checking for a2jmidid availability
Next, it must be checked whether a2jmidid is already installed. This is done by starting the JACK server, then going to the command line and typing:
a2jmidid -e If a2jmidid does not exist, it must be installed with the software manager of the Linux distribution in use until this command responds.
Checking available MIDI ports
If JACK is correctly configured for MIDI, then the MIDI ports should appear in qjackctl under Connections > MIDI.
Making it automatic
Once it has been verified that the ports appear in JACK as expected, this can be made to happen whenever JACK is started:
- If a newer version of JACK 1 is in use, by just making sure the
-X alsa_midior-X seqoptions are enabled for whatever technique is being used to start JACK. - For other versions of JACK, by adding
a2jmidid -e &as an “after start-up” script in the Setup > Options tab of QJackCtl, so that it is started automatically whenever JACK is started.
10.2 - MIDI on OS X
In order for CoreMIDI to work with Jack MIDI, a CoreMIDI-to-JACK-MIDI bridge is required. This feature is available on versions equal to or greater than version 0.89 of JackOSX.
Routing MIDI
Inside Ardour
MIDI ports show up in Ardour’s MIDI connection matrix in multiple locations. Bridged CoreMIDI ports as well as JACK MIDI ports that have been created by other software clients will show up under the “Other” tab. Bridged CoreMIDI hardware ports show up under the “Hardware” tab.
External Applications
There are multiple options for connecting MIDI ports outside of Ardour.
- MIDI Monitor is a handy tool for doing various MIDI-related tasks.
- MIDI Patchbay allows connection of ports and filters MIDI data.
Part III - Ardour’s Interface
11 - Ardour’s Interface Overview
In Ardour, work is done in two main windows: the Editor and the Mixer.
` <#main-menu>`__
` <#status-bar>`__
` <#transport-bar>`__
` <#selection-and-punch-clocks>`__
` <#other-toolbar-items>`__
` <#other-toolbar-items>`__
` <#transport-clocks>`__
` <#other-toolbar-items>`__
` <#selection-and-punch-clocks>`__
` <#mini-timeline>`__
` <#other-toolbar-items>`__
` <#audiomidi-mixer-strips>`__
` <#toolbox>`__
` <#zoom-controls>`__
` <#grid-controls>`__
` <#edit-point-control>`__
` <#nudge-controls>`__
` <#selection-and-punch-clocks>`__
` <#editor-lists>`__
` <#ruler>`__
` <#summary>`__
` <#track-and-bus-groups>`__
` <#bus-controls>`__
` <#audio-track-controls>`__
` <#automation>`__
` <#audio-track-controls>`__
` <#midi-track-controls>`__
` <#midi-track-controls>`__
` <#main-menu>`__
` <#status-bar>`__
` <#transport-bar>`__
` <#selection-and-punch-clocks>`__
` <#other-toolbar-items>`__
` <#other-toolbar-items>`__
` <#transport-clocks>`__
` <#other-toolbar-items>`__
` <#selection-and-punch-clocks>`__
` <#mini-timeline>`__
` <#other-toolbar-items>`__
` <#favorite-plugins-window>`__
` <#strips-list>`__
` <#groups-list>`__
` <#track-and-bus-groups>`__
` <#master-bus-strip>`__
` <#monitor-section>`__
` <#control-masters-mixer-strips>`__
` <#audiomidi-busses-mixer-strips>`__
` <#audiomidi-mixer-strips>`__
` <#audiomidi-mixer-strips>`__
The Editor and Mixer windows. Click on a section to access its description. The Editor and the Mixer share the same toolbar (the top of the window). The sections displayed in this toolbar can be customized to the user’s workflow, by checking options in Preferences > Appearance > Toolbar.
Switching between the Editor and the Mixer windows is done:
- with the Mode Selector buttons in the upper right
- with the M shortcut
- with the menu Window > Editor (or Mixer) > Show.
Both windows can be visible at the same time (e.g. for a multi-monitor setup) using Window > Editor (or Mixer) > Detach option in the same submenu.
The Editor
The Editor window includes the editor track canvas where audio and MIDI data can be arranged along a timeline. This is the window where editing and arranging a project is done. The window has a general “horizontal” sense to it: the timeline flows from left to right, the playhead showing the current position in the session moves from left to right—the window really represents time in a fairly literal way.
It is possible to show a single channel strip in the editor window, and some people find this enough to work on mixing without actually opening the mixer window. Most of the time though, both of these windows will be needed at various stages of a session’s lifetime.
The Mixer
The Mixer window represents signal flow and is the window that will probably be used most when mixing a session. It includes channel strips for each track and bus in the session. It has a general “vertical” sense to it: signals flow from the top of each channel strip through the processing elements in the strip to reach the output listed at the bottom.
To learn more about the process of mixing, see Mixing.
The Main Menu is made of 8 menus that allow the user to interact with Ardour, and below is a reference of all the menu actions.
Notice that a lot of this menus, and probably all of the most used ones have keyboard shortcuts to ease and fasten the work. A sum-up of these shortcuts can be found on the Defaults Keyboard Bindings page, and every menu in Ardour can be reassigned to an user defined key binding, or used via OSC with a control surface.
The Session menu groups together everything related to the session and the file operations.
| New… | Creates a new session |
| Open… | Opens an existing session |
| Recent… | Opens a list of recent sessions that can be opened |
| Close | Closes the current session (but not Ardour) |
| Save | Saves the current session |
| Save As… | Saves to a new session (with options) |
| Rename… | Changes the name of the session |
| Snapshot (& keep working on current version)… | Create a Snapshot but any subsequent change will be saved to this session |
| Snapshot (& switch to new version)… | Same thing, and any subsequent change will be saved to this new snapshot session |
| Save Template… | Saves the session as a template , without the audio |
| Archive… | Exports the session as a compressed file for archiving or sharing purposes, optionally compressing the audio to FLAC |
| Metadata | |
| Edit Metadata… | Opens the Metadata window, where information about the session can be saved |
| Import Metadata… | Creates the metadata by extracting them from another session |
| Add Track, Bus or VCA… | Adds a new track/bus/VCA to the session, same as the Track > Add Track, Bus or VCA… |
| Import | Opens the Import windows, to add media to the session |
| Import PT session | Import a ProTools© session file. Not everything in the original session can be imported. |
| Scripting | |
| Add Lua Script… | Loads or adds a Lua Session script to the current session |
| Remove Lua Script | Removes a loaded Lua Session script from the session |
| Open Video… | Imports a video file in the session |
| Remove Video | Removes the video part of the session (the video timeline disappears) |
| Export | |
| Export to Audio File(s)… | Export all or part of the session in audio form |
| Stem export… | Exports each track as its own audio file (for e.g. DAW interchange) |
| Export to Video File | Exports the session to a video file _ |
| Clean-Up | |
| Bring all media into session folder | Copies all the media files imported from outside the session folder in that folder, see Cleaning up Sessions <#cleaning-up-sessions> __ |
| Reset Peak Files | Reinitializes the buffered images representing the audio files |
| Clean-up Unused Sources… | Quarantines all the media files not used in the session to a specific sub-folder of the session |
| Flush Wastebasket | Deletes those quarantined files |
| [] Properties | Shows the Session Properties dialog, allowing to fine-tune the parameters of the current session |
| Lock | Locks the session by showing an Unlock window that (until clicked) blocks every action on Ardour’s window |
| Quit | Exits Ardour. Prompts for saving the session if it has been modified. |
The Transport menu handles how Ardour handles the playback and playhead.
| Start/Stop | Starts or stops the playhead, and recording if it is armed |
| Play | |
| Play Selection | Only plays the selected part of the session, be it a range or selected regions |
| Play Selection w/Preroll | As the previous menu, except it starts the playback a few bars or seconds before the beginning of the selection (the amount of time can be set in the Preferences) |
| Start/Continue/Stop | Leaves loop play or range play mode but without stopping the transport |
| Play from Edit Point and Return | Starts the playback at the Edit point, and when stopped, goes back to the original location |
| Play Loop Range | If a Loop range is defined, play it and loop until stopped |
| Start Recording | This is a shortcut to trigger the global recording, and start playback at once |
| Stop and Forget Capture | Stops the recording, removes the newly created material, and goes back to the original position |
| Enable Record | Triggers the global recording. Next time “Play” is pressed, it will record on the track(s) that are armed for recording |
| Record w/Preroll | As the Start Recording menu, except it starts the recording a few bars or seconds before the playhead’s position (the amount of time can be set in the Preferences) |
| Record w/Count-In | As the Start Recording menu, except it waits for 2 bars before the playhead’s position. The Metronome will tick (even if disabled) during the count-in |
| Set Loop from Selection | Converts the selection into a Loop range by placing loop markers at the start and end of the selected range |
| Set Punch from Selection | Same thing, for Punch |
| Set Session Start/End from Selection | Same thing, for the start and end markers of the session, defining the session’s length |
| Forward | Plays the audio forwards from the playhead on. If the audio is already playing forwards, increment its speed by 50%. |
| Rewind | Plays the audio backwards from the playhead on. If the audio is already playing backwards, increment its speed by 50%. |
| Transition to Roll | Plays the audio forwards, with a speed of 1 (real time) |
| Transition to Reverse | Plays the audio backwards, with a speed of 1 (real time) |
| Playhead | |
| Playhead to Mouse | Set the position of the playhead at the current position of the mouse cursor |
| Playhead to Active Mark | If a marker is selected, set the position of the playhead at the position of the marker |
| Center Playhead | Centers the view on the playhead without changing the zoom level (putting the playhead in the middle of the screen) |
| Nudge Playhead Forward | Shifts the position of the playhead to the right by the amount shown in the nudge timer |
| Nudge Playhead Backward | Same thing, to the left |
| Move to Next Transient | When transient have been set, moves the playhead to the next one to the right |
| Move to Previous Transient | Same, to the left |
| Playhead to Next Grid | Regardless of the state of the Grid Mode, goes to the next grid to the right, as set by the Snap/Grid unit |
| Playhead to Previous Grid | Same, to the left |
| Playhead to Next Region Boundary | Moves the playhead to the right to the next beginning or end of region on the selected track or, if no track is selected, on all tracks |
| Playhead to Previous Region Boundary | Same, to the left |
| Playhead to Next Region Boundary (No Track Selection) | Moves the playhead to next beginning or end of region, be it on the selected track or any other |
| Playhead to Previous Region Boundary (No Track Selection) | Same, to the left |
| Playhead to Next Region Sync | Moves the playhead to next Region Sync Point, that is by default the beginning of a region but can be moved |
| Playhead to Previous Region Sync | Same, to the left |
| Jump to Next Mark | moves the playhead to the next marker on the Ruler |
| Jump to Previous Mark | Same, to the left |
| Go to Zero | Sends the playhead to the 00:00:00:00 time, regardless of the sessions Start marker |
| Go to Start | Sends the playhead to the Start marker of the session |
| Go to End | Sends the playhead to the End marker of the session |
| Go to Wall Clock | Sends the playhead to the current value of system time, as shown on the top right of the Status bar |
| Active Mark | |
| To Next Region Boundary | Moves the currently selected marker _ to the next region beginning or end |
| To Previous Region Boundary | Same, to the left |
| To Next Region Sync | Moves the currently selected to the next region sync point (by default: beginning or end of the region) |
| To Previous Region Sync | Same, to the left |
| Markers | |
| Add Mark from Playhead | Creates a Marker at the position of the playhead |
| Remove Mark at Playhead | Removes any marker at the position of the playhead |
| Toggle Mark at Playhead | Combine the 2 previous: if a marker exists, deletes it, otherwise create it |
| Locate to Mark n | If it exists, goes to the n-th marker |
| Set Session Start from Playhead | Puts the Start of the session marker at the playhead’s position |
| Set Session End from Playhead | Puts the End of the session marker at the playhead’s position |
| [] Time Master | Sets Ardour as the Time master, i.e. Ardour sends the time information to the audio system |
| [] Punch In/Out | Based on the Punch in and Punch out markers if they exist, tells Ardour to record only between those two points |
| [] Punch In | Based on the Punch in marker, only allow to record from this point on |
| [] Punch Out | Based on the Punch out marker, forbids recording before this point |
| [] Audio Input | If checked, automatically switch the monitor from input to playbackmode when playing |
| [] Follow Edits | If checked, selecting a region moves the playhead to its beginning |
| [] Auto Play | If checked, moving the playhead in the ruler starts the playback |
| [] Auto Return | If checked, when the playback is stopped, go back to the previous position of the playhead. If not, the playhead stays where it is when the playback is stopped |
| [] Click | Activates/deactivates the click track (metronome) |
| [] Follow Playhead | If checked, while playing, when the playhead reaches the right of the screen, Ardour scrolls one screen to the right to keep the playhead visible at all times |
| [] Stationary Playhead | If checked and if Follow playhead is checked, on playback, the playhead stays at the center of the screen, and the session scrolls |
| Panic | Immediately stops all MIDI playback (useful e.g. when a MIDI bug in encountered) |
The Edit menu groups together the actions related to the edition, and so will be mostly used while in Editor mode.
| Undo (action) | Reverts the last editing operation, namely action |
| Redo | Does the last editing operation again, after an Undo |
| Undo Selection Change | Reverts the last selection operation |
| Redo Selection Change | Does the last selection operation again after an Undo Selection Change |
| Cut | Deletes the current selection, but puts it in memory ready to be pasted |
| Copy | Copies the current selection to memory |
| Paste | Pastes the memory at the edit point, after a Cut or Copy operation |
| Select | |
| Select All Objects | Selects all the regions and automation points in the session |
| Select All Tracks | Selects all the tracks, busses and control masters in the session |
| Deselect All | Deselects all objects or tracks, nothing is selected |
| Invert Selection | Select the previously unselected regions, and deselect the previously selected ones |
| Set Range to Loop Range | Creates a range selection on the selected tracks, based on the selected loop markers, and switches to Range Mode tool |
| Set Range to Punch Range | Same as above, based on the selected punch markers |
| Set Range to Selected Regions | Same as above, based on the selected regions (i.e. from the start of the earliest region to the end of the latest one) |
| Select All After Edit Point | Select all the regions and automation points that exist after the Edit Point, even if the region starts before it. If some tracks are selected, only selects on these tracks. |
| Select All Before Edit Point | Same as above, but before the Edit point (i.e. to the left of it) |
| Select All Overlapping Edit Range | Select all the regions and automation points of which at least a part is in the current selection range |
| Select All Inside Edit Range | Selects all the regions that are completely inside the selection range, i.e. their start and end are inside the range. If some tracks are selected, only selects on these tracks. |
| Select All in Punch Range | Selects all the regions of which a part in in the punch range. If some tracks are selected, only selects on these tracks. |
| Select All in Loop Range | Same as above, based on the loop range |
| Move Range Start to Previous Region Boundary | Extends the left boundary of the range to the left to the next region start or end. The region must be in the range. |
| Move Range Start to Next Region Boundary | Same as above, to the right (reduces the selection) |
| Move Range End to Previous Region Boundary | Same as above, with the right edge of the range, to the left (reduces the selection) |
| Move Range End to Next Region Boundary | Same as above, with the right edge, to the right (extends the selection) |
| Start Range | Sets the left edge of the range to the Edit point |
| Finish Range | Sets the right edge of the range to the Edit point |
| Select Next Track or Bus | Select the track or bus under the currently selected one. If multiple tracks are selected, only the first one is considered |
| Select Previous Track or Bus | Same as above, with the track/bus above the first one selected. |
| Delete | Deletes all that is currently selected |
| Crop | Cuts the parts of the regions that are outside the range boundaries. Only applies on the regions that belong at least in part to the range. |
| Split/Separate | Cuts the selected regions at the Edit point, separating them in two regions |
| Separate | |
| Separate Under | Removes all the parts of the regions that are under the selected one. Once done, the selected region is alone on its part of the track. |
| Separate Using Loop Range | Cuts the selected regions or the regions on the selected tracks along the Loop range’s start and end markers. If nothing is selected, acts on all tracks at once. |
| Separate Using Punch Range | Same as above, with the Punch range markers |
| Align | |
| Align Start | Moves the selected regions to align the beginning of the regions to the Edit point |
| Align Start Relative | When multiple regions are selected, moves all the regions together as a block to align the beginning of the earliest one to the Edit point. |
| Align End | Moves the selected regions to align the end of the regions to the Edit point |
| Align End Relative | When multiple regions are selected, moves all the regions together as a block to align the end of the latest one to the Edit point. |
| Align Sync | Moves the selected regions to align the Sync point of the regions to the Edit point |
| Align Sync Relative | When multiple regions are selected, moves all the regions together as a block to align the earliest Sync point to the Edit point. |
| Fade | |
| Fade Range Selection | For all the regions that either begin or end in the range, create a fade in or out on the regions length. |
| Set Fade In Length | If the edit point is withing the region boundaries, adjusts selected audio regions’ fade in to end at the edit point. |
| [] Fade In | Toggles the fade in on the selected region on or off |
| Set Fade Out Length | Same as above, for the fade out |
| [] Fade Out | Toggles the fade out on the selected region on or off |
| Remove Last Capture | Destroy the last recording. A prompt reminds the user this cannot be undone. |
| Edit point | |
| Change Edit Point | Toggles between the mouse and the playhead as the Edit point |
| Change Edit Point Including Marker | Toggles between the mouse, the playhead and marker as the Edit point |
| Snap Mode | |
| () No Grid | Disables snapping, i.e. allows free movement of regions and boundaries |
| () Grid | Forces snapping, so any move of region boundary will be lined to the grid as chosen |
| () Magnetic | If the movement of the region or boundary happens near a grid line, snaps, otherwise, allow free movement |
| Next Snap Mode | Toggles between the No Grid, Grid and Magnetic snap modes |
| Next Snap Choice | Circles through the snap choices, as detailed below |
| Previous Snap Choice | Circles through the snap choices, as detailed below, in reverse order |
| Next Musical Snap Choice | Circles through the musical snap choices, e.g. those expressed in bars and beats |
| Previous Musical Snap Choice | Same as previous, but in reverse order |
| Snap To | |
| Snap to CD Frame | The grid unit will be 1/75th of a second |
| Snap to Timecode Frame/Second/Minute | The grid unit will be based on the timecode settings for the session |
| Snap to Second/Minute | The grid unit will be based on absolute times |
| Snap to nth | The grid unit will be 1/n beats and will depend on the tempo and meter in effect at that point in the timeline. |
| Snap to Beat | Same as above, whole beat |
| Snap to Bar | Same as above, whole bar |
| Snap to Mark | The grid will be made of markers |
| Snap to Region Start | No grid, the regions will snap to the closest region start on any track |
| Snap to Region End | Same as above with the regions’ ends |
| Snap to Regions Sync | Same as above, with the Sync points (by default, start of the region) |
| Snap to Region Boundaries | Same as above, for both the starts and ends of regions |
| Tempo | |
| Set Tempo from Region = Bar | Computes the tempo so that the duration of the first selected region is 1 bar. Ardour prompts if the user wants it to be the global tempo, or a tempo marker at the beginning of the region used |
| Set Tempo from Edit Range = Bar | Same thing, with the current Range instead of a region |
| [] Smart Object Mode | Toggles the Smart Mode, allowing the mouse to be in Range Mode in the upper half of a region, and in Grab Mode in the lower half |
| Scripted Actions | |
| [] Script Manager | Shows the Script manager, allowing to use and manage the Lua scripts in the session |
| Unset #n | Deactivate the nth script |
| Preferences | Displays the Preferences panels, allowing to change Ardour’s behaviour |
The Region Menu is where the user can tweak its regions, the parts of audio or MIDI that sit on the timeline.
| Insert Region from Region List | If a region is selected in the Editor List, add it at the Edit point |
| Play | Starts playback at the beginning of the selected region(s), and stops at its(their) end |
| Loop | Creates a loop range on the selected region’s boundaries, and starts the looped playback |
| Rename… | Changes the name of the region, that appears in its top left area |
| Properties… | Shows the Region properties window, that displays detailed information about the region and allow for some modifications |
| Loudness Analysis… | Shows the Audio Report/Analysis window, that displays detailed `dBFS information <#metering-in-ardour> `__ as well as a spectrogram (dBFS of frequency against time) |
| Spectral Analysis… | Shows the Audio Report/Analysis window, that displays a integrated spectral view of the region (dBFS against frequency) |
| Edit | |
| Combine | Creates a new region by joining the selected audio regions in the same track, and replaces those region with the newly created compound. The same rules are applied to create the compound as for playback regarding e.g. layering |
| Uncombine | Splits back the compound created by combining into its original audio regions |
| Pitch Shift… | Changes the tune of the audio region, by octave, semitones or percentage, based on spectral analysis. Optionally, and if they have been set for the region, preserves the formants |
| Split/Separate | Cuts the selected regions at the Edit point, separating them in two regions |
| Split at Percussion Onset | Allows splitting the selected regions on its Percussion Onsets marker as set by the Rhythm Ferret (Not usable as of 5.5) |
| Make Mono Regions | Creates mono regions out of a stereo or multichannel region by splitting it into its discrete channels. The created regions are added to the Editor List |
| Close Gaps | Extends (or reduces) the selected regions to be perfectly aligned. Optionally, sets up a crossfade duration, or a pull-back (spacing between regions) |
| Place Transient | Places a transient at the Edit Point. Used e.g. for the Pitch Shift… action |
| Rhythm Ferret… | Opens the Rhythm Ferret which is a powerful tool to sequence audio files |
| Strip Silence… | Opens the Strip Silence window which is a very handy tool to remove all audio under a user-chosen threshold (with a preview) |
| Reverse | Mirrors the audio horizontally |
| Layering | |
| Raise to Top | On overlapping regions, puts the selected one(s) on top |
| Raise | On overlapping region, makes the selected one(s) one layer higher |
| Lower | Makes the selected region(s) one layer lower |
| Lower to Bottom | Sends the selected region to the background |
| MIDI | |
| Transpose… | On a MIDI region, shows the Transpose MIDI window, allowing to shift the pitch of the whole MIDI region by ± n semitones or octaves |
| Insert Patch Change… | Inserts a patch change at the Edit Point, allowing a change of patch, channel, program and/or bank |
| Quantize… | Shows the Quantize window, allowing to perfectly align the MIDI notes to the musical grid |
| Legatize | Shortens or elongates the MIDI notes to make them perfectly sequential, i.e. the end of a note is the start of the following one |
| Remove Overlap | Shortens or elongates the MIDI notes to make them perfectly sequential, i.e. the end of a note is the start of the following one |
| Transform… | Transform window, that allows for mathematical operations on the midi notes |
| Unlink from Other copies | Makes the selected MIDI region independent, e.g. editing this region won’t affect any other one. |
| List Editor… | Shows the List Editor which sequentially lists all the MIDI events in the region, and allows for precise modifications |
| Gain | |
| [] Opaque | When checked, makes the region opaque audio-wise, i.e., the underlying regions won’t be audible |
| [] Mute | When checked, mutes only the selected region on the track, without muting the track. The muted regions will have !! prepended to their name and will be semi-transparent |
| Normalize… | Shows the Normalize region dialog, which allows to scale the region level by setting its maximum level, optionally constraining the RMS |
| Boost Gain | Increases the gain on the selected region by boosting the audio, without touching the envelope or automation |
| Cut Gain | Reduces the gain without touching the envelope or automation |
| Reset Envelope | If the gain envelope has been edited, resets it to its initial value (constant at 0 dB) |
| [] Envelope Active | When unchecked, disables any envelope editing that has been made. The envelope will be displayed in yellow instead of green. |
| Position | |
| Move to Original Position | Moves the region where it was initially recorded or inserted in the session |
| Snap Position to Grid | If the Grid Mode is set to Grid, snaps the region to the nearest grid line |
| [] Lock | Locks the selected regions at their current positions in time and tracks, avoiding any movement on the timeline. The region name will be surrounded by > and < brackets |
| [] Glue to Bars and Beats | Locks the region position to relative to the musical grid, i.e. a change of tempo will move the region to keep it on the same bar/beat |
| [] Lock to Video | Same as above, relative to the position in the video |
| Set Sync Position | Creates or move the Sync position, i.e. the point of the region that will be aligned or snapped to the grid, and that is (by default) the beginning of the region. |
| Remove Sync | Removes any user defined Sync point, and resets the sync position to the beginning of the region |
| Nudge Later | Moves the region to the right by the amount shown in the nudge timer |
| Nudge Earlier | Same as above, to the left |
| Nudge Later by Capture Offset | Moves the region to the right by the capture latency computed by Ardour based on the user’s settings regarding latency |
| Nudge Earlier by Capture Offset | Same as above, to the left |
| Sequence Regions | Puts the selected regions one after the other, so that the end of one region is the beginning of the next one, removing any overlap or silence. The reference point is the earliest region. |
| Trim | |
| Trim Start at Edit Point | If the Edit Point is within the region boundaries, shortens the region to align its start with the Edit Point |
| Trim End at Edit Point | Same as above, for the end of the region |
| Trim to Loop | Uses both the start and end Loop markers to shorten the region |
| Trim to Punch | Same as above with the Punch markers |
| Trim to Previous | On overlapping regions, shortens the selected one so that the previous region is complete, i.e. the new start point for the selected region is the end point of the previous region on the timeline |
| Trim to Next | Same as above, with the end of the selected region aligned to the start of the following one. |
| Ranges | |
| Set Loop Range | Creates a Loop range based on the selected regions, i.e. the start of the loop range is the start of the earliest region, and the end of the loop is the end of the latest region. |
| Set Punch | Same as above, for the Punch range |
| Add Single Range Marker | Same as above, for the Edit range |
| Add Range Marker Per Region | For each selected region, creates its own Edit range based on the boundaries of each region |
| Set Range Selection | Creates a range selection based on the boundaries of the selected regions |
| Fades | |
| [] Fade In | Activates/deactivates the Fade In at the start of the region |
| [] Fade Out | Same as above, for the Fade out at the end of the region |
| [] Fades | Shortcut to activate/deactivate both the fade in and fade out |
| Duplicate | |
| Duplicate | Creates a copy of the selected region(s) and appends it to the original |
| Multi-Duplicate… | Shows the Duplicate dialog, allowing to create multiple copies, or a not-integer number of copies (the last one will then be truncated) |
| Fill Track | Creates duplicates until it fills the session, i.e. reaches the End marker of the session. The last duplicate may be truncated to fit in |
| Export… | Shows the Export dialog, with all parameters set to export only the selected region(s) |
| Bounce (without processing) | Creates a bounce, i.e. a version of the region with all the edits (boundaries, envelope), as a new region in the Editor List, without any of the effects of the mixer strip |
| Bounce (with processing) | Same as above, with the effects of the mixer strip |
| Remove | Deletes the region from the edit (no file is harmed in the process, and the region stays in the Editor for later use) |
The Track menu is where one can deal with the tracks, busses and control masters.
| Add Track, Bus or VCA… | Shows the Add Track, Bus or VCA… window, where one can add one or more tracks, busses or control masters to the session and define its parameters |
| Duplicate Tracks/Busses… | Shows the Duplicate Tracks and Busses window, allowing to duplicate the selected track(s) and optionally, its playlist |
| Toggle Record Enable | Sets the Record Enable mode On on the selected track(s). These tracks will record audio/midi next time the global record is active and playback is started. |
| Toggle Solo | Sets the solo On on the selected tracks, so only these tracks will play |
| Toggle Mute | Mutes the selected tracks, they won’t play until unmuted |
| Insert Time | Shows the Insert Time window, allowing to insert a blank time in the selected tracks’ playlist |
| Remove Time | Same as above, but to remove time |
| Move Selected Tracks Up | Changes the position of the selected tracks one track up towards the top. In the mixer, the tracks will be moved to the left. |
| Move Selected Tracks Down | Same as above, towards the bottom |
| Height | |
| Fit Selection (Vertical) | Will fit the selected track(s) in the window. If too many tracks are selected, they’ll be reduced to their minimum height. |
| Largest | Sets the selected tracks height to a very high value, hence making the tracks wide on screen |
| Larger | Same as above, but a little less high |
| Large | Same as above, but again less high |
| Normal | Sets the height of the track to its default value which is a trade-off between readability and number of tracks displayed |
| Small | Reduces the size of the tracks to a low value, increasing the number of on screen tracks |
| Toggle Active | Toggles the active state of a track. An inactive track will be grayed and won’t play any sound. That can be seen in the A column of the `Tracks and Busses List <#the-tracks-and-busses-list >`__ |
| Remove | Deletes this track and its playlist (no file is harmed in the process, and the regions from the playlist stay in the Editor for later use) |
The View menu sets how the session is seen, and what’s visible or not.
| [] Maximise Editor Space | Puts the Editor window in full screen mode |
| [] Maximize Mixer Space | Puts the Mixer window in full screen mode |
| Primary Clock | |
| Focus On Clock | Sets the focus on the main clock, allowing to type in numbers directly to change the playhead position |
| Timecode | Sets the main clock in timecode mode, so it displays time in the Hours:Minutes:Seconds:Frames format |
| Bars & Beats | Sets the main clock in musical time mode, so it displays time in the Bars:Beats:Ticks format |
| Minutes & Seconds | Sets the main clock in absolute time mode, so it displays time in the Hours:Minutes:Seconds.Millisecond s format |
| Samples | Sets the main clock in samples time mode, so the time is displayed in samples from the absolute start |
| Secondary Clock | |
| Timecode | Same as for the main clock (see above) |
| Bars & Beats | Same as for the main clock |
| Minutes & Seconds | Same as for the main clock |
| Samples | Same as for the main clock |
| Zoom | |
| Zoom In | Zooms in, focusing the Zoom Focus (see below) |
| Zoom Out | Zooms out |
| Zoom to Session | Adjust the zoom value so that all the session (as defined by its start and end markers) fit in the window |
| Zoom to Selection | Adjust the zoom value so that all the selected regions fit in the window |
| Fit Selection (Vertical) | Fits the selected track(s) in the window. If too many tracks are selected, they’ll be reduced to their minimum height. |
| Toggle Zoom State | Reverts to last zoom state (kind of “undo” for zoom, even if edits have been made in-between) |
| Expand Track Height | Increases the height of the selected tracks. If no track is selected, then all the tracks are expanded |
| Shrink Track Height | Same as above, but reduces the height of the tracks |
| Zoom Focus | |
| Zoom Focus Left | Sets the screen’s left side as the zoom target, i.e. when zooming in, the left side of the screen will stay at the same place in the timeline |
| Zoom Focus Right | Same, with the right of the screen |
| Zoom Focus Center | Same, with the center of the screen |
| Zoom Focus Playhead | Sets the playhead as the focus point of the zoom, i.e. the point in time that will stay fixed |
| Zoom Focus Mouse | Same as above, with the mouse pointer |
| Zoom Focus Edit Point | Same as above, with the Edit Point |
| Next Zoom Focus | Circles between the previous modes |
| Rulers | |
| [] Min:Sec | Shows (when checked) or hides a line in the Ruler with the time formatted as Hours:Minutes:Seconds.Millisecond s |
| [] Timecode | Same as above, with the time formatted as Hours:Minutes:Seconds:Frames |
| [] Samples | Same as the above, with the time displayed in samples from the absolute start |
| [] Bars & Beats | Same as the above, with the time formatted as Bars:Beats:Ticks |
| [] Meter | Shows / hides the Meter line in the ruler, where the signature can be adjusted along the playline |
| [] Tempo | Shows / hides the Tempo line, where the BPM can be changed with markers |
| [] Ranges | Shows / hides the Range line, where ranges can be defined |
| [] Loop/Punch | Shows / hides the Loop/Punch line, where loops and Punches can be defined |
| [] CD Markers | Shows / hides the Range line, where CD Markers can be defined |
| [] Markers | Shows / hides the Markers line, where custom markers can be defined |
| [] Video | Shows / hides the Video timeline, where frames of the video are shown for syncing purposes |
| Video Monitor | |
| Original Size | When the Video Monitor is active, resets its size to the original size, i.e. 1 pixel in the video is 1 pixel on screen |
| [] Letterbox | When checked, forces the ratio (width/height) to be the one of the original video. If unchecked, the video will be stretched to fit the window |
| [] Always on Top | Stays above all other windows, enabling to work in Ardour without the video windows to be hidden in the background |
| [] Fullscreen | Sets the Xjadeo window to be fullscreen. Can be useful in a dual monitor setup |
| [] Timecode | When checked, displays a Timecode over the video, in the Hours:Minutes:Seconds:Frames format |
| [] Frame number | When checked, shows the absolute frame number inside the video, i.e. this image is the nth of the video |
| [] Timecode Background | Adds a black background to the timecode for readability |
| Scroll | |
| Scroll Tracks Down | Scrolls the view toward the bottom of the session from one screen (vertically, so along tracks) |
| Scroll Tracks Up | Same as above, towards the top |
| Scroll Forward | Scrolls the view toward the right of the session from one screen (horizontally, so along time) |
| Scroll Backward | Same as above, to the left |
| Views | |
| Save View n | Saves the position on the timeline in the memory, horizontally and vertically (along time and tracks) |
| Go to View n | Loads and displays a saved position (see above) |
| [] Show Editor Mixer | When checked, the selected tracks’ mixer strip is displayed on the left of the editor window, allowing for a quick access to e.g. effects and routing |
| [] Show Editor List | In the Editor window, shows the Editor List, giving access to a number of handy lists (regions, tracks, …) |
| [] Toggle Mixer List | In the Mixer view, shows the Mixer list, giving access to some handy lists (`Favorite plugins <#favorite-plugins-window >`__, The Strip list,…) |
| [] Toggle Monitor Section Visibility | If the Use monitoring section on this session has been checked in the Session Properties window, shows or hides the Monitor Section in the Mixer |
| [] Show Measure Lines | If checked, in the Editor, shows a vertical white line at each measure start |
| [] Show Summary | If checked, in the Editor, shows the Summary, allowing a faster navigation in the session |
| [] Show Group Tabs | If checked, makes the groups visible as tabs on the left in the Editor, and on the top in the mixer |
| [] Show Marker Lines | If checked, each marker is extended across all the tracks in the editor with a line of the same color |
The Window menu deals with the layout of the different windows, and their visibility.
| [] Audio/MIDI Setup | Shows the Audio/MIDI Setup window <#newopen-session-dialog> __, where the sound system configuration can be modified |
| Editor | |
| Show | Switches to the Editor view |
| Hide | Hides the Editor, hence showing the Mixer when the windows are attached |
| Attach | If the Editor window is detached, separated from the main window, attach it back |
| Detach | If the Editor is attached to the main window, detach it (makes the Editor a separated window, useful for multi-monitor setup) |
| Mixer | |
| Show/Hide/Attach/Detach | Same as for the Editor, for the Mixer window |
| Preferences | |
| Show/Hide/Attach/Detach | Same as for the Editor, for the Preferences window |
| Meterbridge | Shows the Meterbridge window, that displays all the tracks’ meter at once and their recording status, and is very handy for multitrack recording |
| Scripting | Opens the Lua Scripting window, allowing to edit and run Lua scripts |
| [] Tracks and Busses | Opens the Tracks and Busses window, which is a shortcut to many tracks/busses operations (routing, effects, …) |
| [] Locations | Opens the Ranges and Marks window, a single point of control for all range and location markers |
| [] Binding Editor | Opens the Key Bindings window, which allows for easy creation or modification of any keyboard shortcut |
| [] Bundle Manager | Opens the Bundle Manager window, allowing to create and manage Bundles, which are a way to simplify connection management, by defining groups of ports |
| [] Big Clock | Opens the Main Clock as its own separate (and huge) window, which is helpful when recording |
| [] Video Monitor | If a video has been imported in the session, opens a video window (namely, Xjadeo), synced to the timeline |
| Midi Tracer | Opens the MIDI Tracer window, allowing to follow each and every MIDI message entering or leaving Ardour |
| [] Audio Connections | Opens the Audio Connection Manager window, a way to make connections to, from and within Ardour’s mixer |
| [] MIDI Connections | Same as above, for the MIDI connections |
| [] Log | Shows the Log window, where Ardour lists useful information, warnings and errors |
The Help Menu gives access to useful information about Ardour.
| [] About | Shows the About Ardour window, which contains information about the version, config, authors,and license of Ardour |
| Chat | This is a shortcut to the webchat version of the Freenode IRC channel of Ardour, where the developers meet, and questions can be asked if the Manual is not enough |
| Manual | Link to a FLOSSManual guide to Ardour |
| Reference | Link to this manual, hosted on ardour.org |
| User Forums | Link to ardour.org’s user forum |
| How to Report a Bug | Link to an helping page about reporting bugs |
| Report a Bug | Link to Ardour’s Mantis bugtracker |
| Ardour Website | Link to Ardour’s main and official website |
| Ardour Development | Link to the developers’ part of the official website |
13 - Status Bar

The Status Bar
The status bar is an informative bar at the top of the window, showing:
| File: | the file format used in the session, including when recording |
| TC: | is the timecode, i.e. the number of frames per second used by the session (for videos) |
| Audio: | gives the sample rate used in the session, and the latency computed from the buffer size |
| Buffers: | describe how much data is buffered, see below |
| DSP: | for Digital Sound Processing, shows how much of the CPU is used by Ardour and its plugins |
| PkBld: | (only shows up while creating peaks) displays the number of peak files left to create |
| X: | shows the number of xruns since Ardour’s launch, see below |
| Disk: | reports the remaining hard disk space as the time that can be recorded with the current session setting |
| Wall Clock | showing the system time (especially useful in full screen mode) |
| Log button | that indicates if Ardour has encountered any warning or error. |
Right clicking anywhere on the Status Bar allows to choose which of this information we want displayed, through a checkbox menu.
The buffers are labelled as p for playback and c for capture. If the system is fast enough, these buffers should be 100% full at all times, showing the system has time to precompute all the data before delivering it to the audio system. A buffer constantly under 20% is a sign of an underpowered computer system or of too much processing.
An Xrun (short for buffer over- or under-run) happens when the system has been forced to skip audio frames, e.g. if the latency asked is too short for the computing power of the machine. It usually results in clicks, pops and crackles if it happens while recording.
The log button turns yellow when a warning is shown, and red when an error occurs. Clicking the log button gives access to the log.
14 - Transport Bar
The transport controls
The Transport Bar groups all the actions regarding the control of playback and recording.
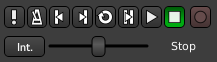
The transport controls
This bar is made of (from left to right):
| Midi Panic | Immediately stops all midi output. |
| Enable/disable Audio Click | Toggles (on/off) a click track (metronome) along the tempo. Right clicking brings up the Click submenu from the Preferences. Scrolling with the mouse wheel adjusts the gain of the click. |
| Go to Start of the Session | Jumps back at the beginning of the session, as defined by the start marker . |
| Go to End of the Session | Jumps forward to the end of the session, as defined by the end marker . |
| Play Loop Range | Repeats the defined loop as defined by the Loop range, until the “Stop playback” button is pressed. Clicking the “Play loop Range” button while already active switches to normal Play mode, which exits the loop without stopping and restarting playback. |
| Play Range/Selection | If a range has been defined using the Range Mode button, plays the range, of if an audio or MIDI region is selected, plays this region. In both cases, the playback stops at the end of the range or selected region. |
| Play from playhead | Starts the playback and optionally record (more below). |
| Stop | Whatever the playing mode (loop, range, …) stops all playback. Depending on other settings, some effects (like chorus or reverb) might still be audible for a while. |
| Toggle Record | Global switch button to activate/deactivate recording. While active, the button blinks red. The button doesn’t start recording by itself: if one or more tracks are marked as record-enabled, pressing the “Play from Playhead” starts recording on those tracks. |
All these actions are bound to keyboard shortcuts, which allows for speedier use and more focused work.
If Ardour is synchronized with other devices then some or all of these control methods may be unavailable—depending on the synchronization protocol, Ardour may respond only to commands sent from its master device(s).
Under these buttons is the Shuttle Speed Control that allows to scrub through the audio quickly. The slider decides the playback speed: the further from the center it is set, the faster the playback will scrub in both directions.
The Shuttle Speed Control supports 2 operating modes, that can be chosen with right click > Mode:
- Sprung mode that allows for a temporary scrub: it only scrubs while the mouse is left clicked on the control.
- Wheel mode that allows to set a playback speed until the “Stop” button is pressed, which stops the playback and resets its speed.
On the left of the slider is the positional sync button (which might show Internal, or MTC or several other values), than can be used to control whether or not the transport position and start is controlled by Ardour, or by an external positional synchronization source, such as MIDI Time Code (MTC), Linear Time Code (LTC) or JACK (see Timecode Generators and Slaves).
The current playback status (Stop, Play, or speed %) is shown on the right of the speed slider.
Using Key Bindings
Ardour has many available commands for playback control that can be bound to keys. Many of them have default bindings, some do not, so the list below shows both the default bindings and internal command names for some of them.
| Space | Switch between playback and stop. |
| Home | Move playhead to session start marker |
| End | Move playhead to session end marker |
| → | Playhead to next region boundary |
| ← | Playhead to previous region boundary |
| 0 | Move playhead to start of the timeline |
Go to the Transport and Transport > Playhead to find more.
15 - Transport Clocks

The transport clocks in Ardour
Clocks in Ardour are used to display time values precisely. In many cases, they are also one way to edit (change) time values, and in a few cases, the only way. All clocks share the same basic appearance and functionality, which is described below, but a few clocks serve particularly important roles.
In the transport bar of the editor window there are two clocks (on a large enough screen), that display the current position of the playhead and additional information related to transport control and the timeline. These are called the transport clocks; the left one is the primary transport clock and the right one is the secondary transport clock.
All the clocks in Ardour share the same powerful way of editing time. Refer to Editing Clocks to learn how.
Editing the time in the transport clocks will reposition the playhead in the same way that various other editing operations will.
The Special Role of the Secondary Transport Clock
On a few occasions Ardour needs to display time values to the user, but there is no obvious way to specify what units to use. The most common case is the big cursor that appears when dragging regions. For this and other similar cases, Ardour will display time using the same units as the secondary clock.
Why are there two transport clocks?
Having two transport clocks allows seeing the playhead position in two different time units without having to change any settings. For example, one can see the playhead position in both timecode units and BBT time.
Special Modes for the Transport Clocks
In addition to the time-unit modes, each of the two transport clocks (again, on a sufficiently large screen) can be independently set to display Delta to Edit Point in whatever time units its current mode indicates. This setting means that the clock shows the distance between the playhead and the current edit point, and it may show a positive or negative value depending on the temporal order of these two points. The clocks will use a different color when in this mode to avoid confusion.
To switch either (or both!) of the transport clocks into this mode, use Edit > Preferences > Transport and select the relevant checkboxes.
Note that when in Delta to Edit Point mode, the transport clocks cannot be edited.
The Big Clock
To show the current playhead position in a big, resizable window, activate Window > Big Clock. The big clock is very useful when working away from the screen but still wanting to see the playhead position clearly (such as when working with a remote control device across a room). The big clock will change its visual appearance to indicate when active recording is taking place. Below on the left is a screenshot showing a fairly large big clock window filling a good part of the display, and on the right, the same clock during active recording.
16 - Selection and Punch Clocks
The Selection Clocks
The range clocks
The current selection range, as set with the Range Mode tool, is displayed in these three clocks: start of the range, end of the range, and length.
Clicking on the range clocks will locate to either the beginning or end of the punch range.
Right clicking on any of the clocks brings up a context menu allowing to change the type of time display between the 4 clock modes, and to copy the selected clock’s time to the clipboard.
The Punch Controls & clocks
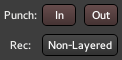
The Punch Controls, and the related Punch clocks
The punch controls available in the main toolbar, work in conjunction with the punch clocks, only visible while in Editor Mode.
The In and Out buttons relate to the Punch range, and allow to use only one of the two punch boundaries, or both:
| In only | Records from the In marker on, without a end boundary |
| Out only | Records until the Out marker, without a beginning boundary |
| In and Out | Records only between the In and Out markers |
The punch clocks can be controlled the same way as the range clocks (moving the playhead, and changing the display mode).
Recording mode
The Rec button affects how the tracks behave when recording:
| Non-Layered OFF (default) | Tracks in normal mode will record non-destructively — new data is written to new files, and when overdubbing, new regions will be layered on top of existing ones. This is the recommended mode for most workflows. |
| Non-Layered ON | Tracks using non-layered mode will record non-destructively — new data is written to new files, but when overdubbing, the existing regions are trimmed so that there are no overlaps. This does not affect the previously recorded audio data, and trimmed regions can be expanded again at will. Non-layered mode can be very useful for spoken word material, especially in combination with push/pull trimming. |
See Track Modes for more information.
17 - Mini-Timeline
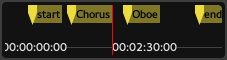
The Mini-Timeline.
The mini-timeline allows, as the Summary does, navigation of a session. Its main advantage, though, is that it stays visible even when in Mixer mode.
The range of time covered by the mini-timeline is set by right clicking the timeline, and choosing a time span from 30 seconds up to 20 minutes.
The mini-timeline also shows all markers (start, end and any user defined ones). Clicking a marker jumps to that point on the timeline, allowing for quick access to key timings in the session.
While hovering with the mouse over the mini-timeline:
- left clicking moves the playhead to the time under the mouse cursor
- using the scroll wheel scrolls the playhead back and forth inside the session
- using scroll wheel scrolls more finely inside the session
- using scroll wheel scrolls even more finely inside the session
18 - Other Toolbar Items
The Monitor Options
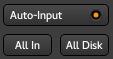
The Monitor options
These buttons allow switching the monitoring mode globally, for all the tracks at once. The monitoring mode allows to decide what the user wants to be listening to, between:
- All In: all the tracks play what’s on their Inputs.
- All Disk: all the tracks play the actual content of the playlist on Disk.
The Auto Input switch allows Ardour to auto-select what is played, which is:
- When not playing: all tracks are on In (to listen to any connected source)
- When playing, all tracks are on Disk (to play whatever was recorded on those tracks)
- When recording, on rec-enabled tracks: In and on non rec-enabled ones: Disk
The Playhead Options
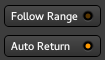
The playhead options
Those 2 buttons control the behaviour of the playhead:
- Follow Range is a toggle that can be used to control whether or not making a range selection will move the playhead to the start of the range.
- Auto Return is a toggle switch too. When active, pressing the Stop button returns the playhead to its previous position, and when inactive, pressing Stop keeps the playhead at its current location. Activating Auto Return can be useful for hearing the same piece of audio before and after tweaking it, without having to set a loop range on it.
The Status indicators

The Status buttons
The Status buttons show the current session state:
| Solo | Blinks when one or more tracks are being soloed, see Muting and Soloing. Clicking this button disables any active explicit and implicit solo on all tracks and busses. Clicking this button deactivates the solo on every track/bus. |
| Audition | Blinks when some audio is auditioned, e.g. by using the import dialog, or using the Audition context menu in the Regions List. Clicking this button stops the auditioning. |
| Feedback | Blinks when Ardour detects a feedback loop, which happens when the output of an audio signal chain is plugged back to its input. This is probably not wanted and can be dangerous for the hardware and the listener. |
The Mode Selector
The Mode Selector
The Mode Selector allows switching between the Editor and Mixer windows. If a window is detached, the corresponding button is lit in blue. Clicking the button switches the detached window visibility.
The global meter shows the levels of the master’s output. Its the same meter that sits in the Master’s Mixer strip, and also shows a peak indicator, that turns red when any level exceeds 0dB. It can be reset by a Left click.
The buttons in between the Mode Selector and the global meter are script buttons, which are user-definable buttons to attach any session lua-script to.
19 - Toolbox

Editor toolbar’s tools, aka toolbox
Global Edit mode
Ardour has a global edit mode selector at the left of the Editing toolbar, which affect how regions are moved or copied:
| Slide | Regions move freely. Ardour creates overlaps when necessary. |
| Ripple | Editing affects the regions to the “right” of the edit (see below). |
| Lock | No region motion is permitted (except for “nudge”). |
Ripple Edit mode provides the following conveniences:
- Deleting a range will move later regions to compensate for the deleted time
- Deleting a region will move later regions to compensate for the deleted region’s length
- Moving a region will move later regions to compensate for the length of the move
- Inserting a new region (via dragging or via Paste) will move later regions to the right to compensate
If Snap To Grid is enabled, then regions can only move so that they align with locations determined by the current snap settings (beats, or seconds, or other region boundaries, etc). See Snap To the Grid for details.
The Smart switch
The Smart Mode button to the left of the mouse mode buttons modifies the Grab Mode. When enabled, the mouse behaves as if it is in “Range Mode” in the upper half of a region, and in “Grab Mode” in the lower half. This allows avoiding constant switching between these two modes.
Mouse Modes
| Grab Mode | The Grab Mode is used for selecting, moving, deleting and copying objects. When in object mode, the mouse pointer appears as a hand whenever it is over the track canvas or the rulers. The mouse can now be used to select and perform operations on objects such as regions, markers etc. This is the most common mode to work in, as it allows you to select and move regions, as well as modify automation points on the automation tracks. |
| Range Mode | When in Range Mode, the mouse pointer appears as a vertical line whenever it is over the track canvas or the rulers. The mouse will now be able to select a point or range of time. Time ranges can be selected over one or several tracks, depending on the selection of your tracks. If none of your tracks are selected, the Range Tool will operate on all the session track visualized in the Editor. If you want to edit only particular tracks, select them before you apply the range tool. |
| Cut Tool Mode | When in Cut Tool Mode, the mouse pointer appears as a pair of scissors whenever it is over the track canvas or the rulers. This tools allows to cut any region into 2 regions at the mouse cursor, regardless of the Edit Point. If one or more track(s) is selected, then all the regions on these tracks will be split at the mouse cursor position. If no track is selected, then only the region hovered by the mouse cursor will be split. |
| Stretch Mode | When in time fx mode, the mouse pointer appears as a distinctive expanding square symbol whenever it is over the track canvas or the rulers. This mode is used to resize regions using a timestretch algorithm. Click on an edge of a region of audio and drag it one way or the other to stretch or shrink the region. |
| Audition Tool | Clicking a region using the audition tool will play this region to the control room outputs. You can also scrub with this tool by clicking and dragging in the direction you wish to listen. The amount you drag in one direction or the other will determine the playback speed. |
| Draw Tool | When in Draw Tool mode, the mouse pointer will change to a pencil. You can then click within an audio region to change the gain envelope for that region. This curve is separate from fader automation for individual tracks. It will remain locked to the region’s time, so if the region is moved, the region gain envelope is moved along with it. The draw tool works on automation too, allowing the creation and modification of control points on the automation curves. Last, it is used on a MIDI region to edit the notes. |
| Internal/Region Edit Mode | When in Internal Edit mode, the mouse pointer will change to cross-hairs. This tool acts on region gain and automation as the Draw tool. On a MIDI region, it allows to lasso-select multiple notes at a time. |
20 - Controls
20.1 - Zoom Controls

Editor toolbar’s zoom
The zoom controls allow to navigate the session along both the time and track axes.
The drop down Zoom Focus menu allows to select a focus point for the zoom, i.e. the center of the zoom. The choices are:
- Left of the screen
- Right of the screen
- Center of the screen
- Playhead
- Mouse
- Edit Point as set in the Edit point control.
The two leftmost zoom buttons (− and +) use this zoom focus to zoom out and in respectively.
The Zoom to session button is a handy shortcut to zoom out or in until all the session (as defined by its start/end markers) fits horizontally.
Changing the Number of visible tracks dropdown menu allows to fit this number of tracks vertically in the screen.
There is a minimal track height to keep it visible, so according to you screen vertical size, some high number can have no effect.
Inside this menu are two handy choices:
- Selected tracks that focus on the selected tracks. If the selected tracks are not contiguous, the unselected tracks inbetween will be hidden, see the Track and Bus list.
- All that fits all the tracks of the sessions vertically (provided there’s enough screen estate).
The rightmost buttons Shrink tracks and Expand tracks reduce or expand the vertical size of the selected tracks. If no track is selected, all the tracks will be shrunk or expanded each time the button is pushed.
20.2 - Grid Controls

Editor toolbar’s grid.
Ardour’s editor utilizes a grid to assist in the placement of regions on the timeline, or with editing functions that need to happen at a specific point in time. This snapping of the cursor and various objects to the grid can be toggled on or off, as does its behaviour, and grid units.
About Snapping
There are two ways to think about aligning material to a grid. The first and most obvious one is where an object’s position is clamped to grid lines. In Ardour, this is called absolute snap and is commonly used when working with sampled material where audio begins exactly at the beginning of a file, note or region.
The second, relative snap, is used when an object’s position relative to the grid lines is important. In music, this allows to move objects around without changing the “feel” (or timing) of a performance.
Absolute snap is the default method of snapping in Ardour.
While dragging objects, pressing the absolute snap modifier key(s) switches from absolute to relative snap.
The snap can also be entirely disabled by using the snap modifier (see below).
Note that in relative snap mode the reference point is taken to be the distance to the nearest grid line.
Note also that when an object lies exactly on a grid line, there will be no difference between relative and absolute snap modes.
The relative snap and snap modifiers (along with other modifier keys) may be set in Edit > Preferences > User Interaction
For common use patterns, it is recommended to assign a unique key for one snap modifier and two keys for the other in such a way that they share an otherwise unused key. For example, the snap modifier may be chosen to be the key and the relative snap modifier to be the and keys.
Snap Modes
Using the above modifications, Ardour supports three different modes of snapping to the grid:
| No Grid | disables the grid. All objects move freely in this mode. In No Grid mode, the grid may be temporarily activated by pressing the snap modifier (for absolute snap) or switch to relative snap by pressing the relative snap modifier. |
| Grid | activates normal snapping. All positions of objects snap to the grid. (See Grid Units below to change the grid). Moving an object in “Grid”-mode, does not change its position until the mouse is far enough for the object to reach the next grid line. To maintain an objects’ position relative to the grid line, the “snap relative” modifier can be used. When holding down this modifier during a drag, the dragged object will jump while maintaining its original distance from the line. New objects will always be created at grid points. Holding down the snap modifier will disable the current grid setting and allow moving the object freely. |
| Magnetic | is a less strict type of snapping. Objects can still be moved to any position, but positions close to the relative or absolute grid points will snap. In order to move an object very close to a snap point, it may be necessary to zoom in to prevent snapping to that point, or to use the snap modifier to disable snap completely. As with Grid mode, the snap modifier will disable snap completely while the absolute snap modifier will move the “notch” of Magnetic snap to the grid lines. |
Syncing Regions to the Grid
By default, a region’s beginning will be used as the reference for both types of snapping, this behaviour can be changed by setting a sync point in the region, by selecting the region(s) and pressing V. This will set the sync point to the current edit point.
Grid Units
The selector next to the grid mode selector defines the size of the grid elements. The grid can be set to several different units:
| CD Frames | A CD Frame is 1/75th of a second. Snapping to CD Frames (using absolute snap) can be used to avoid issues with CD track lengths. |
| Timecode Frames/Seconds/Minutes | The duration of a frame depends on the timecode settings for the session. |
| Seconds/Minutes | These are absolute time units, unaffected by sample rate or timecode settings |
| Beats/N | Set the grid to units of 1/N beats, where N can be 128, 64, 32, 16, 8, 7, 6, 5, 4, 3, 2. The duration of a grid unit will depend on the tempo and meter in effect at that point in the timeline. |
| Beats | Set the grid to whole beats. The duration of a grid unit will depend on the tempo and meter in effect at that point in the timeline. |
| Bars | Set the grid to whole bars. The duration of a grid unit will depend on the tempo and meter in effect at that point in the timeline. |
| Markers | The grid lines are the markers. |
| Region Starts | The grid lines are constructed from region start points (see below). |
| Region Ends | The grid lines are constructed from region end points (see below). |
| Region Syncs | The grid lines are constructed from region sync points. |
| Region Bounds | The grid lines are constructed from region start or end points. |
To use Region starts/ends/syncs/bounds as snap choices, it is necessary to have either:
- No tracks selected, which means that Ardour snaps to regions on any track, or
- Several tracks selected, which means that Ardour only snaps to regions on those selected tracks.
If items are moved on a track, and only the current track is selected, then snapping will only happen with other regions on the same track. This means that enabling Edit > Preferences > Editor > Link Selections of Regions and Tracks will make the “Region” grid unit unusable. This option should not be used in conjunction with the use any of the Region grid units.
20.3 - Edit Point Control

Editor toolbar’s Edit Point
Editing operations in a Digital Audio Workstation like Ardour can be broken down according to how many points on the timeline are required to carry the operation out. Splitting a region for example, requires just one position on the timeline (the one where the split will happen). Cutting out a time range requires two positions, one for the start of the cut and one for the end.
In Ardour the edit point is the location where most single-point editing operations take place. It can be set to either of the following:
- the Playhead position
- the selected (or “active”) Marker
- the position of the Mouse (or touch) pointer
The default edit point is the location of the pointer.
There are two keybindings available to cycle through the edit point options. The most common workflow tends to involve switching back and forth between the playhead and mouse as the edit point. Pressing the grave accent key ` switches between these two. Using ` cycles through all three choices (including the selected marker). The edit point can also be switched using the combo-selector just right of the snap/grid unit selector.
20.4 - Nudge Controls

Editor toolbar’s Nudge
The nudge controls will move the selected region(s) by a fixed amount of time. The left and right buttons move either backward or forward in time, and the small clock to the left of these buttons sets the amount of time to nudge by. As with all other clocks, you can right-click on the clock to choose the time representation you want to use.
If there are no selected objects, the nudge controls can be used to move the playhead backward or forward by the amount shown on the clock.
21 - Ruler

Ardour’s Ruler
The Ruler scales the session along time, allows navigating, and can be marked for different uses.
One of its main uses is to move the playhead: clicking anywhere on the timeline will bring the playhead at this location in time. Also, using the mouse’s scrollwheel while hovering the Ruler will zoom in or out (⇑/⇓ ).
The Ruler is made of a succession of rows, each having a special role related to time. Adding or removing rows can be done by right clicking anywhere in the ruler’s header on the left, and ticking any of:
| Mins:Secs | scaling the session with the Mins:Secs:mSec notation |
| Timecode | scaling the session with the Hours:Mins:Secs:Frames notation |
| Samples | scaling the session with the sample number notation |
| Bars:Beats | slicing the time according to the time signature of the Meter |
| Meter | shows the time signature. It can be changed along the timeline, by Right click > New Meter. The Bars:Beats ruler will reflect the change. |
| Tempo | shows the BPM. It can be changed along the timeline, by Right click > New Tempo. The Bars:Beats ruler will reflect the change. |
| Range Markers | allow to create and modify ranges directly on the Ruler. |
| Loop/Punch Ranges | are special kind of ranges designed to be played as a loop and to do punch recording, i.e. recording on a precise section of time, respectively. |
| CD Markers | are markers designed to be used while creating a recording that has to be split in time, as an audio CD |
| Location Markers | is meant to receive any kind of marker, user generated or from Ardour itself. |
| Video Timeline | shows thumbnails of the video in the timeline |
Most of the operations on the markers are described in Working with Markers, while the Meter, Tempo, Bars:Beats and Timecode use are described in Tempo and Meter.
22 - Summary

Ardour’s Summary
The Summary is a global overview of the session, allowing for a good “bird’s eye” view of where in time and tracks the work happens.
Each horizontal line represents a track in the session, with the colored bars being the audio and MIDI regions, colored as per their track’s color setting.
Two yellow vertical lines show the position of the Start and End markers, defining the session’s length. The red line shows the playhead’s position.
The transparent white rectangle represents what’s actually displayed in the Editor window, i.e. what part of the session is being looked at on screen.
The Summary also doubles as a navigator:
- the arrow on the left allow to scroll the view horizontally to the left, by 1 length of the view each time
- the arrow on the right allow to scroll the view horizontally to the right, by 1 length of the view each time
- the white rectangle can be dragged anywhere on the session, moving the view accordingly
- the right and left borders of the white square can be resized, zooming in and out accordingly
23 - Editor Lists
At the right hand side of the editor window is an optional area which provides one of a range of useful lists of parts of the session. It is not shown by default when first starting using Ardour. The Editor list can be hidden or shown using View > Show Editor List. The very right-hand side of the list gives a selection of tabs which are used to choose the list to view. The left-hand border of the list can be dragged to vary the width of the list.
23.1 - The Region List
The region list shows all the regions in the session. The left-hand column gives the region name, and there are a range of times given for information:
| Position | position of the start of the region on the global timeline |
| End | position of the region on the global timeline |
| Length | duration of the region |
| Sync | position of the sync point, relative to the start of region (can be negative) |
| Fade In | duration of the fade in. Can’t be less than 1 ms, to avoid clipping. |
| Fade Out | duration of the fade out (positive value, ≥ 1 ms). |
The secondary clock defines the time unit used in this list. Set the secondary clock to the type of unit desired.
At the right of the list are four columns of flags that can be altered:
| L | whether the region position is locked, so that it cannot be moved. |
| G | whether the region’s position is ‘glued’ to bars and beats. If so, the region will stay at the same position in bars and beats even if the tempo and/or time signature change. |
| M | whether the region is muted, so that it will not be heard. |
| O | whether the region is opaque; opaque regions ‘block’ regions below them from being heard, whereas ‘transparent’ regions have their contents mixed with whatever is underneath. |
Hovering the mouse pointer over a column heading shows a tool-tip which can be handy to remember what the columns are for.
A handy feature of the region list is that its regions can be dragged and dropped into a suitable track in the session.
23.2 - The Tracks and Busses List
This lists the tracks and busses that are present in the session. The list order reflects the order in the editor, and track or bus names can be dragged-and-dropped in the editor list to re-order them in the editor. The columns in the list represent the following:
| V | whether the track or bus is visible; they can be hidden, in which case they will still play, but just not be visible in the editor; this can be useful for keeping the display uncluttered. |
| A | whether the track or bus is active; inactive tracks will not play, and will not consume any CPU. |
| I | for MIDI tracks, whether the MIDI input is enabled; this dictates whether MIDI data from the track’s input ports will be passed through the track. |
| R | whether the track is record-enabled. |
| RS | whether the track is record safe; a record safe track cannot be armed for recording, to protect against a mistake. |
| M | whether the track is muted. |
| S | track solo state. |
| SI | track solo-isolated state. |
| SS | solo safe state. |
Each icon in these columns can be clicked to toggle the track/bus state, which is a very fast way to set multiple tracks/busses state at once.
As with the region list, hovering the mouse pointer over a column heading shows a tool-tip which can be handy to remember what the columns are for.
23.3 - The Snapshot List
This list gives the snapshots that exist of this session. Clicking on a snapshot name will load that snapshot.
See Snapshots for more information on snapshots.
23.4 - The Track and Bus Group List
This shows the track/bus groups that exist in the session. These groups allow related tracks to share various properties (such as mute or record enable state). For full details, see the section called Track and Bus Groups.
The columns in this list are as follows:
| Col | the colour that the group uses for its tab in the editor. |
| Name | the group name. |
| V | whether the tracks and busses in the group are visible. |
| On | whether the group is enabled. |
| G | ticked if the constituents of the group are sharing gain settings. |
| Rel | ticked if shared gains are relative. |
| M | ticked if the constituents share mute status. |
| S | ticked if the constituents share solo status. |
| Rec | ticked if the constituents share record-enable status. |
| Mon | whether the constituents share monitor settings. |
| Sel | whether the constituents are selected together. |
| A | whether the constituents share active status. |
23.5 - The Ranges and Marks Lists
The Ranges & Marks List is a tab in the Editor Lists area on the right of the Editor window. If the editor list area isn’t visible it can be enabled by checking View > Show Editor List. The Ranges & Marks list can be used as a single point of control for all range and location markers (including the punch and loop ranges), or as a supplement to other methods of working with them.
Common elements
Each section has a set of editable clock widgets which display the location of a marker, or the start, end, and duration times of a range, respectively.
The Use PH buttons allows to set the corresponding clock to the current playhead position. A Middle click on any of the clocks will move the playhead to that location. Both functions are also available from the clock context menus.
Right clicking on any of the clocks brings up a context menu that allows changing of the display between Timecode, Bars:Beats, Minutes:Seconds, and Samples.
The — (subtract) button in front of each user-defined range or marker in the list allows that particular item to be removed. The name fields of custom ranges and markers can be edited.
The Hide checkboxes make markers and ranges invisible on the respective ruler to reduce visual clutter; the markers remain active however, and can be used normally.
Selecting Lock prevents the respective marker from being moved until unlocked. Where applicable, Glue fixes the marker position relative to the current musical position expressed in bars and beats, rather than the absolute time. This will make the respective marker follow changes in the tempo map.
At the bottom of the list are buttons to add new markers or ranges.
List sections
| Loop/Punch Ranges | This list shows the current loop and punch range settings. Since these are built-in ranges, they cannot be renamed or removed. |
| Markers (Including CD Index) | This section lists the session’s markers. By ticking CD, Ardour is instructed to create a CD track index from this marker, which will be included in the TOC or CUE file when exporting. |
| Ranges (Including CD Track Ranges) | This is the list of ranges (including CD track ranges). Ticking CD will convert the range to a CD track, which will again be included in exported TOC or CUE files. This is relevant for Disk-At-Once recordings that may contain audio data between tracks. |
24 - Favorite Plugins Window
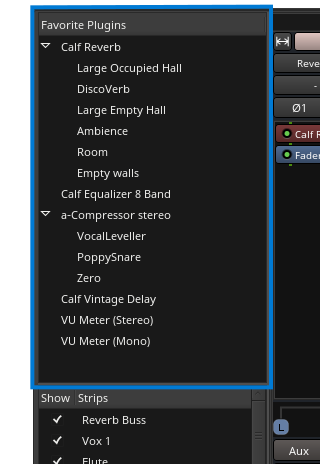
The Favorite Plugins window.
The Favorite Plugins window is on the top-left side of the Mixer Window. Like other elements in that window it has variable height and can be hidden by dragging it to zero-height. If it is not visible, the top-handle can be grabbed and dragged down to reveal it.
Plugin names that have a right facing triangle next to them have presets associated with them; clicking on the triangle will cause all presets associated with the plugin to show in the list.
Features
Dragging a plugin to the window.
The Favorite Plugins window provides easy access to frequently used plugins:
- Plugins can be dragged from the window to any track or bus processor box, which will add the plugin to that track or bus at the given position.
- The list includes user-presets for the plugins. Dragging a preset to a given track or bus will load that preset after adding the plugin.
- Double-clicking on a plugin or preset adds the given plugin to all selected tracks/busses pre-fader. Other insert positions are available from the context menu (right click).
- Dragging a plugin from a track into the window will add it to the list and optionally create a new preset from the current settings. The horizontal line in the list shows the spot where the plugin will land.
- The context-menu allows the deletion of presets or removal of the plugin from the list.
- Plugins in the list can be re-ordered using drag & drop. The custom order is saved.
When favorites are added with the Plugin Manager, they are appended to the bottom of the list.
25 - Strips list
The Strips List is a quick way to manage big sessions, with lots of tracks, where the mixer would otherwise be too crowded.
It is a list of all the tracks, busses and VCA in the session, with a tick to allow for hiding or showing them. This visibility status also affects the Editor view, and is exactly the same as toggling the V checkbox in the Tracks and Busses panel of the Editor List.
Dragging and dropping tracks inside the Strips List allows to reorganise the tracks in the session, both in the Mixer and the Editor. Clicking a track scrolls the Mixer to show this track.
It is possible, by right clicking, to act on multiple tracks at once:
- Show All
- Hide All
- Show All Audio Tracks
- Hide All Audio Tracks
- Show All Audio Busses
- Hide All Audio Busses
- Show All MIDI Tracks
- Hide All MIDI Tracks
The + button under the list is a shortcut to create a new track, bus or VCA, as in clicking Track > Add Track, Bus or VCA….
26 - Groups list
The Groups List allows to quickly manage the groups of the session, and make use of them.
Each group has a Show checkbox to quickly toggle their visibility. Clicking an already selected group allows to rename it.
The context menu, reached by right clicking a group, allows for multiple mixing actions:
| Create New Group From… | Creates a new group based on some track properties. The choice is:
|
| Create New Group with Master From… | Acts exactly as the previous choice, but also creates a Control Master tied to these tracks. |
| Assign Selection to Control Master… | Allows to link all the selected tracks to a chosen Control Master, whether or not they belong to a group. |
| Assign Record Enabled to Control Master… | Allows to link all the record armed tracks to a chosen Control Master. |
| Assign Soloed to Control Master… | Allows to link all the soloed tracks to a chosen Control Master. |
| Enable All Groups | Enable all the groups, i.e. their selected properties are synchronized. |
| Disable All Groups | Disable all the groups, i.e. changing a property in a track won’t affect the others. |
When a group is selected, right clicking it adds the following menu entries:
| Create New Group with Master From… | Acts exactly as the previous choice, but also creates a Control Master tied to these tracks. |
| Edit Group… | Shows the Track/bus Group window. |
| Collect Group | Rearranges the tracks/busses order to visually group together the tracks belonging to the same group. |
| Remove Group | Deletes the group (but not the tracks/busses belonging to this group). |
| Assign Group to Control Master… | Allows to link all the tracks in the group to a chosen VCA. |
| Add/Remove Subgroup Bus | Creates/removes a new bus connected to the Master, and send the output of all the tracks in the group to this new bus. |
| Add New Aux Bus (pre/post-fader) | Creates a new bus connected to the Master, and create Aux Sends (pre or post-fader) in all the tracks in the group to this new bus. |
The + button under the list allows the creation of an (empty) group, while the − button deletes the selected group (but not the tracks in this group).
27 - Mixer Strips
27.1 - Audio/MIDI Mixer Strips

A mixer strip
A mixer strip in Ardour is a vertical view of the track, from a mixing point of view. This view is convenient to deal with I/O, effects, panning/muting, gain, etc… It has a general “top to bottom” flow.
The mixer strips breaks down into:
- Header
- Track name
- Input(s)
- Polarity only for audio tracks
- Processor box
- Panner
- Recording options
- Mute/Solo
- Gain & Meter
- Control master
- Fader automation/mix group/metering point
- Output(s)
- Comments
Headers
At the top of the window, is the group tabs (here, recm…). This allows to group tracks together for common controls.
Bellow are 3 buttons:
- The double arrow button allows to shrink/expand the width of the strip. Click the button will shrink/expand all the tracks at once
- The color bar shows the color of the track in the editor
- The X button toggles the visibility of the track OFF. To turn it back ON, one can either go to the Tracks and Busses list in the Editor view and check the “V” column on the track’s line or stay in the Mixer view and check the Show column of this strip in the Strips list.
Right clicking on the color bar will bring up a context menu, which is exactly the same as clicking on the Track name button.
Track Name
Clicking the Track name button will bring up a menu:
| Color… | Changes the strip/track color |
| Comments… | Shows an editor to put comments about the track, see below the Comments button |
| Inputs… | Shows the Routing grid for the inputs of the track |
| Outputs… | Shows the Routing grid for the outputs of the track |
| Save As Template… | Allows to save the track without its media content (I/O, effects,…) for later reuse |
| Rename… | Changes the name of the track (effective both in the Mixer and the Editor) |
| Active | Select the active status of the track. An inactive track won’t output any sound |
| Strict I/O | While in patchbayStrict I/O mode, a track always has as many output as it has inputs, regardless of the effects. When disabled, a stereo effect put on a mono track will result in a stereo output for the strip. |
| Pin Connections… | Shows the Pin Configuration window, that shows (and allows to modify) all the signal flows inside the track |
| Adjust Latency… | Shows the Track Latency dialog, that allows fine-tune the latency to the track, in samples, msec or period |
| Protect Against Denormals | Uses a trick to get rid of denormals, which are very small numbers the CPU can have a hard time dealing with. To be used if the CPU consumption for plugins is noticeably higher than expected |
| Duplicate… | Copies the track to a new one, optionally with its playlist |
| Remove | Deletes the track and its playlist |
Inputs
The dropdown button shows the current input port(s), i.e. what’s plugged to the “in” of the track. By default, each audio track is connected to the system inputs, ready for recording, as shown by the number(s). Clicking the dropdown Inputs button will allow to change the inputs, through a menu:
| Disconnect | Disconnects everything, i.e. the track has no input |
| In n | Those are the system inputs, e.g. to record from the soundcard. A mono track will have In 1 and In 2 separated, while a stereo track can have In 1+2 |
| Track n output | All the outputs of compatible tracks, e.g., a mono track can only receive a mono signal, a MIDI track can only receive MIDI signal, … |
| Add Audio Port | Adds an audio input to the track, i.e. a mono audio track becomes a stereo one |
| Add MIDI Port | Adds a MIDI input to the track. Adding it to an audio track makes it a mixed Audio/MIDI track. This can be useful e.g. to feed some plugins with a MIDI signal to control the audio, like a vocoder |
| Routing Grid | Shows the Routing Grid window, which allows for more complex input configuration |
The Routing Grid can also be shown by right clicking the dropdown Inputs button. It allows to make the connections through a matrix, and connect things that are not listed in the menu above, or connect to multiple sources at once, reduce the number of inputs, etc…
On audio tracks, is a Trim knob, as on traditional consoles. It set the base input level for the track, avoiding any clipping. Notice that it trims both any input, but (when playing back), also the level of the playlist as displayed in the Editor. It makes sense as while playing, the input of the track is the playlist, on which the mixer strip acts.
On midi tracks, it is replaced by a MIDI Input button, that allows/disallows MIDI input on the track.
Polarity
On audio tracks only, the Polarity button(s), 1 per input, allow to reverse the signal, i.e. a negative value will be positive and vice-versa. This can help deal with phasing issues.
Processor box
The processor box is where the effects are added. By default, one effect is always present: the Fader (see below). The effects can be added pre-fader and appear in brown, or post-fader, where they will appear in dark green. The signal flow is represented by lines, red for the MIDI and green for the audio.
It is also where the Sends come from, whether external or auxiliary.
To learn more about the processor box, see The Processor Box.
Panner
The Panner visually displays how the sound will be distributed between the different outputs. They’ll look and behave differently if the track is mono, stereo, or has multiple channels.
Right clicking the Panner will show a menu:
| Bypass | When checked, the panner is grayed, and the signal is not affected by it |
| Reset | Resets the panner to its default settings, e.g. for a mono signal, it is centered |
| Edit… | Shows a Panner dialog, which allows for fine tuning of the panner |
See Panning to learn more about how to control the panner, and what kind of panners are available inside Ardour.
Recording options
The most noticeable button here is the Record Enable one, with a red circle. When enabled, next time the Global record will be armed and playback started, everything that comes from the input of the track will be recorded. Right clicking a disabled record button allows to enable Rec-Safe, thus protecting the track against accidental recording.
The buttons on the right, In and Disk, show what the user is listening to by lighting up, between the Input and the actual content of the playlist on Disk.
They also allow to override the automatic switching by pressing them to lock one source or the other to be what the user is hearing.
Mute/Solo
These buttons allow to Mute (or silence) the track, or Solo them, shutting down the gain of the other tracks (totally by default, can be set to partially in the options). See Muting and Soloing for more information.
Notice that by default, Solo overrides Mute, i.e. if a track is both Soloed and Muted, it will play. That can be changed in the preferences.
The two led button above are related to solo:
- Solo Isolate, as the name suggests, isolates tracks or busses from the solo system. When tracks or busses are soloed the isolated ones will not mute.
- Solo Lock locks the solo into its current state (i.e. solo on or solo off). It will not allow the solo state to be changed until the lock is released.
Gain & Meter
On the right of this part is a Meter, displaying the level of the track’s output after the fader. In can be set to display the signal at any point, see below Metering Point. Right clicking this meter shows a menu allowing to switch the meter type.
The big Gain slider on the left allows to change the gain of the track. Its default OdB value is reminded with a white horizontal line, and its precise value is shown in a text field above it, that doubles as a way to type in a numeric value.
The text field above the meter shows the “Peak”, i.e. the maximum value that has been reached during playback. To avoid distortion, the value should stay below OdB, and if it goes above this value, the text field will turn red. Clicking on this field will reset the Peak value (for a new measurement or a new part of the track).
Notice that if any gain automation has been set and the automation state is set on “Play” (see below), then the Gain fader is driven by the automation, and not by the user. The Gain fader will turn grey to show it is inactive.
VCAs
If at least one VCA exists, this button will show up, allowing the user to link this track to any control master.
Clicking the button lists all the available control masters, and a menu option to Unassign all. Notice that a track can be a slave to as many VCAs as they are in the session, hence multiplying the number of VCA buttons. The displayed number is the number of the VCA, not the count of VCAs linked to the track. A track with no VCA assigned will show a unique button with a “-vca-” label instead of this number.
Fader automation/mix group/metering point
Fader automation mode
This button allows to choose the mode used regarding automation:
| Manual | (default) The playback won’t use the fader automation data |
| Play | Enables playback/use of fader automation data |
| Write | While the transport is rolling, all fader changes will be recorded to the fader automation lane |
| Touch | While the transport is rolling, touching the fader will initiate recording all fader changes until the fader is released. When the fader is not being touched, existing automation data will be played/used to control the gain level. |
Mix group
This button displays the mix group information as does the tab in the header (see above). It is convenient though, as it allows to quickly switch the track from one group to another with a drop down menu, also allowing to affect the track to a non-adjacent group (which the tab won’t easily allow).
Metering Point
The metering displayed in the meter is by default is ‘Post’, i.e. Post fader. It can be changed with this button to Any point of the signal flow:
| In | The input of the track |
| Pre | Pre-fader |
| Post | Post-fader |
| Out | The output of the track |
| Custom | A Meter processor is added to the processor box and can be set anywhere (by dragging and dropping) to probe the signal flow at that point |
Output(s)
This button is exactly the same as the Input button, but applies to the output of the track.
Comments
This buttons open up a little text editor, that can be used to add some written notes to the track, as e.g. a particular setting. The button’s caption is replaced by the beginning of the text, so it can be used as a “sub” name for the track.
27.2 - Audio/MIDI Busses Mixer Strips

A bus mixer strip
An Ardour bus can be considered a virtual track, as in a track that doesn’t have a playlist (so, no regions). Its use is to “group” some audio signals to be treated the same way. One simple use case is to group all the audio tracks containing the different drums of a drum kit. Routing all the drum tracks’ outputs to a bus allows, once the different levels amongst the drums have been set, to adjust the global level of the drum kit in the mix.
Bus usage goes way beyond this simple example though: busses, as tracks, can receive plugins for common audio treatment, and be routed themselves as needed. This makes for a very useful tool that is very commonly used both for musical purposes and computing ones: instead of using e.g. ten discrete delay plugins on ten different tracks, busses are often used as receivers of sends, and only one delay plugin is used on this bus, reducing the processing power needed.
Audio Busses vs MIDI Busses Ardour supports two types of busses: Audio and MIDI. A MIDI bus differs from an audio bus just by:
- its input (which is midi, as shown by the red signal lines in the processor box) instead of n audio
- the fact that an instrument can be placed on it at creation time, whereas it can’t easily be done for an audio bus
- as for tracks, the MIDI bus doesn’t have a trim knob or invert phase button(s).
MIDI busses provide a particularly efficient workflow for virtual drum kits where the arrangement uses different MIDI tracks. Moreover, busses with both Audio and MIDI inputs are well suited for vocoders and similar plugins, where a MIDI signal controls an audio one.
Adding any audio input to a MIDI bus transforms it into an audio bus.
Description
Busses look and behave exactly like tracks, so they share nearly all of their controls. The differences are:
- as the busses don’t have a playlist (and cannot host any media), they can’t be recorded on. The recording controls are not present
- an Aux button replaces these controls.
Clicking the Aux button makes every track that sends a signal to this bus through Aux sends blink in turquoise. Right clicking this button brings up a menu:
| Assign all tracks (prefader) | Creates an Aux Send in every track, to this bus. The send is placed just before the fader |
| Assign all tracks and busses (prefader) | Creates an Aux Send in every track and every bus, to this bus. The send is placed just before the fader |
| Assign all tracks (postfader) | Same as above, but the send is placed just after the fader |
| Assign all tracks and busses (postfader) | Same as above, with tracks and busses |
| Assign selected tracks (prefader) | Same as for all tracks, but only applies to the selected tracks |
| Assign selected tracks and busses (prefader) | Same as for all tracks and busses, but only applies to the selected tracks and busses |
| Assign selected tracks (postfader) | Same as above, but the send is placed just after the fader |
| Assign selected tracks and busses (postfader) | Same as above, with tracks and busses |
| Set sends gain to -inf | For all the sends to this bus, put the send fader to −∞ so no signal is sent |
| Set sends gain to 0dB | For all the sends to this bus, put the send fader at the default position, 0dB (100% of th signal is sent) |
Connecting a track to a bus
Depending on the user’s workflow and the way busses are used, two possibilities exists:
Connecting a track to a bus via its outputs
Connecting a bus through a track’s outputs
Connecting the output(s) of a track to the input(s) of the bus sends all the audio/MIDI to the bus. In the mixer strip, select (at the bottom) the OUTPUT button (often, by default, “Master”), and in the list, choose the input of a bus. Note that only the bus able to receive this output will show up, e.g. a mono bus won’t be able to be connected to the output of a stereo track).
Obviously, doing so will (by default) disconnect the output from the Master’s input, which means all the audio/MIDI will be routed to the bus. For more complex routing, the OUTPUT button allows to show the Routing Grid that allows to plug the output of the track to multiple outputs at once, be it busses, tracks, Master… The button will then reflect these multiple connections by showing a *number*, number being the number of connections made in the routing grid.
Connecting a track to a bus via Sends
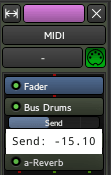
Connecting a bus through a send
This allows not to interrupt the natural flow of the signal, i.e. the track will still output to what its connected to (e.g. Master). The signal is “tapped” at the point of insertion of the send, to be sent to the bus, by right clicking where in the signal flow the signal should be tapped, and selecting New Aux Send… > name_of_the_bus.
By left-clicking the send meter, it is possible to adjust the amount of signal sent to the bus. This is often the way tracks are connected to an effect bus, like a Delay bus.
Busses can be plugged to other busses, through outputs or sends. Both example workflows discussed previously, i.e. busses for grouping tracks and busses for effects, can both coexist, as e.g. a “grouping” drum bus can have a send to a reverb bus, and be connected to a compressor bus.
27.3 - VCA Mixer Strips
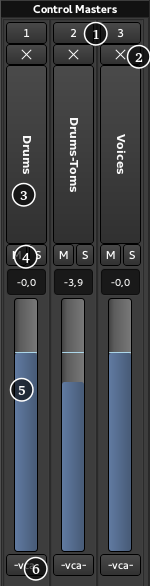
A VCA mixer strip
Although track/bus groups offer a certain kind of grouped-control over gain, solo, mute and more, traditional mixing consoles have long had group master channels (“VCAs”) which allows to combine both a single fader to control the group level while also allowing to easily adjust the relative levels inside the group. For large projects, this can make mixing much easier to control.
Ardour implements those VCAs in a way that allows to use either or both of the conventions used on different traditional consoles for combining multiple masters:
- Nest VCAs (VCA 2 controls VCA 1 etc.)
- Chain VCAs (VCA 1 and VCA 2 both control track or bus N)
Description of the VCAs
A VCA strip is made of (from top to bottom in the screenshot):
- Number of the VCA
- X button: Allows to hide the VCA strip. Left clicking this button toggles the exclusive visibility of the tracks connected to this VCA
- Name button
- M: mutes the VCA, S: solos the VCA
- Level meter: allows to adjust the level of the VCA
- ~vca~: a VCA button to optionally connect to another VCA
Right-clicking the name button shows a context menus comprised of:
| Rename | Renames the VCA |
| Color… | Changes the color of the VCA button in the tracks connected to this one |
| Drop All Slaves | Deletes all connections to this VCA, i.e. no tracks are controlled by this VCA anymore |
| Remove | Deletes this VCA |
Connecting to a VCA strip
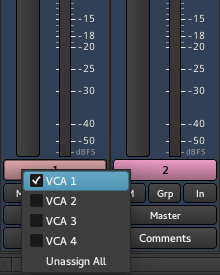
Connecting to a VCA
Connecting a track/bus/VCA to a VCA is as simple as clicking the VCA button that appears on any mixer strip under the main fader and choosing the VCA to connect to.
The VCA button only shows up in mixer strips when at least one VCA exists, i.e., a VCA must be created before connecting tracks to it.
Clicking the VCA button shows all the VCAs in the session, and any or all of this VCA can be checked to link them to the track, making this track controlled by multiple VCAs. The track will then show multiple buttons. Disconnecting a VCA from a track is done by unchecking this VCA in the list that pops up, or clicking Unassign All to disconnect from all VCAs at once.
27.4 - Master Bus Strip

The Master strip in the mixer
The Master strip in Ardour is very similar to the other busses mixer strips. The list of differences is (from top to bottom):
- There is no color affected to the master strip
- The master strip cannot be hidden, so there is not X in the top right
- It is by definition always solo, so no Solo, Iso or Lock buttons. It is replaced by a button to show the Monitoring section if the session has one
- It cannot belong to a mix group, so the button is removed.
The Master bus strip is always fixed, at the right end of the mixer, regardless of the scrolling position.
28 - Editor Tracks
28.1 - Audio Track Controls
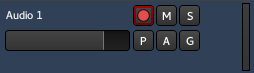
An audio track header section
At the top-left of the controls is the name of the track, which can be edited by double-clicking on it. The new name must be unique within the session.
Underneath the name is the track’s main level fader. Changing it will affect the whole track :
- dragging will change the fader’s value as per the mouse’s position
- clicking will set the fader to −∞
- clicking will reset the fader to its original 0dB position.
On the right-hand side of the headers are level meters for the outputs of the track (1 level per output).
The control buttons are:
| ● (Record) | The button with the pink circle arms the track for recording. When armed, the entire button will turn pink, and change to bright red as soon as the transport is rolling and the track is recording. Right clicking will allow to en/disable Rec-safe, protecting the track against accidental recording. |
| M (Mute) | Mutes the track. Right clicking displays a menu which dictates what particular parts of the track should be muted. |
| S (Solo) | Soloes the track. The behaviour of the solo system is described in detail in the section Muting and Soloing. Right clicking will allow to en/disable Solo isolate and Solo safe. |
| P (Playlist) | Opens a playlist menu when clicked. The menu offers various operations related to the track’s playlist. |
| A (Automation) | Opens the automation menu for the track. For details see Automation. |
| G (Group) | Allows to assign the track to an existing or a new group. For details see Track and bus groups . |
28.2 - MIDI Track Controls
A typical MIDI track header looks like this:
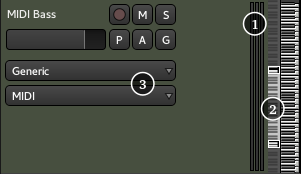
A MIDI track header
To show the full set of MIDI track controls, the track height must be increased beyond the default. MIDI tracks show only a few of the control elements when there is insufficient vertical space.
A MIDI track has the same basic controls as an audio track, with the addition of three extra elements:
- Some meters for the track’s outputs (MIDI in red, Audio in green)
- The Scroomer, a zoom and scroll controller for the midi notes range
- When the track is tall enough, the External MIDI Device selection dropdown appears.
Also, right clicking the ● (record) button shows the Step Entry dialog instead of controlling the rec-safe.
The Scroomer
The Scroomer performs a couple of functions:
- The scrollbar controls the range of pitches that are visible on the track, as visualized by the piano keyboard. Dragging the body of the scrollbar up and down displays higher or lower pitches.
- Dragging the scrollbar handles zooms in and out and increases or decreases the range of visible pitches.
- Double clicking the scrollbar auto-adjusts the zooms to make the range of visible pitches fit the actual content of the track.
- Clicking on the piano plays the corresponding MIDI note for reference.
Channel and patch selection
The Channel Selector
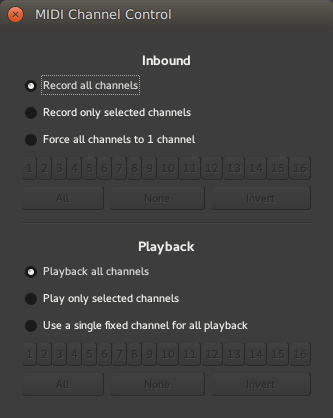
The MIDI channel control window
A MIDI track’s data may span any number of the 16 available MIDI channels, and sometimes it is useful to view only a subset of those channels; different instruments may, for example, be put on different channels. In the context menu (right click), the Channel Selector allows to control the MIDI channel(s) that will be visible in the editor.
This window also gives control over which channel(s) will be recorded, and which will be played back, choosing between:
- All channels
- Only selected channels —Ardour then proposes to choose amongst the 16 channels which are to be recorded/played
- Force all to one channel —Ardour then ‘routes’ all the channels to one user selectable channel.
The Patch Selector
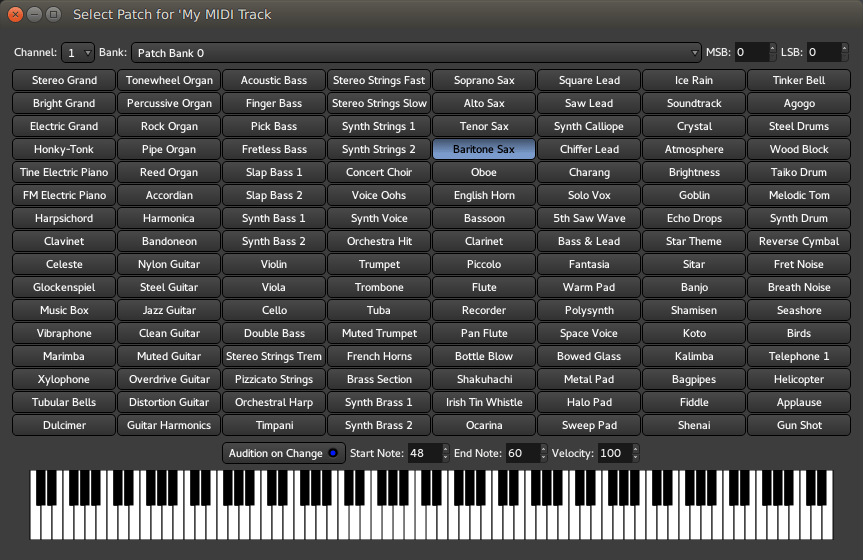
The Patch Selector window
The Patch Selector window is an easy way to set which instrument will be used on any of the MIDI channels. Although patches can be changed at any time using a patch change, this dialog provides an easy and convenient way to preview patches in software and hardware instruments. It integrates fully with Ardour’s support for MIDNAM (patch definition files), so Ardour can display named programs/patches for both General MIDI synths and those with MIDNAM files.
The window itself makes it easy to choose a channel, a bank number, optionally choosing a bank number through its MSB and LSB numbers (CC#00 and CC#32) for large banks, then choosing an instrument.
The keyboard at the bottom of the window allows for a quick preview of the selected instrument, either automatically (using the buttons on top of the keyboard) or manually by either clicking a note or using the computer keyboard as a piano keyboard.
To edit the contents of a MIDI track see MIDI Editing.
28.3 - Bus Controls
A bus header section
The bus’ header is very similar to the audio track header, minus :
- the playlist button, as a bus doesn’t have any playlists or regions by itself, it is only a pipe to route audio or midi through
- the record button, for the same reason.
For more information about the bus concept, see Understanding basic concepts.
29 - Track and Bus Groups
Tracks and busses can be put into groups. Members of a group can share various settings—useful for managing tracks that are closely related to each other. Examples might include tracks that contain multiple-microphone recordings of a single source (an acoustic guitar, perhaps, or a drum kit).

Track headers for a group
Tracks and busses can be grouped in various ways. In the editor window, a track’s controls might look like the adjacent image.
The green tab to the left of the track header indicates that this track is in a group called Fred. These tabs can be dragged to add adjacent tracks to a group.
Create New Groups
There are several ways to create groups for tracks and busses:
- Right-clicking on the group tab and using one of the Create… options there. A group can be created with no members, or one that starts with the currently selected tracks, or record-enabled tracks, or soloed tracks.
- Alternatively, clicking the g button on a track header to open the Group menu. The menu lists the available groups. Selecting one of these groups will add the track or bus to that group. The menu also allows creating a new group.
- Finally, the Groups list has a plus (+) button at the bottom of the list that can be clicked on to create a new group.
Remove Groups
Context-clicking on a group tab and selecting Remove Group from the menu removes it. Removing a group does not remove the members of a group.
Groups can also be removed by selecting them in the Groups list and then pressing the minus (−) button at the bottom of the list.
Add/Remove Tracks and Busses From a Group
Clicking the g button displays a menu with a list of the available groups. Selecting one of these groups adds the track or bus to that group. Selecting No Group removes it.
Alternatively, a group tab can be dragged to add or remove tracks from the group.
Activate/Deactivate Groups via the Group Tab
Clicking on a group tab toggles the group between being active and inactive. An inactive group has no effect when editing its members. An active group will share its configured properties across its members. Tabs for disabled groups are coloured grey.
Modify Group Properties
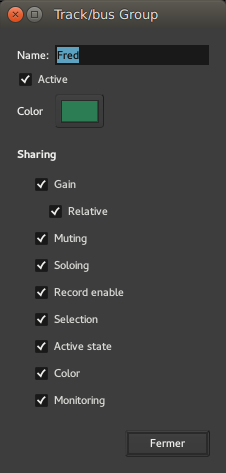
The Track/bus Group dialog
Edit the properties of a group is done by right-clicking on its tab and choosing Edit Group…. This opens the track/bus group dialog, which is also used when creating new groups.
Group Color
Clicking on the color selector button changes a group’s color. This affects the color of the group’s tab in the editor and mixer windows. The color does not affect the color of the group members unless the shared Color property is enabled.
Gain means that the track faders will be synced to always have the same value; Relative means that the gain changes are applied relative to each member’s current value. If, for example, there are two tracks in a group with relative gain sharing, and their faders are set to −3 dB and −1 dB, a change of the first track to a gain of −6 dB will result in the second track having a gain of −4 dB (the difference of the gains remains the same).
Muting, Soloing, record enable, active state, color and monitoring are all straightforward. They simply mean that all member tracks or busses will share the same settings in these respects.
Selection means that if a region is selected or deselected on one member track, corresponding regions on other member tracks will be similarly selected. Since region editing operations are applied to all currently selected regions, this is the way to make edits apply across all tracks in the group.
Context-clicking on the group tab offers a further menu of group-related actions.
| Create a New Group | create a new group |
| Create New Group from… | create a new group and automatically add … |
| Selected | all currently selected tracks and busses |
| Rec-enabled | all currently record-enabled tracks |
| Soloed | all currently soloed tracks and busses |
| Collect Group | moves all the member tracks so that they are together in the editor window |
| Remove Group | removes the group (and only the group, not its members). |
| Add New Subgroup Bus | creates a bus (giving it the name of the group) and connects the output of each member to the new bus. |
| Add New Aux Bus | adds a bus and gives each member a send to that bus. There are two options for this, specifying whether the sends should be placed pre- or post-fader. |
| Fit to Window | will zoom the member tracks so that they fill the editor window. |
| Enable All Groups | makes all group active, including any hidden groups. |
| Disable All Groups | makes all groups inactive, including any hidden groups. |
30 - Monitor Section
The Monitoring strip
The Monitor section is an optional feature that provides Control Room/Monitor Speaker outputs. It can be activated for the current session in the Session > Properties window by enabling the Use monitor section in this session option in the Monitoring tab. By default the Monitor Section is fed with audio from the Master Bus, but depending on solo mode and other functions such as Auditioning, other audio sources may be temporarily heard instead.
The Monitor section appears on the right hand side of the Mixer, and comprises:
- Detach/attach control. This separates the Monitor section into its own floating window
- Status indicators for important functions
- Solo behaviour selection
- Show, hide and status of the Monitor Sections inline processors
- Level controls for solo functionality
- Level control for Monitor Dim
- Individual monitor path controls
- Mute, Dim and Mono functions for the monitor outputs
- Monitor level control
- Monitor output routing
Status Indicators
The Status indicators, two of which also appear in the Transport tool bar, flash to indicate when that function is in operation:
- Soloing: This indicates when one or more tracks or busses are currently being soloed. See Muting and Soloing. Clicking on this indicator cancels all currently soloed channels or busses
- Auditioning: This indicates when an audio file is being listened to directly, e.g. when using the import dialogue, or using the Audition context menu in the Regions List. Clicking this indicator cancels the current audition
- Isolated: This indicates when one or more tracks or busses are solo isolated. See Muting and Soloing. Clicking on this indicator cancels any current isolation.
Solo behaviour selection
The SiP, PFL and AFL controls inter-cancel with each other and select the desired Solo mode. Excl. Solo and Solo Mute then modify the modes behaviour. See Muting and Soloing. The current mode is indicated by the illuminated ‘LED’ on the button.
| SiP | This selects Solo In Place as the current solo mode and cancels the previous mode. |
| PFL | This selects Pre Fade Listen as the current solo mode and cancels the previous mode. |
| AFL | This selects After Fade Listen as the current solo mode and cancels the previous mode. |
| Excl. Solo | This enables or disables the Exclusive Solo option. |
| Solo » Mute | This enables or disables the Solo Mute option. |
Changing the solo mode (SiP, PFL or AFL) will update the labels on the mixer strips’ solo controls accordingly.
The Processors button
Clicking the Processors button show or hides the Monitor Sections processor box. This is used in the same way as processor boxes present in tracks and busses. It can be used to insert plugins, e.g. a room correction EQ or a specific metering type.
As this processing is local to the Monitor Section it is only applied to audio that is ultimately available at the monitor outputs.
Solo level controls
These controls set the level of the audio when a channel or bus solo is engaged.
| Solo Boost | This is the level that will be added to the current main monitor level when a track or bus is soloed, providing a convenient boost in level for the isolated signal. The rotary control has a range of 0dB to +10dB and can be set at any point between these two values. A drop down menu with pre-defined values is also provided for convenience. |
| SiP Cut | Only relevant to Solo in Place mode. This sets the level that all muted tracks or busses will be muted by. By default it is -&infinity; i.e. the non soloed tracks are totally inaudible. The level can be raised to make the other tracks audible, though dimmed. This is also sometimes referred to Solo in Front. The rotary control has a range of -inf to +0dB and can be set at any point between these two values. A drop down menu with pre-defined values is also provided for convenience. |
Dim level control
The Dim level control sets the amount by which the monitoring will be reduced when a Dim button is engaged. The rotary control has a range of -20dB to 0dB and can be set at any point between these two values. A drop down menu with pre-defined values is also provided for convenience.
Monitor path controls
Each of the individual paths through the Monitor Section, (e.g. L and R for stereo), can be controlled individually. Four functions are available:
| Mute | Mutes the selected path(s) |
| Dim | Reduces the selected path(s) level by the amount set with the Dim level control |
| Solo | Solos the selected channel(s) |
| Inv | Inverts the selected channel(s) polarity |
Global Monitor controls
Those buttons directly affect the output of the monitoring section:
- Mono: sums all of the paths to a single mono signal and applies it to all Monitor Section outputs.
- Dim: Reduces overall monitor level by the amount set with the Dim level control.
- Mute: Mutes all monitoring.
Global Monitor level
This control sets the level for Monitor Section output. The rotary control has a range of -inf to +6dB and can be set at any point between these two values. A drop down menu with pre-defined values is also provided for convenience.
Monitoring Output routing
Clicking on this button shows a menu that allows quick and convenient routing of the Monitor Section’s outputs to audio hardware outputs, e.g. to feed control room monitors. It also has an option to open Ardour’s routing matrix, where more detailed connectivity is available if routing to something other than hardware is required.
Part IV - Sessions & Tracks
31 - Sessions
31.1 - What’s in a Session?
The Session is the fundamental document type that is created and modified by the Ardour workstation. A Session is a folder on a computer filesystem that contains all the items that pertain to a particular project or “recording/editing/mixing session”.
The Session folder includes these files and folders:
session_name.ardourthe main session snapshot*.ardour, any additional snapshotssession_name.ardour.bak, the auto-backup snapshotsession_name.history, the undo history for the sessioninstant.xml, which records the last-used zoom scale and other metadatainterchange/, a folder which holds the raw audio and MIDI files (whether imported or recorded)export/, a folder which contains any files created by the Session > Export functionpeaks/, a folder which contains waveform renderings of all audio files in the sessionanalysis/, a folder which contains transient and pitch information of each audio file that has been analyseddead sounds/, a folder which contains sound files which Ardour has detected are no longer used in the session (during a Session > Clean-up > Clean-up Unused Sources operation, will be purged by Flush Waste Basket, see Cleaning Up Sessions)
A session combines some setup information (such as audio and MIDI routing, musical tempo & meter, timecode synchronization, etc.) with one or more Tracks and Buses, and all the Regions and Plug-Ins they contain.
31.2 - Where Are Sessions Stored?
Sessions are stored in a single folder on the computer’s filesystem. The first time Ardour is run, it will ask for the default location for this folder, with the initial choice being the current user’s home folder.
After the first-run dialog, the default location can still be changed at any time via Edit > Preferences > Misc > Session Management. A particular (different) location for a session can also be specified when creating it, in the New Session dialog.
31.3 - New/Open Session Dialog
The initial Session dialog, displayed at each start of Ardour, consists of several consecutive pages:
Open Session Page
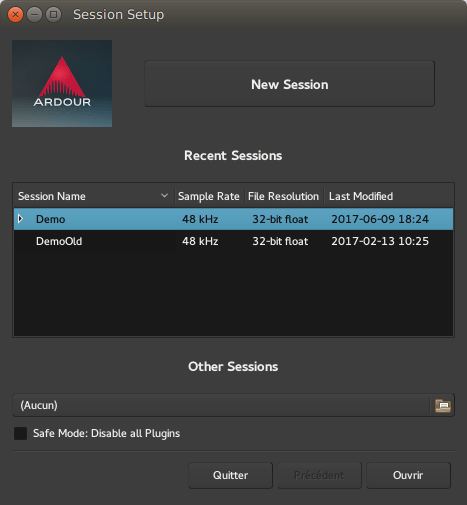
The Session Setup Dialog
On this page, an existing session can be opened. Any snapshot of a particular session can also be accessed by clicking on the arrow next to the session name to display all snapshots, and then selecting one.
If the session is not displayed in the Recent Sessions list, the Other Sessions button will bring up a file selection dialog to navigate the file system.
Alternatively, a New Session can be created.
New Session page
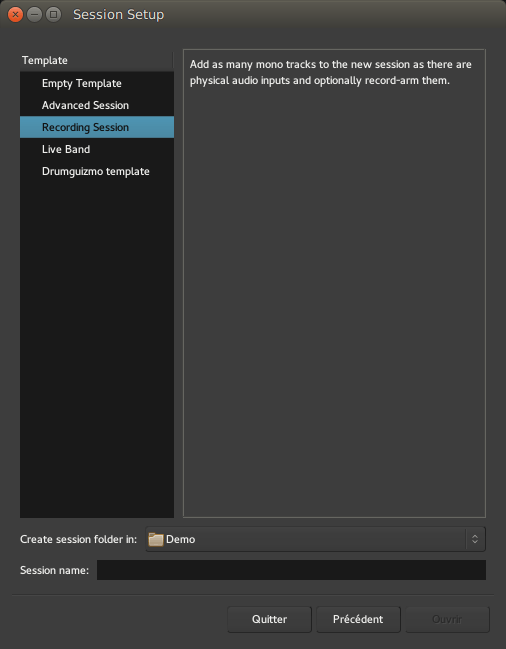
The New Session Dialog
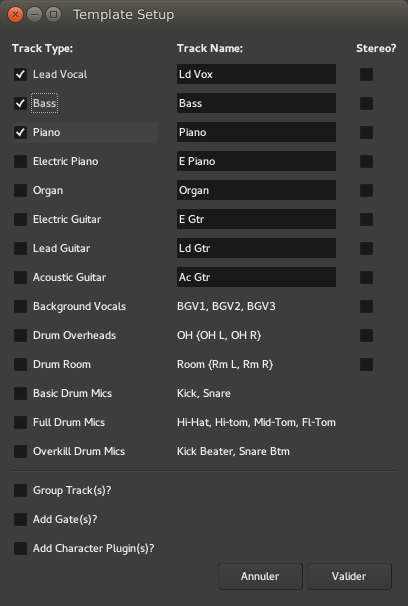
One of the Template Setup Dialogs
This page allows to type in the name of a session, select a folder to save it in, and optionally use an existing template.
The different templates, both the “factory” ones and the ones created by the user, are easily available on the left-side panel. Depending on the chosen template, a specific Template Settings window may be shown, allowing the user to fine-tune the details of the template and/or choose between the different options of the template.
Templates can be huge time savers when working on similar projects, or on usual projects, as they allow to preset and tweak a lot of the session properties, (like the availability of a monitoring section, connection to a Master Bus, etc.), and handle the creation of tracks of any kind.
The Empty Template preset allows to create a session “from scratch”. Everything a session template does can be done manually —albeit more tediously— and the resulting sessions will not differ whatsoever.
As of Ardour 5.12, which introduced the new template dialog, the factory templates are:
| Empty Template | Creates an empty session with no tracks and no monitoring. A stereo Master Bus is created, and any track created defaults to output on this bus. |
| Advanced Session | Like the Empty Template, but adds the ability to easily manage the Master bus (channels, hardware connection, and track autoconnection), and the creation of a monitoring section. |
| Recording Session | Like the Empty Template, but allows the fast creation of a number of tracks, optionally ready to record. |
| Live Band | Fast tracks the creation of usual tracks for a band setup (vocals, guitars, piano, …), and optionally adds usual effects on these tracks. |
Selecting a template will display its description in the right-side panel, while hovering over a template name will show a tooltip indicating if it is a factory template, or, if it is a user-created one, which version of Ardour was used to create it.
Whether or not a template is used, and before the “Template Setup” dialog, the Audio/MIDI Setup will be shown.
Audio/MIDI Setup
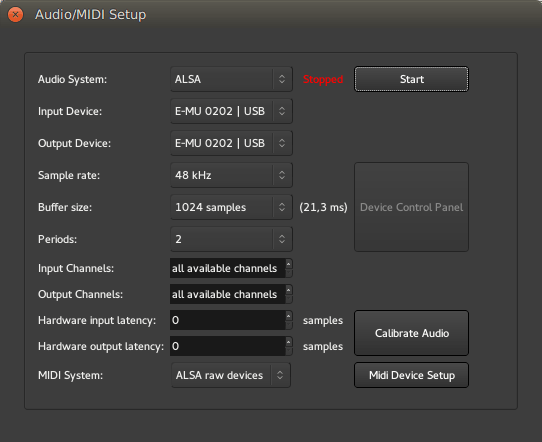
The Audio/MIDI Setup Dialog
This window exposes the different audio options to be used by Ardour for the current work session, for hardware and software and is made of:
| Audio System | Depending on the operating system, Ardour can possibly use different audio systems, e.g. on Linux, both ALSA and JACK are available. |
| Driver | On Mac OS X this will typically be CoreAudio. On Linux usually this will be either FFADO or ALSA, depending on whether or not a firewire device is used. Advanced users on all platforms may also use NetJack which provides network audio I/O. |
| Device | The selector should show all available interfaces provided by the driver above and which are capable of duplex operation. When using an Intel Mac running OS X and the builtin audio interface, its separate input and output devices must be merged first into a single “aggregate device” before Ardour will be able to use it. |
| Sample Rate | The selector will allow to select from any sample rate supported by the device selected above it. |
| Buffer Size | The size of the buffer used by the audio interface can be adjusted to allow for either lower latency, or lower CPU usage and higher latency. |
| Input/Output Channels | Specifies the number of hardware channels to use. The default is all available channels. |
| Hardware Input/Output Latency | Specify the hardware delay in samples for precise latency compensation. |
| Calibrate | This button runs a semi-automated guided process to obtain precise hardware latency measurements for the above option. |
| MIDI System | Selects the MIDI driver to use. On Mac OS X, this will be CoreMIDI. On Linux, it can be changed between two legacy ALSA drivers or the (preferred) new JACK+ALSA implementation. |
31.4 - Renaming a Session
Using the Session > Rename menu allows to give the session a new name. A dialog will appear asking for the new one.
This operation does not make a new session folder—the existing session folder and relevant contents are renamed. If the session was not saved before a rename operation, it will be saved automatically and then renaming will continue.
Ardour’s Session > Save As operation will not make a new copy of the session folder and its contents. All it does is create a new session file.
31.5 - Session Metadata
Session Metadata
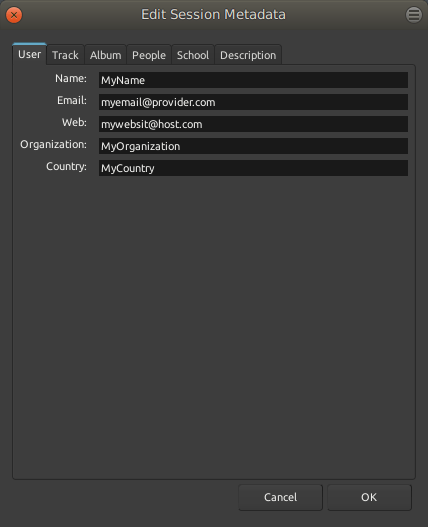
The session metadata editor
Sessions can have various items of metadata attached to them, and saved in the session file. These metadata are filled by the user via Session > Metadata > Edit Metadata….
These metadata will be exported as tags in the audio and video files that support it, as long as the right option is chosen at the export stage. All the video format can retain a subset of the metadata if the Include Session Metadata is checked in the export video window, while only the Ogg-Vorbis (tagged) and FLAC (tagged) audio format will be exported with the metadata (as Vorbis comment).
Ardour can also reuse the metadata from another session file in the current session, with Session > Metadata > Import Metadata…. This menu brings up a file selector, asking for the source ardour session file to extract the data from. This can be handy when reusing a lot of information (Author, Artist Name, etc…) or working on multiple tracks of the same media.
31.6 - Backup and Sharing of Sessions
An Ardour session is stored in a single folder on the computer’s filesystem. This makes backup very easy: any tool capable of backing up a folder can be used to backup a session. The location of a session is picked when it is created —by default it will be in the default session location, which can be altered via Edit > Preferences > General > Session.
The single folder approach also makes sharing a project easy. Simply copy the session folder (onto a storage device, or across a network) and another Ardour user (on any platform) will be able to use it.
There is one complication in both cases: a session may reference media files that are stored outside of the session folder, if the user has opted not to select Session > Import > Copy to Session during import. Backing up a session with embedded files will not create a copy of the session containing those files. To bring those external files to the session folder, the Session > Clean-up > Bring all media into session folder menu can be used.
Using the dedicated Zip/Archive Current Session tool
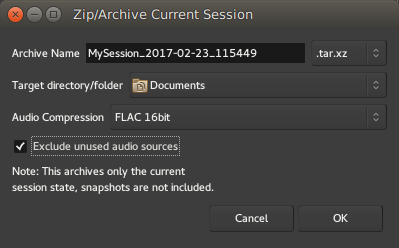
The Zip/Archive Current Session window
The Zip/Archive Current Session tool is located in the File > Archive… menu.
It allows to create a single file containing everything useful in the session, to share it or back it up, conveniently compressed to a session-archive which is a zip-file (tar.xz to be specific) containing all the audio, MIDI, plugin-settings,… and the currently active session. Ardour can also extract those bundles (Session > Open…).
As opposed to zipping the entire session-folder manually,
- the session-archive only contains the current session-snapshot and only files which are used
- externally referenced files are included in the archive.
The window shows the following options:
| Archive Name | The name of the archive file, defaulting to the name of the session followed by the date and time |
| a dropdown extension selector | allowing to choose between different kind or compressed archive file types |
| Target directory/folder | defining where in the filesystem the archive file will be generated |
| Audio Compression | a dropdown menu allowing to compress the audio files themselves by using an audio-tailored compression format, more on that below |
| Exclude unused audio sources | a checkbox to drop every audio that is in the session, but not actually used in the editor |
The Audio Compression selection accepts any of:
- None
- FLAC 16bit
- FLAC 24bit
Encoding the audio sources to FLAC allows for a good size reduction of the session. It should be noted though that FLAC is a fixed-point format, meaning that if the audio in the session is in a floating-point format, this conversion will lose some information on the samples values that are rounded, though usually, this lost information cannot be perceived. Choosing “None” for Audio Compression does not compress the audio to FLAC, hence preserving the floating-point data at the cost of a bigger file size. Notice also that converting to FLAC automatically normalizes the audio.
Using the Exclude unused audio sources option allows to only keep the files actually used in the session, which can be useful to leave any unused take or reference material out of the backup, reducing the archive’s global file size.
32 - Tracks
32.1 - Track Types
Ardour offers three track types depending on the type of data they contain, and differentiates between three track modes, depending on their recording behaviour.
Track types
An Ardour track can be of type audio or MIDI, depending on the data that the track will primarily record and play back. However, either type of track can pass either type of data. Hence, for example, one might have a MIDI track that contains an instrument plugin; such a track would record and play back MIDI data from disk but would produce audio, since the instrument plugin would turn MIDI data into audio data.
Nevertheless, when adding tracks to a session, its content is typically known, and Ardour offers three choices:
| Audio | An Audio Track is created with a user-specified number of inputs. The number of outputs is defined by the master bus channel count (for details see Channel Configuration below). This is the type of track to use when planning to work with existing or newly recorded audio. |
| MIDI | A MIDI track is created with a single MIDI input, and a single MIDI output. This is the type of track to use when planning to record and play back MIDI. There are several methods to enable playback of a MIDI track: add an instrument plugin to the track, connect the track to a software synthesizer, or connect it to external MIDI hardware. If an instrument plugin is added, the MIDI track outputs audio alongside MIDI data. |
| Audio/MIDI | There are a few notable plugins that can usefully accept both Audio and MIDI data (Reaktor is one, and various “auto-tune” like plugins are another). It can be tricky to configure this type of track manually, so Ardour allows to select this type specifically for use with such plugins. It is not generally the right choice when working normal MIDI tracks, and a dialog will warn of this. |
Track Modes
Audio tracks in Ardour have a mode which affects how they behave when recording:
| Normal | Tracks in normal mode will record non-destructively—new data is written to new files, and when overdubbing, new regions will be layered on top of existing ones. This is the recommended mode for most workflows. |
| Non-Layered | Tracks using non-layered mode will record non-destructively—new data is written to new files, but when overdubbing, the existing regions are trimmed so that there are no overlaps. This does not affect the previously recorded audio data, and trimmed regions can be expanded again at will. Non-layered mode can be very useful for spoken word material, especially in combination with push/pull trimming. |
| Tape | Tape-mode tracks do destructive recording: all data is recorded to a single file and if a section of existing data is overdub, the existing data is destroyed irrevocably—there is no undo. Fixed crossfades are added at every punch in and out point. This mode can be useful for certain kinds of re-recording workflows, but is not suggested for normal use. |
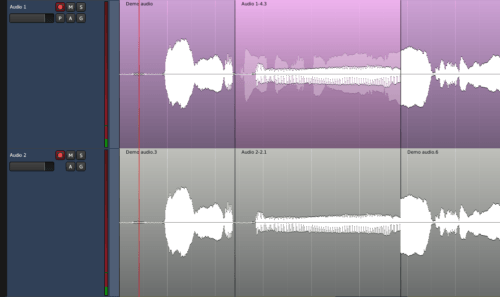
Normal and non-layered overdubbing comparision
The screenshot on the right shows the subtle difference between an overdub in normal mode (upper track) and one in non-layered mode (lower track). Both tracks were created using identical audio data.
The upper track shows a new region which has been layered on top of the the existing (longer) region. It can be seen by the region name strips.
The lower track has split the existing region in two, trimmed each new region to create space for the new overdub, and inserted the overdub region in between.
Channel Configuration
Ardour tracks can have any number of inputs and any number of outputs, and the number of either can be changed at any time (subject to restrictions caused by any plugins in a track). However it is useful to not have to configure this sort of thing for the most common cases, and so the Add Tracks dialog allows to select “Mono”, “Stereo” and few other typical multichannel presets
The name of the preset describes the number of input channels of the track or bus.
If Ardour is configured to automatically connect new tracks and busses, the number of outputs will be determined by the number of inputs of the master bus, to which the track outputs will be connected.
For example, with a two-channel master bus, a Mono track has one input and two outputs; a Stereo track has two inputs and two outputs.
If Edit > Preferences > Signal Flow > Track and Bus Connections is set to manual, then tracks will be left disconnected by default and there will be as many outputs as there are inputs. It is up to the user to connect them as desired. This is not a particularly useful way to work unless something fairly unusual is done with signal routing and processing. It is almost always preferable to leave Ardour make connections automatically, even if some changes are manually done later.
32.2 - Adding Tracks, Busses and VCAs
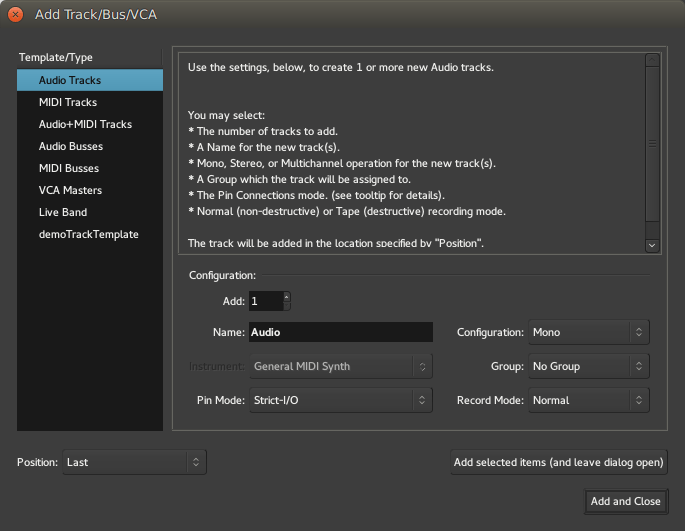
The Add Track/Bus/VCA dialog.
A track, bus or VCA can be added to a session by either:
- Choosing Track > Add Track, Bus or VCA….
- Right-clicking in an empty part of the track controls area.
- Clicking the Plus (+) button underneath the list of tracks in the mixer.
Any of these actions will open the Add Track/Bus/VCA dialog.
The list of available track templates (both factory and user-created ones) in the left panel allows to choose the track(s) type (e.g. Audio, MIDI, bus, VCA etc.). Some templates can do even more, like the factory-provided Live Band that automatically creates a number of usual tracks for a common band setup. See New Session for more information about templates.
The common templates have parameters to tweak:
| Add | Selects the number of tracks, busses or VCAs to create. |
| Name | Defines the name of the new track(s). If multiple tracks are created, or if a track with the same name already exists, a space and number will be happened at the end (e.g.: Audio 1, Audio 2…). |
| Configuration | This menu allows to choose from a number of route templates, which determine the number of input ports and optionally contain plugins and other mixer strip configuration. The most common choices here are mono and stereo. |
| Instrument | This option is only available for MIDI tracks and busses and allows the selection of a default instrument from the list of available plugins. |
| Group | Tracks and busses can be assigned groups so that a selected range of operations are applied to all members of a group at the same time (selecting record enable, or editing, for example). This option assigns the new track/bus to an existing group, or create a new group. |
| Pin Mode | Defines how the number of output responds to adding a plugin with a different number of outputs than the track itself. In Strict I/O mode, plugins cannot alter the track’s channel count, while in Flexible I/O mode, it will automatically adapt to the I/O of its plugins. See Signal flow to learn more about those options. |
| Record mode | This option is only available for audio tracks and affects how it behaves when recording. See Track Modes for details. |
| Position | Defines where in the track list is the track created. The default is Last, i.e. after all the tracks and busses, and can also be First, Before Selection (to place it just above the selected track) or After selection. |
Multiple tracks of different types can be created by using the Add selected items (and leave dialog open) button, which, used in conjunction with the Add field, allows for a very efficient and fast way to create a base track setup.
New tracks appear in both the editor and mixer windows. The editor window shows the timeline, with any recorded data, and the mixer shows just the processing elements of the track (its plugins, fader and so on).
Removing Tracks and Busses
Removing tracks and busses, is done by selecting them, right-clicking and choosing Remove from the menu. A warning dialog will pop up, as track removal cannot be undone; this option should be used with care!
32.3 - Controlling Track Ordering
Ardour does not impose any particular ordering of tracks and busses in either the editor or mixer windows. The default arrangements are as follows:
- In the Editor window, the Master bus will always be on top unless hidden. Tracks and busses will appear in their initial order, from top to bottom. The monitor section (if used) is never visible in the editor window.
- In the Mixer window, the tracks and busses will be displayed in their initial order, from left to right. The Master bus is always on the far right and occupies its own pane, so that it is always visible no matter how many other mixer strips are present. If a Monitor section is used, it shows up at the right edge of the mixer window; it can also be torn off into a separate window.
Reordering Tracks
The track ordering of the Editor and Mixer is synchronized: if a track is reordered in one window, the ordering in the other window will follow.
Reordering in the Editor Window
Reordering is done by selecting the tracks to be moved, then using Track > Move Selected Tracks Up (shortcut: ↑) or Track > Move Selected Tracks Down (shortcut: ↓).
Alternatively, the Tracks & Busses panel of the Editor Lists can be used, if visible. Here, tracks and busses can be freely dragged-and-dropped into any desired order.
Reordering in the Mixer Window
Within the Strips List pane at the top left of the Mixer window, tracks and busses can be freely dragged-and-dropped into any desired order.
“Collecting” Group Members
Tracks and Busses that are members of a group can be reordered so that they display contiguously within the Editor and Mixer windows, by Right-clicking on the group tab and choosing Collect.
Ordering of New Tracks
When adding new tracks, the Insert: field allows to determine their placement. New tracks will be placed Last by default, so after the rightmost (in the mixer) or bottom-most (in the editor) selected track. If no tracks are selected, new tracks will be added at the end, regardless of the choice.
Because new tracks are automatically selected, they can be quickly reordered in the editor window via the keyboard shortcuts after adding them.
Track Ordering and Remote Control IDs
Every track and bus in Ardour is assigned a remote control ID. When a control surface or any other remote control is used to control Ardour, these IDs are used to identify which track(s) or buss(es) are the intended target of incoming commands.
Remote IDs are assigned to tracks and busses in the order that they appear in the mixer window from left to right, starting from #1; manual assignment of remote IDs is not possible. The master bus and monitor section can be accessed by name.
Within the editor window, context-clicking (right click) on either a region or empty space within a track displays the track context menu. The context menu provides easy access to many track-level operations.
If a region is clicked, the first item in the menu is the name of the region. If a layered region is clicked, the next item in the menu is Choose Top. If selected, a dialog appears that allows to change the vertical order of layers at that point. See Layering Display for more details.
The rest of the track context menu is structured as follows:
| Play | |
| Play from Edit Point | Plays from the location of the current Edit Point. |
| Play from Start | Plays from the start of the session |
| Play Region | Plays the duration of the session from the start of the earliest selected region to the end of the latest selected region |
| Select | |
| Select All in Track | Selects all the regions and automation points in the current track |
| Select All Objects | Selects all the regions and automation points in the session |
| Invert Selection in Track | Select the previously unselected regions, and deselect the previously selected ones only in the current track |
| Invert Selection | Select the previously unselected regions, and deselect the previously selected ones |
| Set Range to Loop Range | Creates a range selection on the selected tracks, based on the selected loop markers, and switches to Range Mode tool |
| Set Range to Punch Range | Same as above, based on the selected punch markers |
| Set Range to Selected Regions | Same as above, based on the selected regions (i.e. from the start of the earliest region to the end of the latest one) |
| Select All After Edit Point | Select all the regions and automation points that exist after the Edit Point, even if the region starts before it. If some tracks are selected, only selects on these tracks. |
| Select All Before Edit Point | Same as above, but before the Edit point (i.e. to the left of it) |
| Select All After Playhead | Same as above, but considering the Playhead, regardless of the Edit Point choice |
| Select All Before Playhead | Same as above, with the Playhead |
| Select All Between Playhead and Edit Point | Selects all the regions between the Playhead and the Edit Point |
| Select All Within Playhead and Edit Point | Same as above, but the regions must be totally included between the Playhead and Edit Point |
| Select Range Between Playhead and Edit Point | Creates a Range between the Playhead and the Edit Point |
| Edit | |
| Cut | Deletes the current selection, but puts it in memory ready to be pasted |
| Copy | Copies the current selection to memory |
| Paste | Pastes the memory at the Edit Point, after a Cut or Copy operation |
| Align | Aligns the sync point of all selected regions to the Edit Point |
| Align Relative | Same as above, but considers multiple regions as a block and aligns the whole block, not each regions |
| Insert Selected Region | If a region is selected in the Region List, inserts it in the track |
| Insert Existing Media | Inserts an external media file in the track, same as the Session > Insert Media menu |
| Nudge | |
| Nudge Entire Track Later | Moves all the region to the right by the amount shown in the nudge timer |
| Nudge Track After Edit Point Later | Same as above, but only for regions that begin after the Edit Point |
| Nudge Entire Track Earlier | Same as above, to the left |
| Nudge Track After Edit Point Earlier | Same as above, to the left |
| (un)Freeze | Consolidates all the regions in the track into one frozen region which can be handled as a normal, single region. This operation can be undone at any time with the same sub-menu. |
33 - Controlling Track Appearance
Ardour offers many options for controlling the appearance of tracks, including color, height, waveform style and more. These can all be found in the Edit > Preferences > Editor menu.
33.1 - Layering Display
The Track layering menu
Ardour allows arbitrary layering of regions—there can any number of regions at a given position. By default, the regions are overlaid in the editor window, to save vertical space.
However, this display mode can be confusing for tracks with many overdubs, because its not obvious in which order the overdubs are layered. Although there are other methods of moving particular regions to the top of an overlapping set, and although Ardour also has playlists to manage takes a bit more efficiently than just continually layering, there are times when being able to clearly see all regions in a track without any overlaps is reassuring and useful.
The example below shows a track with a rather drastic overdub situation, viewed in normal overlaid mode:

Overlapping regions in overlaid mode
This display can be changed by right clicking on the track header, showing the menu displayed above. There are two choices for layers, and overlaid is currently selected. Clicking on stacked, the track display changes to: .. figure:: /images/layers_stacked.png
alt: Overlapping regions in stacked mode Overlapping regions in stacked mode
Regions can still be moved around as usual, and can be dragged so that they overlay each other again, but when the mouse button is released, things will flip back to them all being stacked cleanly. The number of lanes for the track is determined by the maximum number of regions existing in any one spot throughout the track, so if a track has 10 overdubs stacked up in one spot, it will end up with 10 lanes. Obviously, using a large track height works much better for this than a small one.
33.2 - Track Color
New tracks in Ardour are assigned a random color from a pastel color palette, so they should never end up being particularly bright or particularly dark.
Changing the color of specific tracks
Changing the color of a track is done by selecting the track(s) and right clicking on the track header of one of them then from the context menu, selecting Color and picking a hue in the color dialog. Every selected track will be re-colored.
If only one track is changed, right clicking on that track’s header will be enough to select it, saving the extra mouse click.
Changing the color of all tracks in a group
Tracks that belong to a track/bus group can share a common color by enabling the Color option for the group. With this enabled, any color change will be propagated to all group members.
The group color can also be explicitly changed by context-clicking on the group tab in the Mixer, selecting Edit Group… and then clicking on the Color selector in the displayed dialog.
33.3 - Track Height
At some stage of the production, a quick overview over as many tracks as possible may be required, or a detailed view into just a few, or a combination of the two. To facilitate this, the height can be configured individually for each track in the editor window, or globally.
Resizing one or a few tracks
A right click on a track header will display the Height menu, and allow to choose from a list of standard sizes. All selected tracks will be redrawn using that height.
Alternatively, moving the pointer to the bottom edge of a track header will change the cursor to a two-way vertical arrow shape. Left-dragging dynamically resizes all selected tracks.
Resizing all the tracks
The three rightmost items of the Zoom Controls, in the toolbar, allow to quickly resize multiple tracks’ heights at once, or to display a selected number of tracks in the editor, or all the selected ones, etc.
Fitting to the Editor Window
Fitting one or many tracks to the Editor window can be done by selecting the tracks to display and choosing Track > Height > Fit Selection (Vertical) or using the keyboard shortcut, f. Ardour adjusts the track heights and view so that the selected tracks completely fill the vertical space available, unless the tracks cannot be fitted even at the smallest possible size.
The Visual Undo (default shortcut: Z) can be used to revert this operation.
33.4 - Waveform display
The display of waveforms (or, more correctly, peak envelopes, since the actual waveform is only visible at the highest zoom levels) is configurable via the Edit > Preferences > Appearance > Editor dialog, to support different use cases and user preferences. The following options are available:
Show waveforms in regions